
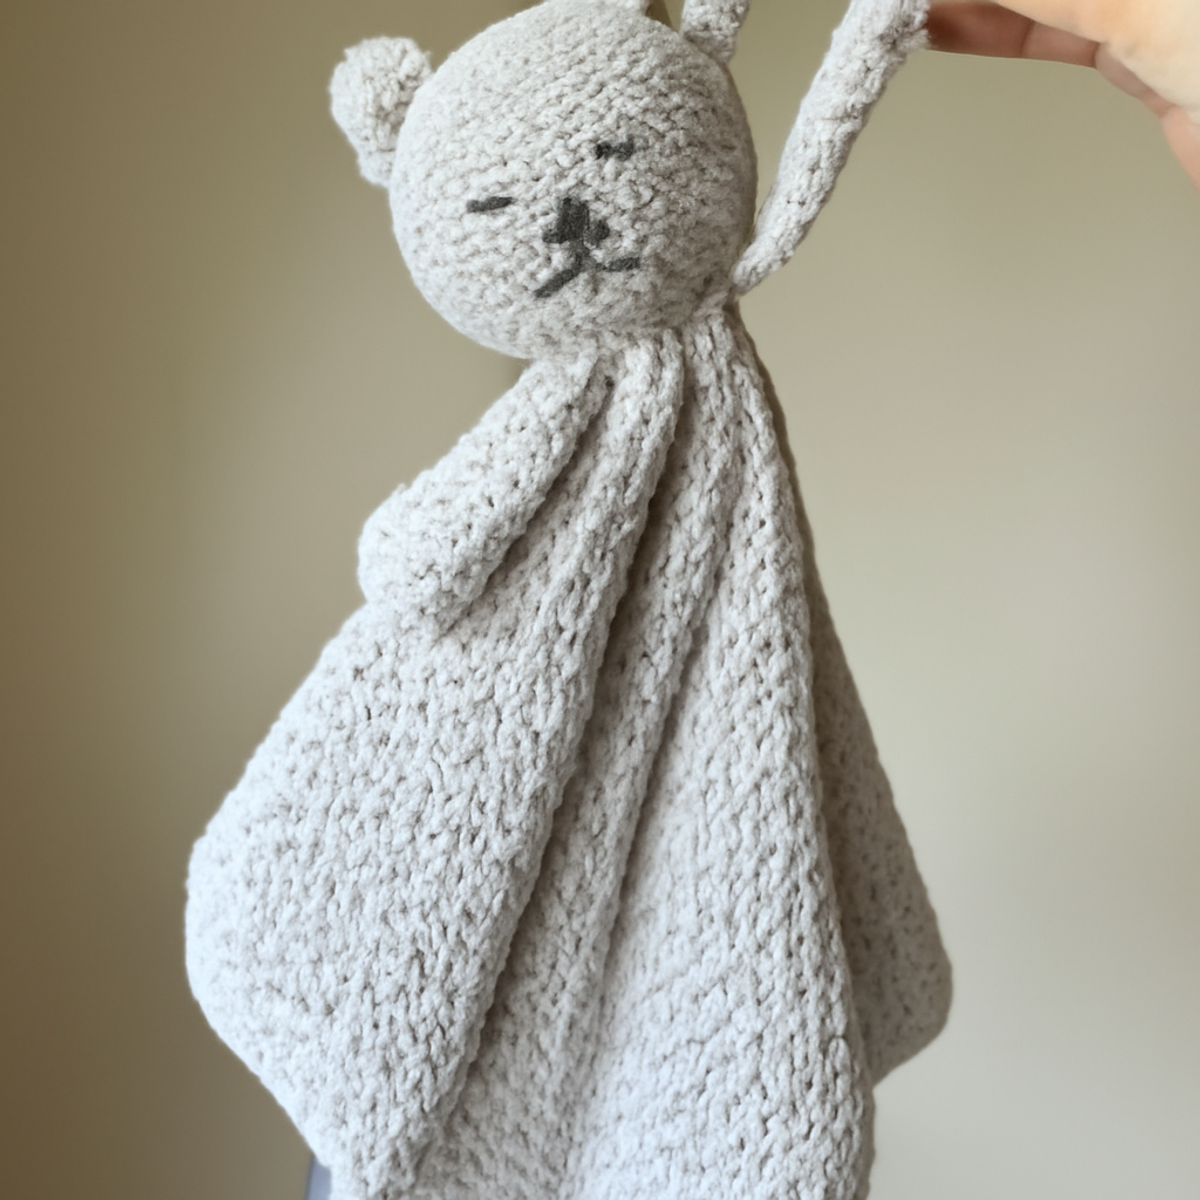
As I settled down with my favorite yarn, the gentle feel of the soft fibers reminded me of the joy that comes from creating handmade treasures. Today, I’m excited to share the Crochet Cat Baby Lovey pattern—a whimsical and cozy project that balances playfulness with practicality, making it a perfect gift for new parents or as a sweet baby shower surprise. This adorable lovey not only offers a comforting snuggle for little ones but also sparks creativity as you craft its charming cat features. It's an ideal project for intermediate crocheters, blending the skill of shaping a toy head with the soft drape of a loving blanket. With just a few supplies, you’ll find yourself creating a cherished companion that’s sure to become a child's favorite. Let’s dive into the delightful stitches that will bring this cuddly cat to life!
Cat Baby Lovey Materials & Tools
Note: Gather these supplies to create your adorable cat baby lovey!
Yarn
- Worsted Weight Yarn (Light Gray) – Approximately 200-300 yards will provide the softness needed for the lovey’s cozy texture.
Tools & Notions
- 4.0mm (G/6) Hook – A snug hook size helps achieve tight stitches, minimizing the risk of stuffing escaping.
- Yarn Needle – Essential for weaving in ends to give your lovey a polished finish.
- Safety Eyes (optional) – If you wish to make a child-safe cat face, choose securely attached safety eyes for extra cuteness.
- Stitch Marker – A helpful tool for tracking your rounds, especially when switching between different sections.
Why Crochet a Cat Baby Lovey?
Playful Design: The enchanting cat-themed motif is sure to capture the hearts of little ones and become a cherished companion.
Comforting Texture: Crafted with soft fibers, this lovey offers a wonderfully cozy drape, perfect for snuggling during naptime.
Creative Excitement: Combining features of a toy and blanket, this pattern encourages crafters to explore their creativity.
Versatile Customization: Easily personalize your lovey with color variations, yarn types, and even added embroidery for a unique touch.
Perfect Baby Gift: This delightful project makes an ideal gift for baby showers or new parents, blending functionality with playful aesthetics.
Gauge & Sizing Notes
Don't skip the gauge swatch! Checking your tension is crucial for the Crochet Cat Baby Lovey to ensure your cuddly creation comes out the right size for little hands. As a general guideline, you should aim for a crochet gauge of around 4×4 inches (10×10 cm) with approximately 15 single crochets by 18 rows. If you're looking to adjust the size of your lovey, remember that you can increase your starting chain in multiples of 4 to make it wider. If your tension swatch is smaller than expected, simply go up a hook size to achieve the cozy and snug feel this lovey deserves. Make sure to keep those measurements in mind as you crochet your charming cat baby lovey!
Step-by-Step Pattern for cat baby lovey
Round 1: Start the Cat Head
Begin by creating a magic ring and work 6 sc into the ring. Pull the ring tight to close, then join with a sl st to the first sc. This will form the base of the cat's head. Your work should resemble a small circle (6 sts).
Round 2: Increase for Shape
Ch 1, and in the same stitch, make 2 sc. Continue to inc in each stitch around (12 sts total). This round will create a more rounded shape for the cat's head, which should start to appear fuller.
Round 3: Continue Increasing
Ch 1, *sc in the next stitch, then inc in the following stitch; repeat from * around. Join with a sl st (18 sts). As you progress, the head should begin to take a more defined shape, becoming slightly larger.
Round 4: Shape the Head
Ch 1, *sc in the next 2 stitches, then inc in the next stitch; repeat from * around. Join (24 sts). Your cat head should now be nicely rounded and should feel soft to the touch, making it inviting for little ones.
Round 5: Form the Head’s Depth
Ch 1, sc in each stitch around (24 sts). This round establishes a solid head base. Your work should feel stable, with no indentations from previous rounds.
Round 6: Begin Decreasing
Ch 1, *sc in the next 2 stitches, then dec over the next 2 stitches; repeat from * around. Join (18 sts). You’ll notice the shape starting to close up, resembling the top of the cat’s head.
Round 7: Stuff and Shape
Ch 1, *sc in the next stitch, then dec over the next 2 stitches; repeat from * around. Join (12 sts). Before closing it completely, add safety eyes (if using), then lightly stuff the head for a cozy feel.
Round 8: Final Decrease
Ch 1, dec across each stitch around. Join and fasten off, leaving a long tail for sewing (6 sts). The cat head is now fully crafted, round, and soft, ready to be attached to the lovey.
Step 2: Creating the Lovey Blanket
With your worsted weight yarn, ch 45 to create the foundation for the lovey blanket. This chain will turn into a comforting base for the cat head. The blanket will measure approximately 15 inches wide.
Row 1: First Row of Blanket
In the second ch from the hook, make 1 sc, then sc in each stitch across the row. Turn your work at the end (44 sts). Your stitches should be evenly spaced, providing a cozy texture for snuggling.
Row 2: Textured Pattern Begins
Ch 1, *sc in the first stitch, then hdc in the next; repeat from * across. Turn (66 sts). You’ll start to see a texture forming, adding visual interest to the lovey with alternating stitches.
Repeat Rows for Blanket Texture
Continue alternating between rows of sc and hdc, always ending with a sc row for seven rows total. Your lovey blanket should feel plush, creating a delightful surface for little hands to touch.
Step 3: Attaching Cat Head to Blanket
Position the cat head at the center top of the lovey. Using the yarn tail, securely sew it to the blanket with a whip stitch, ensuring it's safely anchored. The head should sit snugly atop the blanket, ready for cuddles.
Step 4: Add Edging
To finish, ch 1 and work 1 sc in each stitch around the entire lovey, adding a decorative border. This gives your cat baby lovey a polished look while also ensuring durability (approximately 60 sts).
Final Steps: Weave in Ends
Using a yarn needle, weave in any loose ends. The cat baby lovey should now be complete, and you can admire the charming features and soft texture that make it a perfect treasure for little ones.
How to Wash and Care for Your Cat Baby Lovey
Machine Washing: Use a gentle cycle with cold water to prevent felting or shrinking your beloved cat baby lovey.
Hand Washing: For added care, hand wash in cold water with mild detergent to keep the texture soft and cuddly.
Drying/Blocking: Lay flat to dry in a shaded area, avoiding direct sunlight that can fade the colors and affect the yarn's softness.
Storage: Store in a cool, dry place away from direct light, ensuring your cat baby lovey stays fresh and ready for snuggles whenever needed.
Customizing Your Cat Baby Lovey
Step into the world of creativity as you explore delightful ways to personalize your crochet project.
-
Yarn Weight Swap: Try using a lighter yarn for an airy feel. This change can create a lovey that’s easy for tiny hands to handle.
-
Color Play: Experiment with bold colors or soft pastels for the cat and blanket. Ombre yarn adds a beautiful gradient, making it uniquely yours.
-
Fiber Alternatives: Explore cotton or bamboo blends for a breathable lovey option. These fibers are perfect for warm-weather snuggles!
-
Size Adjustments: Scale the lovey up or down to suit different age groups. A larger size becomes a comforting companion for toddlers.
-
Textured Embellishments: Add a pom-pom or playful fringe to the lovey's edges. These details can spark joy and interest in little ones.
-
Personalized Embroidery: Consider stitching on a name or a sweet message. Customized touches make each lovey a cherished keepsake.
-
Border Variations: Instead of a simple edge, incorporate a shell or scallop border for added flair. This simple change can elevate your finished piece.
-
Safety Switch: If crafting for a baby, skip the plastic eyes and embroider them instead. This keeps your project safe for even the tiniest hands.
What to Pair with Crochet Cat Baby Lovey
Embarking on this adorable journey opens the door to creating even more charming companions and cozy accessories!
- Matching Cat Blanket: Craft a larger cozy blanket using the same yarn, perfect for playtime or cuddling during naptime.
- Whimsical Cat Plushie: Design a huggable plush cat, echoing the features of your lovey, for extra snuggles and imaginative play.
- Sweet Cat Booties: Create cute baby booties that mirror your cat's color scheme, adding warmth and style to tiny feet during chilly days.
- Playful Cat Hat: Fashion a playful cat hat to keep little ones warm and stylish, featuring charming cat ears that compliment the lovey perfectly.
- Tiny Cat Toy: Whip up a small cat toy to attach to the lovey, providing even more fun and interactive knitting for baby’s delight.
Each of these projects enhances the joy of your cat baby lovey, transforming your crafting into a delightful story of warmth and connection!
Expert Tips for Cat Baby Lovey
-
Consistent Tension: Maintain even tension throughout to ensure uniform stitches; this will help attach the cat head seamlessly to the blanket.
-
Track Your Stitches: Use a stitch marker to note the beginning of each round, preventing errors while transitioning between sections.
-
Stuffing Securely: If using safety eyes, attach them firmly before adding stuffing to the cat's head for a sturdier finish that withstands playtime.
-
Avoid Gaps: When sewing the cat head onto the blanket, securely whip stitch all around, preventing any gaps where little fingers might reach.
-
Keep Track of Rows: As you alternate stitches in the blanket, jot down the number of rows completed to avoid confusion and ensure consistency in texture.
Crochet Cat Baby Lovey FAQs
Can I substitute the recommended yarn with another type?
Absolutely! While a worsted weight (category 4) yarn is recommended for a soft and snuggly texture, you can substitute it with a bamboo or cotton blend for breathability. Keep in mind, just make sure that your chosen yarn has a similar weight to maintain the lovey's dimensions.
What if I want to make the lovey larger or smaller?
Don’t panic! To adjust the size of your cat baby lovey, simply increase or decrease the starting chain length for the blanket. If you want a bigger lovey, add more chains and increase your rows accordingly. Conversely, for a smaller size, reduce the foundation chain and row count.
Why is my work curling at the edges?
Curling can occur if your tension is too tight or if you’re using a hook that’s too small. I recommend checking your gauge and possibly trying a slightly larger hook to achieve a looser stitch. Consistent tension throughout your work will help keep everything flat and tidy.
What hook size should I use for this project?
For this crochet cat baby lovey, I suggest using a 4.0mm (G/6) hook. This size helps ensure your stitches are tight enough to prevent stuffing and safety eyes from escaping while still achieving a cozy drape for the blanket.
How do I fix dropped stitches while crocheting?
It’s an easy fix! When you notice a dropped stitch, gently pull the yarn back to the point of the drop, then use your hook to pull the loose strand back into place, working it back into the existing stitches. Just remember to be gentle to avoid unraveling more stitches!
Can I add personalization to my lovey?
Certainly! Adding personalized embroidery or a name onto the lovey can make it extra special. Use a contrasting color for your embroidery thread to ensure it stands out against the yarn, and consider using a washable fabric marker for outlining before stitching to maintain neatness.
Leave a Reply