
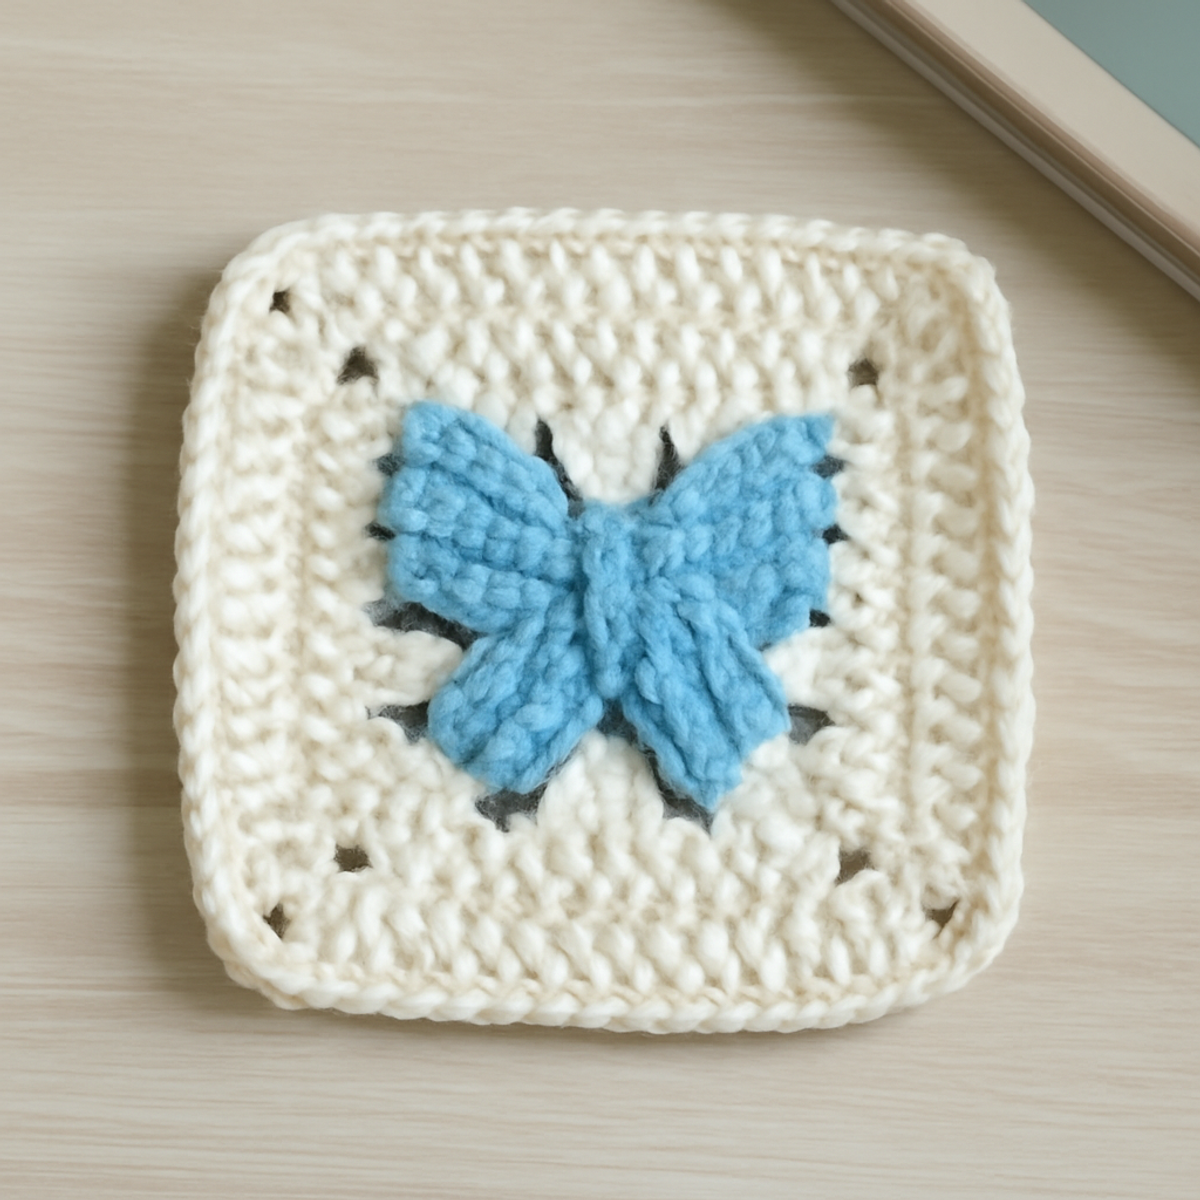
As I settled into my favorite armchair, yarn in hand, I couldn’t help but be enchanted by the playful beauty of a Butterfly Granny Square. This whimsical design effortlessly combines classic granny square charm with the imaginative flair of butterfly motifs, inviting us to explore a world of colors and creativity. Not only does this butterfly granny square serve as a stunning decorative piece, perfect for transforming blankets, pillows, or wall art, but it also allows us to express our unique style, making it an ideal gift or home accent. With its intermediate skill level, you’ll enjoy blending techniques while creating a tactile masterpiece that captivates the heart. So, are you ready to spread your wings and create something magical today?
Butterfly Granny Square Materials & Tools
- Worsted Weight Yarn – Choose a range of colors to beautifully represent the butterfly motifs, using about 50-75 yards per square.
- 5.0 mm (H-8) Hook – This size will give you the ideal stitch definition for the intricate design.
- Stitch Markers – A great tool for keeping track of your rows and ensuring consistent tension as you crochet.
- Yarn Needle – Essential for weaving in ends and finishing your butterfly granny square neatly.
Why You'll Adore This Butterfly Granny Square?
Vibrant Aesthetics: The enchanting butterfly motifs bring a lively and playful touch to your crochet projects, turning ordinary items into statement pieces.
Functional Versatility: Perfectly suited for a range of creations—from cozy blankets to striking wall art—this pattern adapts to fit your crafting needs.
Joyful Creativity: With the chance to mix colors and textures, each square becomes a unique expression of your artistic vision, making every piece truly one-of-a-kind.
Engaging Techniques: Designed for intermediate crocheters, this pattern offers a delightful blend of familiar stitches that keeps your skills sharp while maintaining ease.
Gift-Ready Design: The charm and beauty of the Butterfly Granny Square make it an ideal choice for heartfelt, handmade gifts that are sure to impress loved ones.
Delve into a world of color and creativity with every stitch, and transform your crafting experience today!
Gauge & Sizing Notes
Don't skip the gauge swatch! Ensuring you check your tension is crucial for achieving the perfect Butterfly Granny Square. A general rule of thumb for crochet gauge is to aim for a 4×4 inch (10×10 cm) square, which might translate into around 16 double crochets and 8 rows, but always refer back to your specific tension. If you'd like to make your squares larger, simply adjust your starting chain in multiples of 6 + 2 for wider squares, or reduce the starting chain for smaller ones. If your swatch comes out too small, don’t worry—just try going up a hook size to help your Butterfly Granny Square bloom with the right dimensions.
Step-by-Step Pattern for Colorful Butterfly Granny Square
Row 1: Start with the Base
Begin by making a magic ring and chaining 3 (counts as first dc). Work 2 dc (double crochet) into the ring, then ch 2 (this forms a corner). Repeat this process for a total of 4 clusters of 3 dc, separated by ch 2. Pull the magic ring tightly and join with a sl st to the top of the initial ch-3. You should have 4 corners created and your base should appear round (12 dc + 4 ch-2 spaces).
Round 2: Create the Butterfly Motif
Ch 3 (counts as first dc), then in the first ch-2 space, make 2 dc, ch 2, and 2 dc (this forms a corner). In each subsequent ch-2 space, work 2 dc, ch 2, and 2 dc until you reach the last ch-2 space. Join with a sl st to the top of the initial ch-3. Your work should have a lovely frill around it now, with 8 dc clusters and 4 corner spaces (24 dc + 4 ch-2 spaces).
Round 3: Adding Butterfly Wings
In the first corner, ch 5 (counts as dc) and make 2 dc in the same space, then ch 3, sl st to the same space to form a wing. Repeat this for each corner space. In the straight sides, make 2 dc in between the corners to keep your piece balanced. Join with a sl st to close the round. Your granny square should now take on a 3D look with lovely wings emerging (16 dc + 4 ch-3 spaces).
Row 4: Second Layer of Wings
For this round, continue working in the same manner. In each corner, create 3 dc, ch 5, 3 dc, ch 3, and sl st to finish the wings. In between corners, simply place 1 dc to bridge the spaces neatly. This adds dimension to your butterfly granny square, ensuring that the wings pop beautifully on the square (24 dc + 4 ch-5 spaces).
Step 5: Finalizing the Square
To finish the butterfly granny square, work one final round of sc (single crochet) around the entire square to create a neat edge. Put 3 sc in each corner, ensuring a smooth transition around. When you reach the starting point, join with a sl st to the first sc. Your square should now feel solid, with distinct edges and a charming detail to lift the butterflies (total of around 68 sc).
Butterfly Granny Square Variations
Ready to make your Butterfly Granny Squares even more delightful? Here are some fun ways to customize and add your personal touch to this enchanting pattern.
- Yarn Substitutions: Swap out the worsted weight yarn for lighter cotton yarn to create airy, summer-themed squares. The texture will brighten your projects!
- Color Palette Changes: Use a monochromatic palette for a more sophisticated look, allowing the butterfly details to stand out beautifully against the muted tones. Each square can become a piece of art!
- Size Modifications: By using a larger hook and more rounds, you can create oversized squares. Imagine cozy blankets that showcase your butterflies in larger-than-life splendor!
- Textured Borders: Add a fun border using front post double crochet stitches for depth. This will give your square a standout finish that frames the butterfly motif beautifully.
- Motif Swaps: Try introducing alternative motifs like whimsical birds or delicate flowers in place of butterflies. This can transform your squares into a truly personal representation of your crochet journey.
- Fringe Embellishments: Attach playful fringe to the edges of your square for a trendy, boho chic vibe! It’s a simple addition that makes a big difference.
- Mixed Yarn Effects: Combine different yarn fibers, such as cotton and wool, for unique textures. This variation will give your square a delightful tactile experience that complements its design.
- Color-Blocked Design: Experiment with color blocking by using multiple colors within a single square. You can create a stunning visual impact with each square being a masterpiece!
Embrace the potential of your Butterfly Granny Squares and let your imagination take flight!
What to Pair with Colorful Butterfly Granny Square
As you embark on your enchanting journey of creating Butterfly Granny Squares, why not continue the magic with complementary projects that sing in harmony?
-
Charming Throw Blanket: A cozy throw will tie your butterfly squares together, creating a vibrant focal point for any room. Imagine snuggling under it on a chilly evening, feeling the warmth of color wrap around you.
-
Delicate Pillow Cover: Add a matching cushion to your living space, providing plush comfort and enhancing the aesthetic of your butterfly granny square. Picture a soft, inviting place for guests to rest their heads while admiring your art.
-
Whimsical Wall Art: Frame your squares in embroidery hoops, creating a stunning art piece that showcases your butterfly motifs beautifully. Hang them in a sunny spot, where they can flutter in the breeze of admiration.
-
Elegant Coaster Set: Craft coasters using a smaller version of the granny square pattern as lovely gifts or delightful table accents. They’ll add a touch of your unique style to every sip shared with friends and loved ones.
-
Charming Tote Bag: Transform your butterfly granny squares into a stylish tote, perfect for carrying your latest yarn haul or everyday essentials. Each trip out will showcase your creativity, making errands a little more enjoyable!
How to Wash and Care for Your Butterfly Granny Square
Machine Washing: Wash your butterfly granny square in cold water on a gentle cycle to protect the delicate stitches and prevent any unwanted felting.
Hand Washing: For extra care, hand wash your piece in cold water with a mild detergent, gently pressing the water through without wringing, to maintain the integrity of the design.
Drying/Blocking: Lay your butterfly granny square flat to dry on a clean towel, reshaping it as needed. Blocking can help set the shape and enhance the butterfly motifs for a polished finish.
Storage: Store your finished crochet piece in a cool, dry place, away from direct sunlight, to prevent fading and damage while preserving its charm for years to come.
Expert Tips for Butterfly Granny Square
-
Consistent Tension: Keep your stitch tension uniform throughout the project to prevent uneven shapes. Too loose will lead to floppy squares, and too tight can hinder your work.
-
Accurate Counting: Check your stitch counts regularly, especially when forming the butterfly motif. Losing track can disrupt symmetry and ruin the lovely aesthetics of your butterfly granny square.
-
Blocking Technique: Use steam blocking after completing each square for a polished look. This will help maintain the shape and enhance the butterfly details, ensuring your final product shines.
-
Finishing Strands: Don’t forget to weave in all your loose ends! A yarn needle will help identity these pesky strands, giving your butterfly granny square a clean and professional finish.
-
Join-as-You-Go: When assembling multiple squares, use the join-as-you-go technique. This not only keeps your edges tidy but also secures your squares together seamlessly, adding to the overall beauty.
Colorful Butterfly Granny Square FAQs
Can I substitute yarn types for this butterfly granny square pattern?
Absolutely! While the pattern recommends worsted weight yarn, you can swap out the acrylic for cotton or bamboo for a different texture and drape. Just keep in mind that changing yarn types may affect the final size, so you might need to adjust your hook size accordingly.
How can I make my butterfly granny square larger or smaller?
If you want to adjust the size, you can easily do so by using a larger hook and heavier yarn for bigger squares. Conversely, for smaller squares, try a smaller hook and lighter yarn. Just remember to keep an eye on your tension to ensure the squares come out even!
Why is my butterfly granny square curling at the edges?
Don't panic! Curling often occurs due to tight tension. I recommend checking your gauge and adjusting your tension as you go. If needed, you can also try blocking your square after completing it to help flatten the edges.
How can I fix a dropped stitch in my butterfly granny square?
It's an easy fix! Simply use a crochet hook to pick up the dropped stitch and rework it into your row. If it's a tricky spot, don't hesitate to use a yarn needle to loop the stitch back into place. Just take your time, and your work will look as good as new!
What size hook should I use for this project?
The pattern suggests a 5.0 mm (H-8) hook, which is ideal for achieving the right stitch definition. However, if you find your stitches are too tight or too loose, feel free to experiment with a hook size one step up or down until you achieve the desired results.
Leave a Reply