
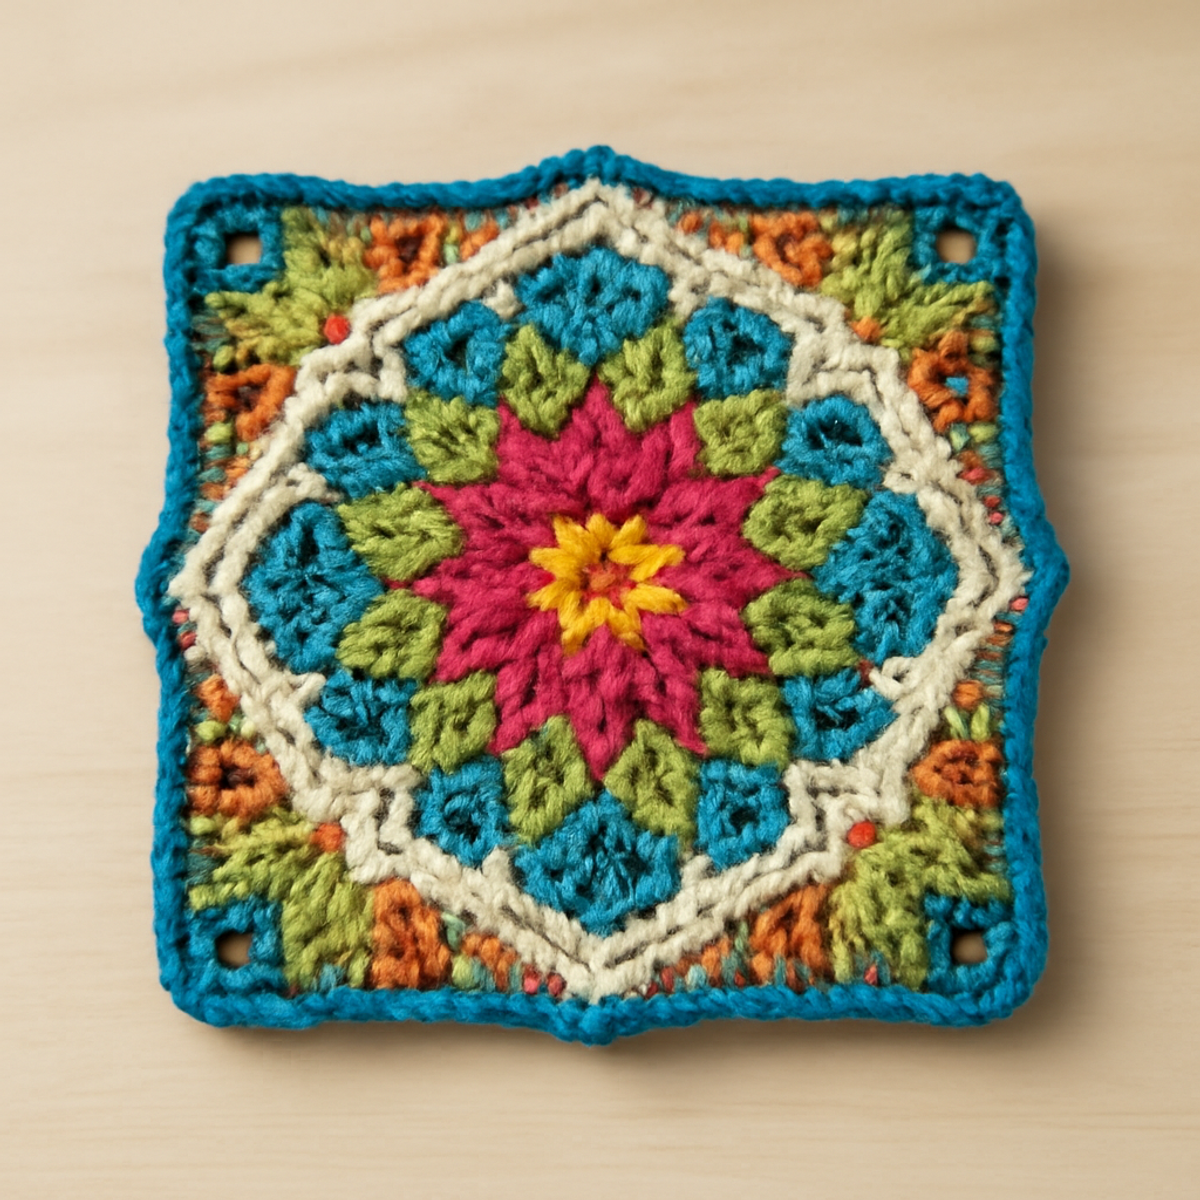
As I sat surrounded by a riot of colorful yarn, the thought of bringing vintage charm to life through my hook was simply irresistible. The Vintage Flower Crochet Motif Square captures the playful spirit of retro floral designs, making it the perfect project for those looking to sprinkle a little whimsy into their crochet repertoire. This pattern isn’t just a feast for the eyes; it’s also a wonderful chance to refine your stitch techniques while working with vibrant colors. With the added joy of creating beautiful decorative items, like blankets or wall hangings, you’ll find that each square showcases your unique flair and creativity. So, grab your favorite medium-weight yarn, and let’s get stitching—because a world of colorful motifs awaits you!
Vintage Flower Crochet Square Materials & Tools
Note: Gather these materials to bring your vibrant flower crochet square to life!
Yarn
- Medium Weight Yarn (Worsted Weight) – Opt for a blend of cotton or acrylic for durability and rich color; you’ll need approximately 50-70 yards per square.
Tools & Notions
- 4.0-5.0 mm (G/6 to H/8) Hook – This size helps you achieve a tidy fabric that showcases your intricate design.
- Stitch Markers – Use these handy tools for tracking color changes in your beautiful motifs.
- Yarn Needle – Essential for weaving in ends and finishing touches that make your flower crochet square stand out.
Why Choose This Flower Crochet Square?
Vintage Charm: Embrace the joy of crafting with this delightful floral motif, marrying retro designs with modern crochet techniques.
Colorful Creativity: The vibrant palette offers boundless opportunities for personal expression—each square becomes a canvas for showcasing your unique style.
Textural Richness: Enjoy constructing a piece with a lovely balance of slight density and softness, thanks to the variety of stitches used.
Skill Refinement: This pattern serves as an excellent way to hone your intermediate skills, from color changes to the intricacies of advanced stitch techniques.
Versatile Uses: Create stunning decorative items like blankets, coasters, or wall hangings—only your imagination limits the possibilities!
Satisfying Completion: Each finished square delivers a sense of accomplishment, making it an engaging project to share with friends or use in your home décor.
Gauge & Sizing Notes
Don't skip the gauge swatch! For the Vintage Flower Crochet Motif Square, checking your crochet gauge is essential to ensure your floral design comes out just right. Aim for a standard 4×4 inch (10×10 cm) square to help you verify your tension is consistent, as the pattern's intricacy relies on evenly sized stitches. If you find that your motif is too small, consider going up a hook size or adjusting your yarn tension to loosen up those stitches. To make your square larger, increase the initial magic ring and subsequent rounds by multiples of 6—this way, you're guaranteed to maintain the lovely floral shape while creating a larger piece. Happy crocheting!
Step-by-Step Pattern for Vintage Flower Crochet Motif Square
Row 1: Create the Flower Center
Start with a magic ring, then work 6 sc into the ring to form the flower center. Pull the ring tight, and your work should lie flat. This round sets the foundation for your flower crochet square and should have a total of 6 sts at the end of the round (6 sts).
Row 2: Petals Round
Ch 3 (counts as first dc), then work 2 dc into the same ring, ch 2, and sl st into the ring. Repeat this process 5 more times for a total of 6 petals around the center, chaining 2 between each petal. Your work should resemble a floral shape at this point (6 petals).
Row 3: Expand the Square
Join a contrasting color yarn in any ch-2 space. Ch 3, then work 2 dc into the same space, ch 2, and 3 dc into the same space (a cluster). In each subsequent ch-2 space, repeat this petal cluster sequence. You will have a total of 6 clusters around the square, creating a lovely floral design with rich texture (6 clusters).
Row 4: Form the Open Spaces
Change back to your original color, and in each of the next rounds, sl st into the top of each cluster. Ch 4 (counts as the first tr), then work 1 tr in the same sp. Skip 1 cluster and (1 dc, ch 2, 1 dc) in the next cluster. Continue this pattern, ensuring your stitch count remains even. The spaces should start to define the square shape (12 open spaces).
Row 5: Shape the Edging
To create the scalloped edges, work 1 sc into each of the open spaces you created in the previous round, and into each corner, work (3 dc, ch 2, 3 dc) for a nice turn. Your flower crochet square should now have a charming edging that frames the piece beautifully (16 sts along straight edges).
Row 6: Final Border
For the last round, you will use a single color for consistency. Sc in each st around, working 3 sc in each ch-2 corner space. This tidy border not only unifies the piece but also adds a lovely finish. At this point, your vintage flower crochet square should look polished and complete (approximately 56 sts).
Step 7: Weaving In Ends
Complete your motif by weaving in any loose ends with a yarn needle, securing all color changes neatly. Blocking the finished flower crochet square is recommended to enhance its crisp edges and maintain its shape, ensuring a professional-looking final product.
Helpful Tricks for Flower Crochet Square
-
Check Tension Often: Maintain consistent tension while changing colors to avoid puckering. This keeps your flower crochet square looking even and professional.
-
Count Stitches Regularly: Frequent counting—especially in intricate rounds—helps ensure you don't lose track of your stitches. It's a great way to prevent errors and maintain a smooth design.
-
Block Your Motif: Blocking is key for achieving crisp edges and defined open spaces. A well-blocked square ensures that your work lays flat and showcases its beautiful vintage charm.
-
Secure Color Changes: Use stitch markers to track color changes effectively. This prevents accidental errors and keeps your flower crochet square's pattern intact.
-
Finish Neatly: Weaving in ends carefully with a yarn needle helps tidy up your project. This step enhances the overall look and longevity of your lovely, colorful square!
What to Pair with Vintage Flower Crochet Motif Square
As you bask in the joy of your vibrant creation, consider crafting additional pieces that harmonize beautifully with your flower crochet square.
- Charming Coaster Set: Create colorful coasters using the same yarn blends to protect surfaces while showcasing your floral motifs.
- Decorative Pillow Cover: Transform your motifs into a stunning pillow cover that adds a cozy, vintage charm to your living space.
- Matching Blanket: Combine several squares into a blanket, offering warmth and a burst of color that celebrates your stitching journey.
- Floral Wall Hanging: Use your squares to craft a decorative wall hanging that turns your vintage designs into eye-catching art.
- Adorable Keychain: Make mini versions of your motifs to create sweet keychains, adding a touch of whimsy to your everyday life.
Each of these projects beautifully complements your flower crochet square, allowing your creativity to blossom in delightful ways!
Flower Crochet Square Variations
Unleash your creativity by exploring delightful twists to personalize your crochet project.
-
Color Combinations: Choose pastel or monochromatic shades for a modern take on vintage charm, making each square unique.
-
Yarn Switch: Opt for a lightweight, delicate yarn for airy squares perfect for summer garments that feel light and soft.
-
Oversized Motif: Use a larger hook and thicker yarn to create dramatic, oversized versions of your flower square for eye-catching decor.
-
Texture Additions: Enhance your design by adding embellishments like buttons or beads in the flower centers for extra flair and personal touch.
-
Sizing Adjustments: Adjust your hook size and yarn weight to create smaller squares for coasters or larger ones for blanket patches, expanding your project’s versatility.
-
Fringe Flair: Add fringe to the edges of your square for a playful and trendy twist that gives a free-spirited vibe to your projects.
-
Color-Blocking: Experiment with color-blocking techniques by changing yarns between rounds, introducing striking visual contrast in your motifs.
-
Edging Variations: Swap the final border with a scalloped or picot edge for a different texture that beautifully frames your flower crochet square.
Care Instructions for Vintage Flower Crochet Square
Washing: Use cold water and a gentle cycle to maintain the integrity of your flower crochet square. Avoid agitation to prevent any felting or pilling.
Drying/Blocking: Lay your finished square flat to dry, reshaping it to enhance those beautiful floral designs. Block your piece after washing for crisp edges and open spaces.
Storage: Keep your flower crochet square stored in a cool, dry place. Use a breathable bag to protect it from dust while maintaining its vibrant colors.
Avoid Moths: Consider using lavender sachets in your storage area to naturally repel moths and keep your crochet square safe and fresh!
Vintage Flower Crochet Motif Square FAQs
Can I substitute yarn for this pattern?
Absolutely! If you wish to swap acrylic for cotton, you can do so; just try to maintain a similar weight. Keep in mind that the texture and drape may vary slightly, but the vibrant colors can still shine through beautifully.
How can I adjust the size of my flower crochet square?
If you want to make your square larger or smaller, simply change your hook size or the thickness of your yarn. For a bigger square, using a larger hook or adding extra rounds is effective. Conversely, for a smaller motif, use a smaller hook and reduce the number of rounds.
Why is my flower crochet square curling?
Don't panic! Curling can often be attributed to inconsistent tension, especially during color changes. I recommend checking your tension and making sure your stitches are even. Additionally, blocking your finished square can help it lay flat and eliminate any curling.
What hook size should I use for this project?
For the Vintage Flower Crochet Motif Square, a 4.0-5.0 mm (G/6 to H/8) crochet hook is ideal. This size will allow you to create a tidy fabric that showcases the intricate details of the design while maintaining the right amount of drape.
How do I fix dropped stitches in this pattern?
It's an easy fix! To correct dropped stitches, simply pull the loop up to the correct height and work the stitch back into place. You may also want to reinforce the surrounding stitches to ensure they hold better moving forward.
Leave a Reply