
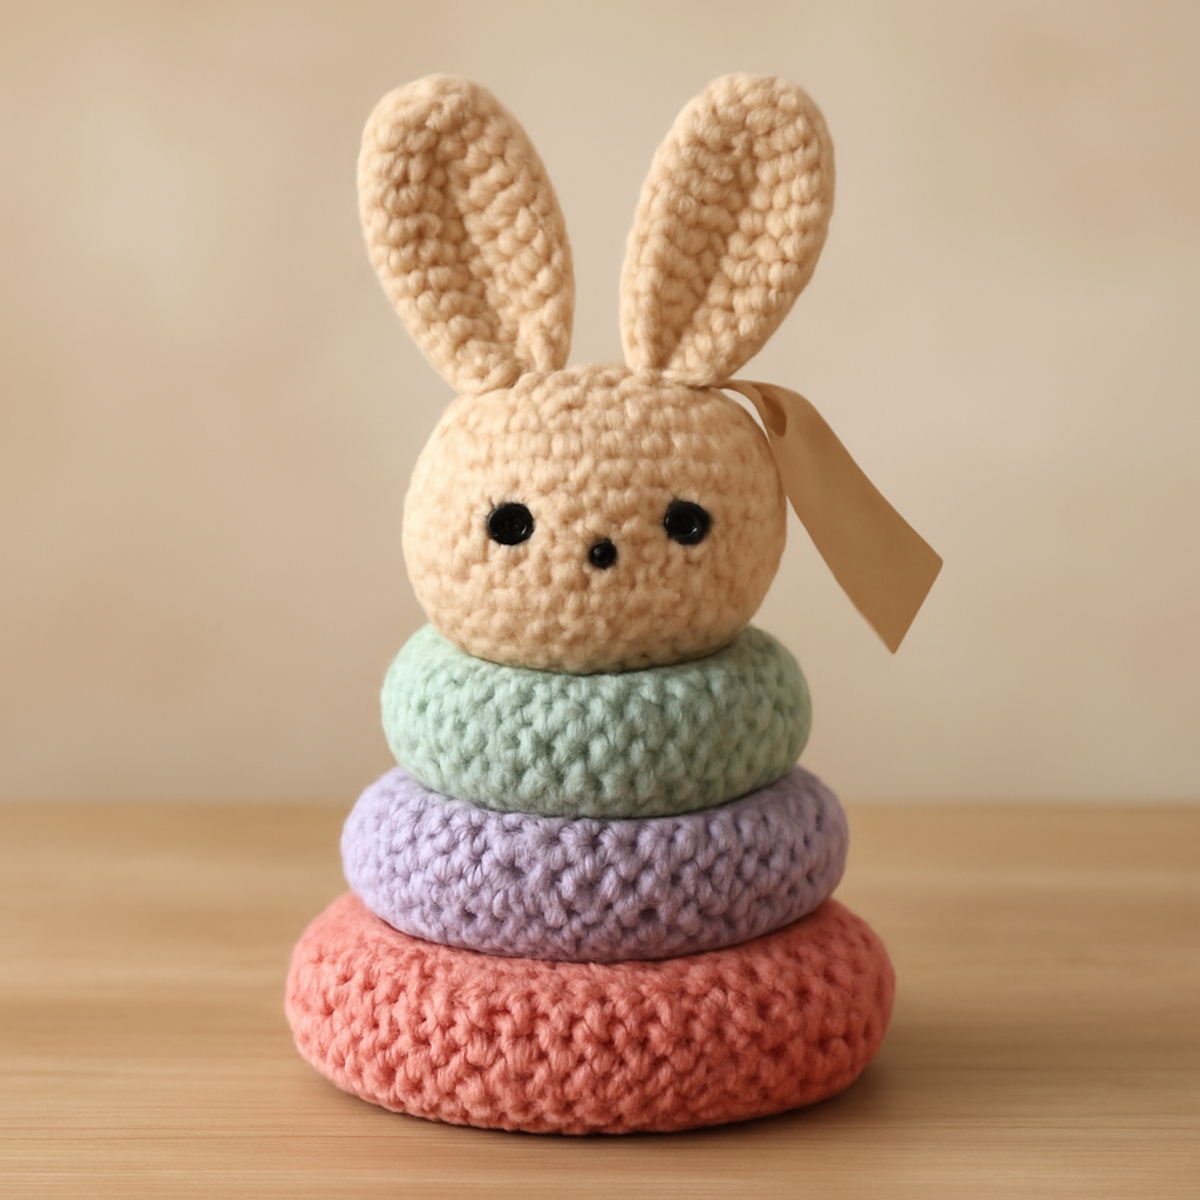
As I sift through my yarn stash, the soft texture of a medium-weight acrylic catches my eye, whispering promises of playful creations just waiting to spring to life. Today, I'm excited to share the "Playful Bunny Stacker: A Crochet Toy Pattern for Little Ones," a delightful whimsical project that combines fun and function. This crochet bunny stacking toy not only serves as an engaging activity for little ones, encouraging hand-eye coordination and tactile exploration, but it also adds a charming touch to any nursery decor. With its various rings in vibrant colors, this pattern allows for creative expression and is perfect for those who enjoy working with multiple techniques. Whether you're looking for a cozy afternoon project or a unique gift, this bunny stacking toy is sure to be a beloved companion for any child. Grab your hook, and let’s hop into the delight of stitching together this cuddly tale!
Crochet Bunny Stacking Toy Materials & Tools
- Medium Weight Yarn – Approximately 150 yards in soft acrylic or cotton blend for a plush feel.
- 4.5mm (G/6) Hook – Ideal for creating a sturdy yet soft texture in your crochet bunny stacking toy.
- Safety Eyes – For adding a charming face to your bunny; ensure they are securely attached for child safety.
- Yarn Needle – Essential for weaving in ends and sewing pieces together for a polished finish.
- Stitch Marker – Helpful for tracking rounds, especially in the continuous spiral of the bunny's head.
Why is this bunny stacking toy special?
Whimsical Design: The playful shape of the bunny adds a delightful touch, making it perfect for both playtime and nursery decor.
Skill Enhancement: This intermediate pattern introduces various stitches and techniques, providing a rewarding challenge for crafters looking to grow their skills.
Encourages Learning: As little hands stack and explore, they will enhance their hand-eye coordination while engaging in tactile play.
Charming Decor: With its vibrant colors and cute aesthetics, this toy is not just a plaything but also a gorgeous addition to any child's room.
Creative Freedom: Feel free to customize colors or even change the theme to other cute animals, ensuring each piece is uniquely your own!
How to Check Your Gauge for Crochet Bunny Stacking Toy
Don't skip the gauge swatch! Checking your gauge is essential for creating a beautifully balanced crochet bunny stacking toy. Aim for a standard crochet gauge of approximately 4×4 inches (10×10 cm) to achieve the best fit. If your tension doesn't match, try adjusting your hook size; if your swatch is too small, simply go up a hook size. To make this stacking toy larger, increase your starting chains and rounds in multiples of 6 + 2 for consistent increases. This way, you'll ensure that your playful creation retains its lovely shape and balances perfectly for little hands to enjoy!
Step-by-Step Pattern for crochet bunny stacking toy
Row 1: Head Creation
Begin by making a magic ring. In the ring, work 6 sc to create the foundation of the bunny's head. Pull the ring tightly to close. This will create a small circle, and your work should start to cup slightly. Continue crocheting in a continuous spiral without joining rounds.
Row 2: Increasing the Head
In the next round, work 2 sc in each sc from the previous round, increasing your stitch count. You will have 12 sts at the end of this row. This round should start to take shape as the head becomes fuller. Remember to maintain a consistent tension for an even finish!
Row 3: Shape the Bunny's Head
For the third round, make 1 sc in the next stitch, then 2 sc in the following stitch and repeat this around. You will have 18 sts at the end of this round. The head should be visibly rounded by now, developing a lovely plump shape.
Row 4: Adding More Shape
Continue to crochet the head by making 1 sc in the next 2 stitches, then 2 sc in the next stitch. Repeat around for this round, resulting in 24 sts. The shape should be more pronounced, and you might notice your stitches curling inwards a bit.
Row 5: Finishing the Head
Now, for the fifth round, make 1 sc in the next 3 stitches, then 2 sc in the following stitch. Repeat this around for a total of 30 sts. The bunny's head should be a soft dome by this stage, and your work should really start taking form.
Step 6: Bunny Ears
Next, create the bunny ears. Start with a new piece by chaining 15. From the second ch from the hook, work 1 hdc in each chain across. This sets the base for the ears. You should have a nice length, creating a floppy effect that defines the bunny's charm.
Step 7: Shaping the Ears
For the second row of the ears, turn, ch 1, and work 2 hdc in the first st, then 1 hdc in the next 5 stitches, 2 hdc in the next stitch. Finish with 1 hdc in the last 3 stitches. You will have 9 sts now. The ears are starting to take shape with a slight curve.
Step 8: Completing Ears
For the third and final row of the ears, turn your work, ch 1, and work 1 hdc in the first 7 stitches, then 2 hdc in the last stitch. You will have 10 sts total. This project gives the bunny its playful and cuddly look as the ears finish rounding off nicely.
Step 9: Beginning the Base Rings
To create the bottom ring of the stacking toy, start again with a magic ring and work 6 sc into the ring (like the head). Pull it tight and crochet in continued rounds. This base will provide stability for your adorable crochet bunny stacking toy.
Step 10: Building the First Ring
In the next round, work 2 sc in each stitch around. You will now have 12 sts in this round. This will start forming the round shape of your first stacking ring. The edges should gently round out, creating the supportive base for the toy.
Step 11: Second Ring
Continue building upwards with the second ring, working 1 sc in the next stitch, then 2 sc in the next stitch around for a total of 18 sts. This expansion creates a broader ring, suitable for the stacking purpose while providing texture in the design.
Step 12: Adding Final Rings
Repeat a similar increase for the third and fourth rings, working the third ring with 1 sc in the next 2 stitches, then 2 sc in the next stitch, and ending with 24 sts. Finally, make the fourth ring by repeating the same pattern to complete the stacking structure.
Step 13: Assembly of the Bunny Stacking Toy
Now it's time to assemble your crochet bunny stacking toy. Place the rings with the largest at the bottom and smallest on top. Securely sew the bunny head onto the top ring, ensuring everything is tightly fastened. Your adorable crochet bunny stacking toy is now complete and ready for play!
What to Make after the Playful Bunny Stacker?
As you embark on crafting your delightful crochet bunny stacking toy, why not consider creating a cozy collection of complementary pieces to enrich the playful atmosphere?
-
Bunny Ear Headband: This charming accessory can bring the whimsy of the bunny stacking toy to life, making playtime even more magical. Imagine your little one wearing their favorite toy's ears while stacking rings.
-
Soft Bunny Blanket: Create a plush blanket in coordinating colors that adds warmth and comfort, perfect for snuggling during playtime or story time. It's a beautiful way to tie the whole theme together.
-
Mini Bunny Bags: Whip up adorable little bags that match the colors of your stacking toy. These can store small treasures, fostering imaginative play and keeping little items together.
-
Bunny-Themed Wall Decor: Transform your yarn stash into charming wall hangings or canvases that echo the cute aesthetics of your crochet bunny pairing. Make your nursery or play area come alive!
-
Playful Bunny Coasters: How about some functional art? Craft whimsical coasters featuring bunny motifs that echo the crochet bunny stacking toy’s playful spirit, merging utility with fun decor.
By adding these accessories to your crafting journey, you can create an enchanting world that celebrates the joy of whimsy and creativity!
Expert Tips for Your Crochet Bunny Stacking Toy
-
Gauge Consistency: Ensure you maintain a consistent gauge throughout your crochet bunny stacking toy to avoid size discrepancies. Check your tension frequently, especially during the head's spiral formation.
-
Stitch Markers: Using stitch markers can help you accurately track your stitch count, particularly in the continuous rounds of the bunny's head. This prevents losing count, a common mistake among crocheters.
-
Blocking Tips: Lightly block the rings once complete to maintain their shape. This extra step enhances the overall look and sturdiness of your stacking toy.
-
Secure Attachments: When sewing the bunny's head onto the rings, ensure it's secured tightly to prevent it from wobbling. Double-check your stitches for a robust finish.
-
Enjoy Customization: Feel free to experiment with different colors and textures to make your crochet bunny stacking toy uniquely yours. Personal touches make every project special!
crochet bunny stacking toy Variations
Explore exciting ways to customize your crochet bunny stacking toy and let your creativity shine!
- Yarn Substitutions: Try a cotton blend for a firmer texture, perfect for warmer climates or outdoor play.
- Color Play: Use vibrant colors like bright yellows and blues to create a stunning rainbow effect on each ring.
- Themed Characters: Swap the bunny for other animals, such as a friendly bear or playful elephant, for a delightful twist.
- Larger Rings: Increase the size of the rings for a more substantial toy; this change will add extra fun for little hands!
- Textured Elements: Add pom-poms or fun fringes to the edges of the rings for a playful touch that invites tactile exploration.
- Sound Surprise: Incorporate a rattle or crinkle paper inside the rings to make every stacking session extra engaging and entertaining.
- Mixed Techniques: Combine crochet with simple knitting elements to create unique borders along the rings, enhancing the overall design.
- Size Adjustments: Feel free to modify the overall dimensions of the bunny for personalized gifting—make it a mini version for travel or a larger one for cuddles!
How to Wash and Care for Your Crochet Bunny Stacking Toy
-
Machine Washing: Use a gentle cycle with cold water to preserve the integrity of your crochet bunny stacking toy. Avoid agitation to prevent felting or pilling of the yarn.
-
Hand Washing: For a more delicate clean, wash your toy by hand in lukewarm water with a mild detergent. Gently squeeze out excess water, taking care not to wring or stretch the fibers.
-
Drying/Blocking: Lay your crochet bunny stacking toy flat on a clean towel to air dry; this helps maintain its shape. Avoid hanging it to dry, which can lead to stretching.
-
Storage: Store your toy in a dry, cool place away from direct sunlight to prevent fading. Consider placing it in a breathable bag to keep dust away while maintaining its lovely texture.
Crochet Bunny Stacking Toy FAQs
Can I use a different type of yarn for this crochet bunny stacking toy?
Absolutely! You can substitute medium weight yarn with similar weights, such as DK or light worsted yarns, but keep in mind that the finished size and plushness may vary. If you're opting for cotton instead of acrylic, the texture might become firmer but offers durability and is great for little hands.
How can I make this bunny stacking toy smaller or larger?
To adjust the size, you can either change your hook size (a larger hook will create a bigger toy, while a smaller hook will yield a smaller one) or modify your weight of the yarn, using bulkier yarn for a larger result. Just keep in mind that sizing adjustments may also affect the amount of yarn needed.
Why is my work curling up while I'm crocheting the rings?
Don't panic! Curling often occurs due to tension issues or not having enough increases in your rounds. I recommend checking your gauge first and ensuring you are following the increase pattern accurately. Crocheting too tightly can also contribute to this, so try to relax your tension a bit.
What hook size should I use if I'm a loose crocheter?
If you tend to crochet loosely, I suggest starting with a 4mm (G/6) hook instead of 4.5mm (G/6). This smaller size can help tighten your stitches for a denser fabric. Always check your gauge to achieve the desired look!
How do I fix a dropped stitch in my bunny stacking toy?
It's an easy fix! Simply pull up the loop of the dropped stitch with a crochet hook, and insert it back into the correct stitch. Depending on where the drop occurred, you might need to weave the yarn tail back into your work to secure it. Just be patient, and take it one stitch at a time!
What can I do if my bunny's ears don't stand up?
If your bunny's ears aren't standing up as you'd like, try using a bit of wire inside the ear to give it structure. Alternatively, you can run a few rows of slip stitches through the top of the ear to hold its shape better. Just ensure you leave any sharp ends safely tucked away!
Leave a Reply