
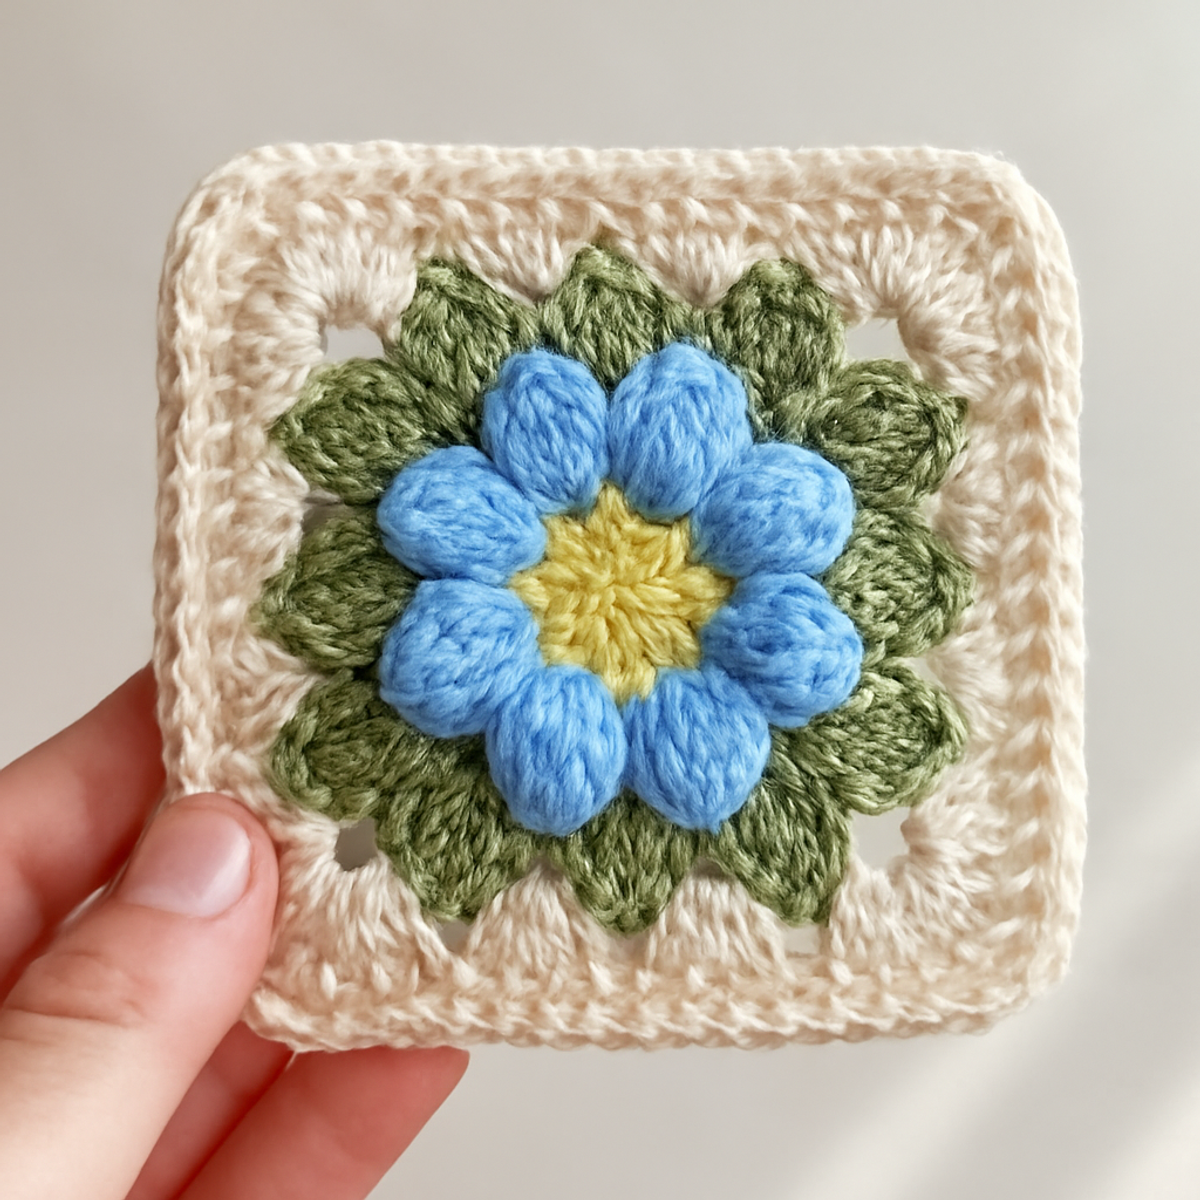
As I sat on my cozy couch, the afternoon sun streaming in to warm my hands, I couldn’t resist the allure of vibrant yarn dancing through my fingers. That’s when I decided to create something special—a floral granny square that captures the beauty of nature with every stitch. This Blossom Granny Square pattern is not only a delightful way to hone your crochet skills, but it also offers a stunning centerpiece for your home decor or accessory projects. With its charming floral design and inviting texture, you’ll find joy in crafting pieces that can transform into everything from cozy blankets to stylish tote bags. Plus, it’s an intermediate-level project that allows you to practice color blending and intricate techniques. Are you ready to embrace the art of crochet and add a blooming touch to your collection? Let's dive in!
Floral Granny Square Materials & Tools
Yarn
- Worsted Weight Yarn – Approximately 70 yards total in your favorite colors, with options in acrylic or cotton for beautiful sheen and texture.
Tools & Notions
- 4.0 mm (G-6) Hook – Ideal for maintaining tightness while showcasing the delicate stitch details.
- Yarn Needle – Essential for weaving in ends to give your floral granny square a polished finish.
- Stitch Markers (optional) – Helpful for marking the beginning of each round, especially in color-change sections.
Why Choose This Floral Granny Square?
Craftsmanship and Beauty: This floral granny square elevates your crochet game with an intricate design that's as rewarding to create as it is beautiful to behold.
Versatile Appeal: Perfect for a range of projects, from cozy home decor to trendy accessories, it can easily be adapted to suit any style.
Intermediate Challenge: This pattern provides a fun opportunity to practice essential techniques like color blending and intricate stitch work, enhancing your skills while you craft.
Comfortable Size: Measuring around 6 to 8 inches, it fits perfectly into many creations, making it a practical addition to your crochet repertoire.
Joyful Experience: Immersing yourself in this project is a delight, featuring the joyful rhythm of creating something unique with your own hands.
Textured Results: The combination of yarn and stitch techniques yields a lovely, soft, yet sturdy finish that you'll adore using or gifting.
Gauge & Sizing Notes
Don't skip the gauge swatch! Checking your tension is essential for your floral granny square, as it ensures your finished piece has the right fit and texture. Aim for a gauge of approximately 4×4 inches (10×10 cm), which typically equals around 16 double crochets by 10 rows—this can vary based on your individual style. If you desire a larger square, simply increase your starting chain in multiples of 3 to keep the stitch count balanced. If your swatch feels too small, consider going up a hook size to adjust your crochet gauge. Happy crafting, and enjoy the delightful journey of your floral granny square!
Step-by-Step Pattern for Blossom Granny Square
Row 1: Center Flower Formation
Begin by creating a magic ring. Inside the ring, work 8 sc (single crochet) to form the center of the flower. Pull the tail to close the ring tightly. Your work should lay flat, establishing a solid foundation for the floral granny square (8 sts).
Round 2: Petals Creation
Ch 3 (counts as your first dc), then work 2 dc in the same stitch for the first petal. Skip the next sc and create 3 dc in the following sc. Repeat this petal creation across all sc to create a total of 4 petals. Each petal will be separated by a skipped stitch, leading to a lovely open design (16 dc).
Round 3: Leaf Layering
To establish the leaves, join green yarn and sl st into any petal base. Work (hdc, dc, hdc) in the base of each petal and sl st to secure. This creates a lush leaf effect on your floral granny square while also enhancing its depth. Repeat around for each petal to create leaves (16 hdc, 8 dc).
Round 4: Outer Shell Border
Switch to your cream yarn for a lovely border. Begin with a ch 3 (counts as your first dc), then work 2 dc in the same stitch. Skip 2 stitches and make 3 dc into the next sc (shell). Continue this pattern around the square, ensuring to skip stitches for a delicate, lace-like finish (32 dc).
Round 5: Final Touches
For a polished look, make a round of sl st in each dc of the shell stitches. This final round will give your floral granny square structure and stability, enhancing its overall appearance. Your work should flatten out and present a neat edge to complete your square (32 sl st).
Care Instructions for Floral Granny Square
Machine Washing: Use cold water on a gentle cycle to protect the integrity of your floral granny square and prevent any felting or pilling.
Hand Washing: For extra care, consider hand washing in cool water with mild detergent. Gently swirl and avoid agitation to maintain your square's beautiful stitches.
Drying/Blocking: Lay your square flat on a clean, dry towel to dry. This helps preserve its shape and texture while blocking enhances the final appearance.
Storage: Keep your finished floral granny square in a cool, dry place, away from direct sunlight to prevent fading and maintain its vibrant colors.
Floral Granny Square Variations
Unleash your creativity and personalize this lovely crochet piece with these fun variations and substitutions!
-
Yarn Weight Swap: Experiment with lighter or heavier yarn to change the texture and drape; consider using DK or bulky yarn for a different feel.
-
Fiber Alternatives: For sustainability, try organic cotton or bamboo yarn. These fibers offer a fresh sheen and softer touch, giving your square a unique finish.
-
Color-Blocking Fun: Add dynamism by incorporating bold color blocks. Alternate between your favorite hues in each round for a visually striking pattern.
-
Size Adjustments: Modify the foundation chain to create a larger square for blankets or a smaller one for coasters. It’s all about personalizing the project to your needs!
-
Texture Twists: Add a playful pom-pom or fringes to your edges for extra flair. These additions can transform your floral granny square into something truly fun and unique.
-
Petal Variation: Swap the petal shape by using a swirl pattern instead of classic petals. This change will lend an artistic vibe while keeping the floral essence intact.
-
Shell Border Experiment: Try a different border style, like a scalloped edge or picot stitch, to add a unique finishing touch to your square. This can elevate the overall look significantly.
-
Gradient Effects: Work with gradient yarn for a seamless color transition across your square. This approach brings a modern twist while maintaining a cohesive design.
What to Pair with Blossom Granny Square?
Imagine the joy of creating a harmonious set that brings warmth and charm to your space or wardrobe.
- Charming Pillow Cover: Transform your floral granny squares into a lovely pillow cover that adds a cozy touch to your couch.
- Delicate Wall Hanging: Use multiple squares to create a stunning wall hanging, celebrating your craftsmanship in every intricate detail.
- Stylish Tote Bag: Crochet a tote that showcases your squares, merging utility and beauty for your daily adventures.
- Cozy Blanket: Join several squares for a warm, inviting blanket that wraps you in that same comfort you felt while working.
- Vibrant Coasters: Make small squares for delightful coasters that protect surfaces while adding cheerful pops of color to your home.
- Elegant Shawl: Craft a shawl with alternating granny squares, turning your work into a fashionable accessory that stands out.
Expert Tips for Floral Granny Square
-
Mind Your Tension: Consistent grip is key! Maintain even tension throughout your project to ensure each stitch contributes to a uniform and beautiful floral granny square.
-
Count Carefully: Regularly count your stitches, especially when changing colors. Mark the beginning of each round with a stitch marker to avoid miscounting and losing track.
-
Don’t Rush the Blocking: Once you've completed your square, take a moment to block it. This step enhances the texture and visual appeal, making it easier to incorporate into your larger projects.
-
Maintain Hook Placement: Be mindful of your hook position when creating shell stitches. Avoid twisting the foundation or dropping stitches for a clean, polished finish.
-
Practice Color Blending: Embrace the opportunity to experiment with color in your floral granny square. Practice blending shades to elevate the overall aesthetic of your project.
Blossom Granny Square FAQs
Can I substitute different yarn types for my floral granny square?
Absolutely! While worsted weight acrylic or cotton yarns are recommended, you can experiment with others like bamboo or blends. Just ensure the yarn weight remains consistent to achieve the pattern's lovely dimensions.
How do I make my floral granny square bigger or smaller?
To adjust the size, you can increase or decrease the number of chain stitches in the foundation. For a larger square, start with more chains; for a smaller one, simply reduce the number.
Why is my floral granny square curling up?
Don’t panic! This is often due to tension issues. Make sure you're keeping an even grip throughout your work. If problems persist, also consider checking your stitch counts—an extra stitch or two can sometimes cause unevenness!
What hook size should I use for this floral granny square?
I recommend using a 4.0 mm (G-6) hook. This size strikes a balance between having a tight enough fabric to show off the intricate details while still being easy to work with for those delicate flower petals!
How do I fix dropped stitches in my floral granny square?
It's an easy fix! Simply use a yarn needle to weave the dropped stitch back through the surrounding stitches. If you notice it happening frequently, double-check your tension and keep a close eye on your hook placement when working the rounds.
How can I ensure my color changes look seamless?
To achieve smooth color changes, always complete the last stitch of the old color before switching to the new. You might also try carrying the yarn along the edge or using a slip stitch to secure your new color, keeping the tension even throughout.
Leave a Reply