
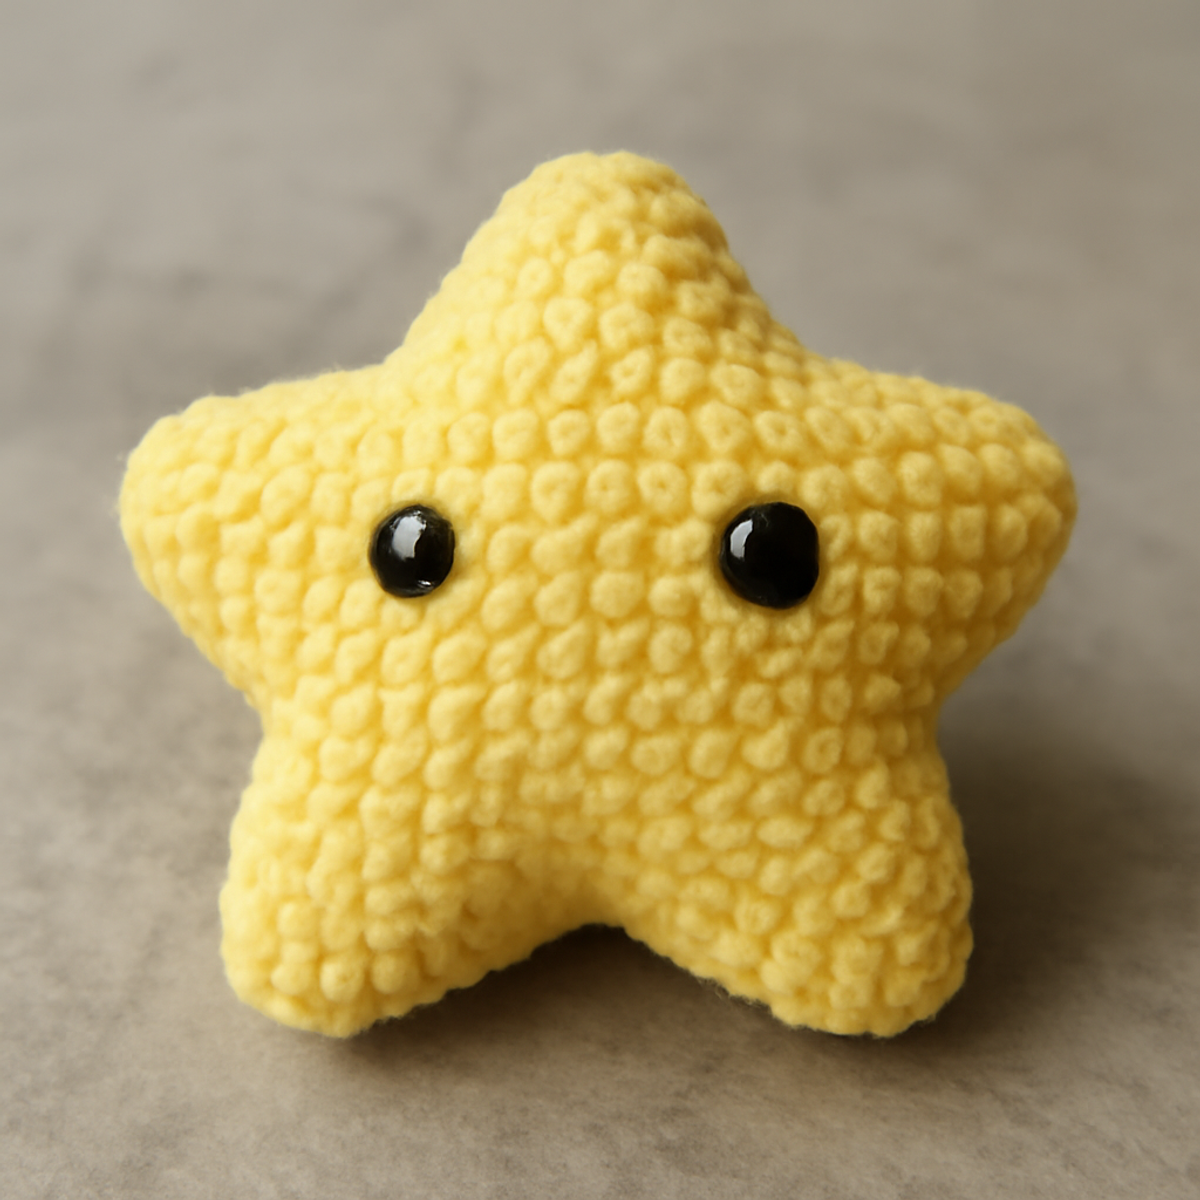
As I unspooled the bright yellow yarn, excitement bubbled up inside me, and I could hardly wait to bring this playful creation to life. The Twinkling Amigurumi Star crochet pattern is perfect for beginner crafters looking to create something utterly charming and multifunctional. Not only will you whip up an adorable star that doubles as a toy and a decorative piece, but you'll also master essential crochet techniques, like working in the round, all while basking in that cozy crafting vibe. Picture this starlit softie brightening a child's room or serving as a heartfelt gift; you'll find instant joy in every stitch. Ready to embark on this delightful crochet journey? Let’s create some magic together!
Amigurumi Star Pattern Materials & Tools
Get ready to craft your adorable Amigurumi Star! Here’s what you’ll need to bring this cheerful creation to life:
Yarn
- Worsted Weight Yarn – Approximately 50-100 yards in bright yellow to create that delightful star shape.
Tools & Notions
- 3.75mm (F) or 4.0mm (G) Crochet Hook – Choose the size that gives you a snug stitch for a neat finish.
- Safety Eyes (5-7mm) – Two small eyes to bring your star to life with an adorable face.
- Yarn Needle – For sewing components together and weaving in those pesky ends.
Why is this Amigurumi Star Pattern special?
Beginner-Friendly: This pattern is designed specifically for beginners, making it an ideal first project that won't overwhelm new crafters.
Whimsical Charm: With its bright yellow hue and adorable shape, this star adds a playful touch to any room, making it a delightful decorative item.
Quick Satisfaction: The project can be completed in a short amount of time, offering immediate gratification for those eager to showcase their crochet skills.
Multi-functional Use: Whether as a toy or a unique gift, this amigurumi star is versatile enough to fit many needs while spreading joy.
Skill Development: As you work on this pattern, you'll get to practice essential crochet techniques, like working in the round, enhancing your crafting abilities.
Endearing Texture: The squishy, plush feel makes it suitable for little hands, ensuring it’s not just cute but also interactive and fun.
Gauge & Sizing Notes
Don't skip the gauge swatch! It's crucial for ensuring that your Twinkling Amigurumi Star turns out just as charming as you envision. A good rule of thumb is to aim for a crochet gauge that allows your star to be approximately 4-5 inches (10-12 cm) across at its widest point, typically achieved by working in continuous rounds. If you find your tension swatch is too small or large, you can adjust your starting chain (or round) in multiples of 6 to increase or decrease the size accordingly. If your swatch is too tight, simply go up a hook size for a cozier feel. Understanding these sizing adjustments ensures your amigurumi star pattern fits your crafting desires perfectly!
Step-by-Step Pattern for Twinkling Amigurumi Star
Row 1: Begin the Star Center
Start your Twinkling Amigurumi Star by creating a magic circle. Inside the circle, work 6 single crochets (sc) to form the core structure. Pull the slip knot tight to close the circle and join with a slip stitch (sl st) to the first sc. Your work should form a small round shape (6 sts).
Row 2: Increase the Base
In this round, crochet 2 single crochets (sc) in each stitch around. This will help increase your star’s base, creating a supportive foundation. You’ll have a total of 12 single crochets at the end. Your piece should look fuller and more defined at this stage (12 sts).
Row 3: Form the First Points
Next, ch 2 for height, then work 1 half double crochet (hdc) in the first stitch. In the next stitch, make 2 double crochets (dc) to create the point of the star. Repeat this process in every other stitch around, resulting in 5 points of the star. As you progress, your work will start to show the star-like shape (30 stitches total, including ch 2).
Row 4: Shape the Points
For the shaping, continue working 1 single crochet (sc) in between each point you’ve created. Be sure to count carefully to maintain the star's structure, which helps emphasize the charming points. Your star's tips will now be more pronounced, and at the end, you should have 30 stitches (30 sts).
Row 5: Create the Star's Body
Now it's time to complete the body of the Twinkling Amigurumi Star. Start this round with a single crochet in each stitch around, keeping your stitches even to maintain that cozy texture. After this round, your star should be nicely rounded, and you’ll have a total of 30 single crochets (30 sts).
Row 6: Close the Shape
To finish the body, continue crocheting in the same manner. Work 1 single crochet (sc) in each stitch, ensuring you maintain a consistent tension. You’ll solidify the shape of your star as you round off this row. Count again to confirm you have 30 stitches total (30 sts).
Step 7: Add Safety Eyes and Stuff
Before closing your star, add the safety eyes between the second and third points. This will give your star a friendly face! Then, gently stuff the star with polyester stuffing, ensuring it’s plush but not overfilled. Your star should feel soft and cuddly in your hands.
Step 8: Seal the Bottom
To complete your Twinkling Amigurumi Star, work a sl st to join in the last round. Then, use your yarn needle to weave in the end and close off any gaps at the base. Your cozy star should now be ready for display or play, bringing warmth and charm to any space!
What to Pair with Twinkling Amigurumi Star?
Imagine the joy of creating a whimsical ensemble that enhances your playful Amigurumi Star project, enriching your crafting experience.
-
Mini Amigurumi Moon: A delightful companion to your star, this crescent shape brings balance to your cosmic collection.
-
Cloud Plushie: Soft and fluffy, this cloud adds a dreamy touch, creating a serene atmosphere for a child's room.
-
Twinkling Garland: String several stars together for a charming garland; it’s perfect for enhancing rooms or festive celebrations.
-
Amigurumi Hearts: These sweet additions offer an inviting contrast and can be crafted with similar yarn for a cohesive look.
-
Cozy Blanket: Create a warm blanket in matching colors, adding comfort and a playful vibe, making the star shine even brighter in its new context.
Amigurumi Star Pattern Variations
Unleash your creativity and personalize your Twinkling Amigurumi Star project with delightful variations that bring your vision to life!
-
Yarn Weight Swap: Use a lighter or heavier yarn to create a larger or smaller star. Adjust hook size accordingly for the best results.
-
Color Combinations: Mix and match colors for a playful twist. Imagine a big, bright rainbow star to really stand out in any space.
-
Sparkly Yarn: Incorporate a sparkle or glitter yarn for an enchanting touch. Picture your star shimmering like a real celestial body!
-
Embellishments: Add embroidery or felt shapes to customize the face or body. Little hearts or stars would add endearing details perfect for gifts!
-
Texture Fun: Try adding pom-poms or fringe to the tips for a playful texture. This will give your star a whimsical flair and encourage tactile exploration.
-
Size Adjustments: Experiment with different yarn weights and hook sizes for various sizes. Create a mini star for keychains or a giant one for show-stopping decor!
-
Creative Borders: Stitch a charming border around the star for an extra pop of color. A contrasting hue can turn this cozy star into a vibrant focal point.
-
Themed Stars: Tailor your star’s colors and details to match specific themes or occasions, like red and green for Christmas or pastel shades for spring. Each star can tell a new story!
Helpful Tricks for Amigurumi Star Pattern
-
Consistent Tension: Maintaining even tension is crucial to prevent gaps between stitches. Practice by crocheting swatches before starting the star.
-
Frequent Counting: Regularly count your stitches, especially in the early rounds, to stay on track. This helps you avoid losing the star's shape.
-
Use a Stitch Marker: Place a stitch marker at the end of each round. This will help you keep track of when to switch between rounds and maintain consistency in your amigurumi star pattern.
-
Stuff Gently: When stuffing the star, do it gradually to avoid overfilling. This keeps your star plush and cuddly while retaining its shape.
-
Secure Finishing: When closing the bottom, weave in your ends securely to prevent unraveling. A tight finish adds durability to your charming creation.
Care Instructions for Amigurumi Star
Machine Washing: If your amigurumi star needs a freshen-up, place it in a mesh laundry bag and machine wash on a gentle cycle with cold water to avoid agitation.
Hand Washing: For more delicate care, hand wash your star in cold water using a mild detergent, gently pressing the fabric without twisting to maintain its shape.
Drying/Blocking: Lay your star flat on a clean towel to dry, reshaping it as needed. Avoid hanging, which can stretch it out of shape.
Storage: Keep your amigurumi star in a cool, dry space, ideally in a breathable bag, to help maintain its cute plush texture and vibrant color for years to come!
Twinkling Amigurumi Star FAQs
Can I substitute the yarn for a different type?
Absolutely! You can use cotton yarn instead of acrylic for a firmer texture or even a super soft yarn blend if you prefer a plush feel. Just keep an eye on your gauge since different fibers can alter the final size and appearance of your star.
How do I adjust the size of my Amigurumi Star?
If you want to make a bigger star, you can use a bulkier weight yarn and a corresponding larger hook size. Alternatively, to create a smaller star, opt for a lighter weight yarn and a smaller hook. Just be sure to adjust your stitch count accordingly as you work to maintain the shape.
Why is my work curling as I crochet?
Don't panic! Curling can often be a sign of uneven tension. Make sure your stitches are consistent; if you're pulling too tight in some areas, try to relax your grip. A little practice with tension control can make a big difference, so keep at it!
How do I fix dropped stitches in my pattern?
It's an easy fix! Simply locate the dropped stitch, use your crochet hook to pick it back up through the loop, and continue crocheting from there. You can weave in any loose ends afterward to secure it properly. And remember, counting your stitches regularly can help prevent this in the future!
What size hook should I use for my Twinkling Amigurumi Star?
I recommend starting with a 3.75 mm (US size F) or a 4 mm (US size G) crochet hook. This size will give you a nice balance between stitch firmness and flexibility, helping your star maintain its adorable shape while still being cuddly and fun.
Leave a Reply