
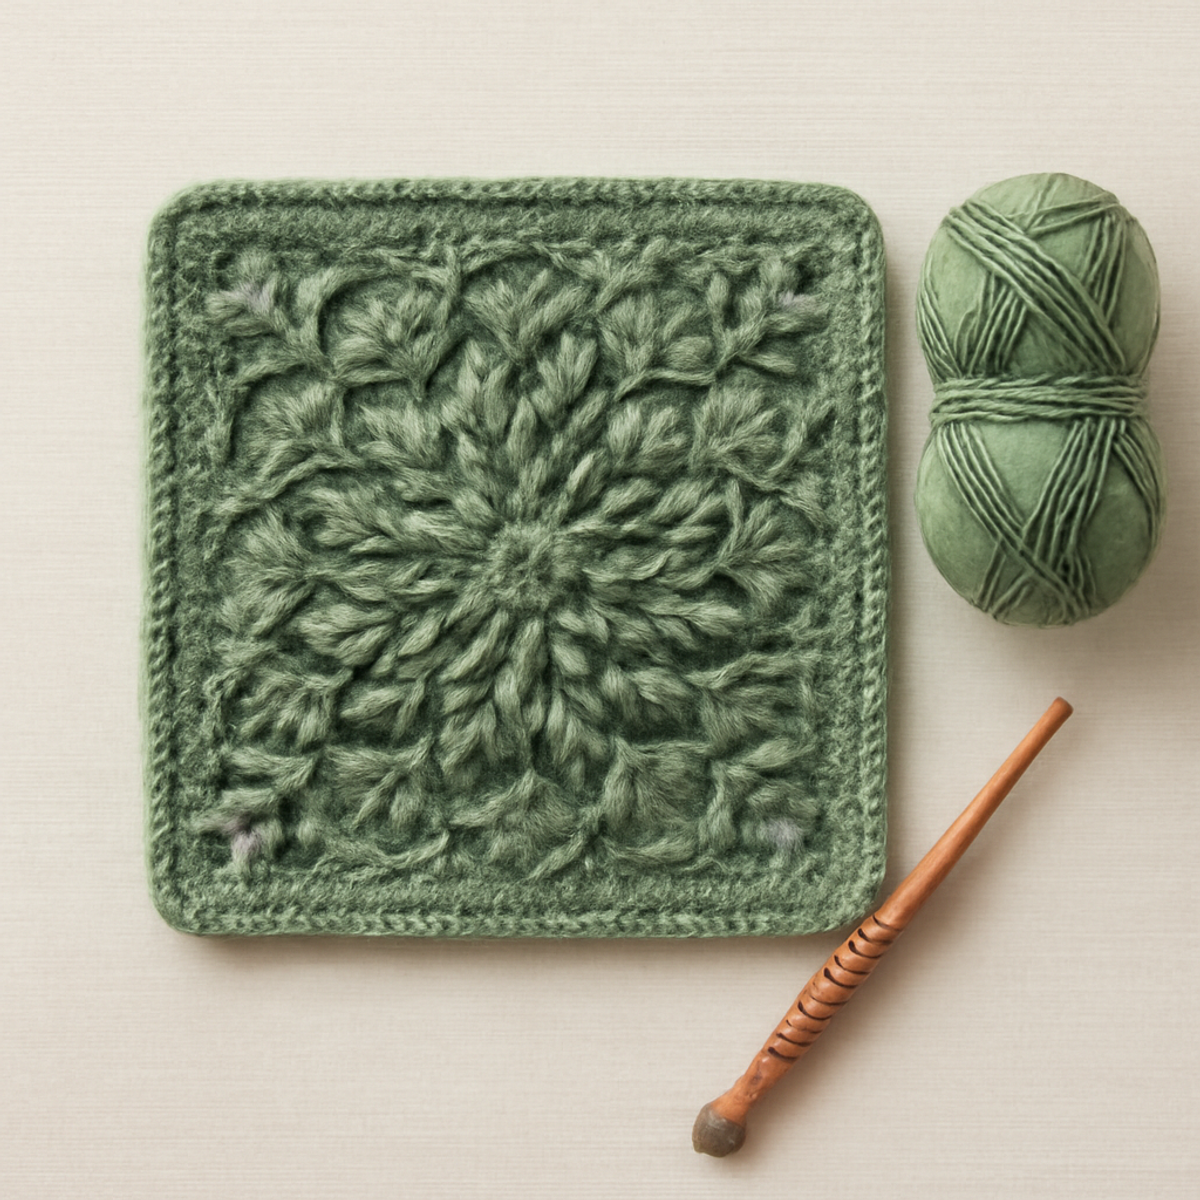
As I nestled into my favorite crochet nook, I was instantly charmed by the intricate texture of my latest project—the wheat stitch granny square. This delightful pattern offers the perfect blend of modern flair and classic appeal, inviting you to elevate your crochet skills while creating stunning pieces that can enhance any space. Whether you're crafting a cozy afghan, decorative coasters, or a unique home accessory, the versatility of this granny square will ignite your creativity. Not only does this project work up beautifully in medium-weight yarn, but its soft floral texture is sure to catch the eye of fellow yarn lovers. With its unique stitches, you'll be thrilled to refine your technique, all while enjoying the satisfaction of creating something truly special. Ready to embrace the charm of the wheat stitch? Let's dive into this delightful pattern together!
Wheat Stitch Granny Square Materials & Tools
Yarn
- Medium Weight Yarn – Choose a worsted weight yarn, approximately 200-300 yards, to create a soft yet sturdy granny square.
- Acrylic or Cotton Blend – Opt for a blend for durability and easy washing, making your squares functional and beautiful.
Tools & Notions
- 5.0mm (H) Hook – This hook size is perfect for achieving the desired stitch definition in your wheat stitch granny square.
- Stitch Markers – Use these to track stitch placements in intricate corners for smoother, more precise rounds.
- Wooden Crochet Hook – Incorporating a wooden hook can enhance your crafting experience with its warm, traditional feel.
Happy crocheting!
Why Choose the Wheat Stitch Granny Square?
Versatile and Functional: This granny square adapts beautifully to endless projects, from cozy afghans to chic coasters, making it a must-have pattern in your crochet repertoire.
Elegant Texture: The unique wheat stitch adds an exquisite floral touch, elevating your crochet game while ensuring your work remains both modern and timeless.
Skill Enhancement: As an intermediate-level project, you’ll refine your crochet techniques, allowing you to confidently tackle more complex designs in the future.
Quick and Rewarding: Designed to work up in a flash, this pattern offers immediate satisfaction, perfect for those who crave instant gratification from their crafting.
Stunning Aesthetic: With its plush look and vibrant colors, this square guarantees visual appeal, drawing admiration from anyone who sees it.
How to Check Your Gauge for Wheat Stitch Granny Square
Don't skip the gauge swatch! Ensuring your tension is just right is crucial for achieving the beautiful, textured look of your wheat stitch granny square. A general guideline to follow is to aim for a gauge of around 4×4 inches (10×10 cm), which often translates to roughly 14 double crochets by 8 rows—but be sure to check your own tension! To adjust the size of your granny square, you can increase your starting chain in multiples of 6 for a wider piece or decrease for a snugger fit. If you find your swatch is smaller than desired, simply try going up a hook size for that perfect finish!
Step-by-Step Pattern for Wheat Stitch Granny Square
Row 1 (or Round 1): Start the Foundation
Begin by creating a magic ring. Chain 3 (this counts as your first double crochet), then work 2 double crochets (dc) into the ring to form your first cluster. Next, chain 2 to create a corner, and repeat the pattern of 3 dc followed by a chain 2 two more times. Join with a slip stitch (sl st) to the top of the beginning chain 3 to close the round. Your work should have 3 clusters and 3 corners (3 clusters, 3 corners).
Row 2: Create Wheat Stitch Corners
Start Round 2 with a slip stitch into the first corner space. Chain 3 (counts as 1 dc) and then make 2 dc into the same corner space. For the wheat stitch, work 1 hdc, followed by 1 dc in the next stitch, and finish with 1 hdc, all in the same corner. Chain 2, and in the next corner space, repeat the wheat stitch pattern (3 dc, hdc, dc, hdc) followed by chain 2. Join with a sl st at the top of the chain 3. Your work should have 3 nice corners (3 clusters, 6 corners).
Row 3: Continue the Wheat Stitch
For Row 3, slip stitch to the first corner space again. Chain 3 and repeat the pattern of 3 dc into the corner, followed by a chain 2. In the next side space, place 1 wheat stitch by doing 1 hdc, 1 dc, and 1 hdc in the same stitch. Now chain 1, and in the next corner space, repeat your corner pattern. Continue this all the way around, ensuring you have wheat stitches between each corner. Join with a sl st at the top of your chain 3 (3 clusters, 6 wheat stitches).
Row 4: Expanding the Square
Begin by slip stitching to the first corner space. Chain 3 and complete the corner cluster of 3 dc followed by chain 2. In each side space, work 2 hdc for additional texture between corners. This round will repeat your corner design with wheat stitches in between, so you will have 2 hdc between each corner. Finish the round by joining with a sl st to the chain 3. Your attachment points should be neat, creating a smooth texture as your piece grows (3 clusters, 6 wheat stitches, 12 total hdc).
Row 5: Finalize the Granny Square
For Row 5, slip stitch to the corner again. Chain 3 and repeat the corner cluster. This time, as you progress between corners, add 1 dc in each stitch along the sides instead of hdc. Each side will have more flexibility with the extra stitches. As you connect back to your starting point, join with a sl st to the chain 3. This round will solidify the shape of your wheat stitch granny square with a nice, flat edge (3 clusters, 6 total dc).
Step 6: Finish and Block
When your desired size is achieved (about 12-14 inches), fasten off the yarn and weave in your ends. To enhance the definition, lightly block your square by wetting it and pinning it to shape. Your wheat stitch granny square is now ready for any cozy project you have in mind!
What to Pair with Wheat Stitch Granny Square?
Embrace the charm of crafting a matching set that perfectly complements your lovely wheat stitch granny square.
-
Charming Coasters: Use the same yarn and stitch pattern to create delightful coasters that add a decorative touch to your living space.
-
Stylish Cushion Covers: Larger squares can be joined together for unique cushion covers that enhance your home’s aesthetic. Imagine sinking into that plush comfort!
-
Lovely Table Runner: Craft a series of granny squares to make a beautiful table runner, perfect for adding elegance to any dining experience.
-
Elegant Blanket: Combine multiple squares into an afghan that celebrates the wheat stitch’s texture, wrapping you in warmth and style during chilly evenings.
-
Wheat Stitch Bag: Design a tote bag featuring your granny squares for a charming accessory that showcases your crochet skills while being functional.
Care Instructions for Wheat Stitch Granny Square
Machine Washing: Wash your finished wheat stitch granny square in cold water on a gentle cycle to prevent any agitation that could lead to pilling or felting.
Hand Washing: If you prefer, hand wash in cold water with a mild detergent, gently swirling without wringing to maintain the texture of your lovely creation.
Drying/Blocking: Lay your square flat on a clean surface to dry, reshaping the edges for optimal definition. This also helps to preserve the intricate stitches you worked so hard on.
Storage: Store your granny square in a dry, cool place, away from direct sunlight, to protect the vibrant colors and lovely texture from fading or damage.
Expert Tips for Your Wheat Stitch Granny Square
Consistent Tension: Maintaining even tension across your stitches is crucial for a uniform appearance. Practice creating a relaxed hold to achieve this.
Track Your Stitches: Use stitch markers to keep count of your stitches, especially around the intricate corners where a mistake is easy. This prevents losing count in complex areas.
Blocking Advice: Don’t skip blocking your finished square! Lightly wet it and pin to shape. This enhances the definition of the wheat stitch and gives your piece a polished look.
Avoiding Mistakes: Be cautious not to drop the first or last stitch in each round, as this can create an uneven edge. Always double-check your final count before joining rounds.
Adjust Size Easily: If you want to alter the size, simply add or subtract rounds. This flexibility makes the wheat stitch granny square perfect for various projects!
Wheat Stitch Granny Square Variations
Embrace your creativity by personalizing the wheat stitch granny square! Here are some fun ways to modify your project and make it uniquely yours.
-
Yarn Weight Swaps: Try using a lighter DK weight for an airy, delicate square perfect for spring. The softer drape will add an ethereal quality to your piece.
-
Fiber Alternatives: Substitute acrylic yarn with a cotton blend for a breathable square. This change will give you a lovely, lightweight finish suitable for summer coasters.
-
Color-Blocking Ideas: Add a pop of color by introducing a contrasting hue every few rounds. Think rich crimson or ocean blue—this playful twist will bring a modern edge to your design!
-
Sizing Adjustments: Easily customize your square by adding or removing rounds to achieve your desired size. Larger variations are perfect for throws, while mini squares make delightful coasters.
-
Textural Modifications: Elevate your design with fun embellishments like pom-poms or fringe along the edges. This added texture will take your granny square to the next level!
-
Mixed Materials: Incorporate metallic yarn for a sophisticated touch, ideal for elegant decor pieces. The shimmer will catch the light beautifully and turn heads.
-
Layering Squares: Create a layered look by joining multiple squares in various colors and sizes. This exciting technique will result in stunning patchwork items.
-
Border Enhancements: Add a decorative border with simple shells or picots around the square. This finishing touch will frame your work and enhance the overall aesthetic.
Wheat Stitch Granny Square FAQs
What yarn can I use for the wheat stitch granny square?
Absolutely! While medium-weight yarn is recommended, you can substitute acrylic for cotton or even try a cotton blend. Just make sure to check that your yarn maintains a similar weight to achieve the desired texture and drape.
How can I adjust the sizing of my granny square?
Don't panic! It's an easy fix to adjust the size. Simply add or remove rounds based on your preference. If you want a larger square, just continue adding rounds for a bigger piece. For smaller squares, you can stop earlier while keeping an eye on your stitch count!
Why is my granny square curling at the edges?
Curling can be frustrating, but it's often tied to tension issues. I recommend checking your tension and making sure it's consistent throughout your work. You might also try blocking your finished square, which can help smooth out those edges beautifully!
What size hook should I use for this pattern?
The 5.0 mm (H) hook is perfect for the wheat stitch granny square, as it helps achieve the lovely stitch definition you'll want in your project. If you find your stitches too loose, you might consider sizing down to a 4.5 mm hook.
How do I fix dropped stitches in my granny square?
If you notice dropped stitches, don't despair! You can simply reinsert the hook into the stitch below and pull it back up to the correct height. If you're unsure, work back through your rounds to see where you lost track; a stitch marker can help prevent mistakes in the future!
Can I mix different colors in my granny square?
Absolutely! Mixing colors not only adds personal flair but also elevates the aesthetic of your wheat stitch granny square. Feel free to experiment with vibrant colors or subtle gradients for a unique twist. The possibilities are as endless as your creativity!
Leave a Reply