
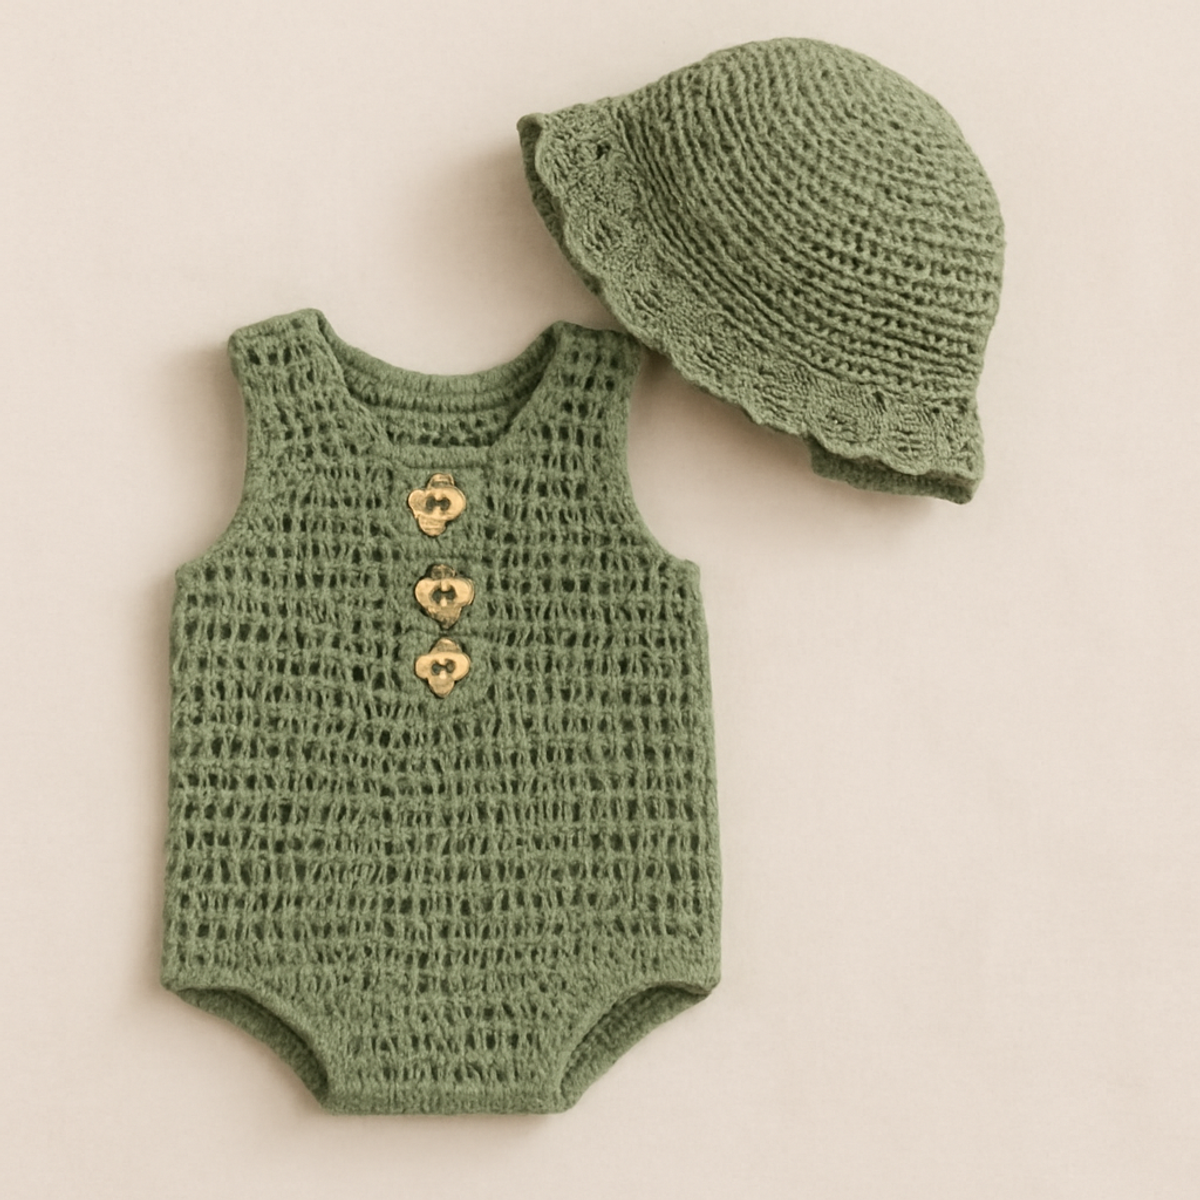
As I sat in my cozy corner, sunlight streaming through the window, I couldn’t help but smile at the thought of making a delightful crochet baby romper. This sage green crochet baby romper not only embodies a timeless style but also offers a breathable, comfortable fit perfect for little movers on warm summer days. The beauty of this project lies in its handmade charm, which easily outshines mass-produced outfits, creating a unique piece for your little one. Plus, with its gentle color palette and comfortable texture, this romper becomes a versatile go-to in any baby’s wardrobe. Ready to dive into this fun blend of skill and creativity? Let’s get started on crafting something special!
Crochet Baby Romper Materials & Tools
Get ready to gather everything you need for your crochet project!
Yarn
- Medium Weight Yarn – A soft cotton blend is recommended, with approximately 200-300 yards, depending on the size of the romper.
Tools & Notions
- 4.5mm to 5.0mm (G or H) Hook – This size provides the right balance of sturdiness and flexibility for your crochet baby romper.
- Stitch Marker – This is essential for keeping track of your rows, ensuring everything aligns during assembly.
- Three Wooden Buttons – These create a charming front closure; you'll also need needle and thread for easy attachment.
With these materials at hand, you're all set to create a delightful crochet baby romper!
Why Choose This Crochet Baby Romper?
Timeless Aesthetic: The sage green color and classic design make this romper a stunning addition to any baby's summer wardrobe.
Breathable Comfort: Crafted from soft cotton, it ensures that little ones stay cool and comfortable during warmer days.
Unique Handmade Touch: Unlike commercial outfits, this crochet baby romper showcases unique craftsmanship that family and friends will admire.
Perfect for Active Babies: Designed with free movement in mind, it allows your little explorer to crawl and play without any restrictions.
Easy to Customize: Whether you want to change colors or add embellishments, this pattern offers plenty of creative potential for a one-of-a-kind piece.
How to Check Your Gauge for Crochet Baby Romper
Don't skip the gauge swatch! Ensuring your tension is correct is crucial for achieving the perfect fit with your crochet baby romper. While a standard measurement may vary, a 4×4 inch (10×10 cm) square typically equates to around 14 double crochets by 8 rows—but please verify this with your own swatch for accuracy. If you wish to adjust the sizing of your romper, consider increasing your starting chain in multiples of 6 plus an additional 2 for stability. If your tension doesn't match the intended gauge, simply switch to a larger hook size to loosen your stitches, or go down a hook size if your swatch is too small. Happy crocheting!
Step-by-Step Pattern for crochet baby romper
Row 1: Foundation Chain
Ch 56 (or desired length for the romper). This foundation chain will serve as the base for the bodice of your crochet baby romper. Make sure your chain is not too tight to maintain flexibility; your work should lay flat and be ready for the subsequent rows.
Row 2: Beginning Bodice
In the 3rd ch from the hook, work 1 dc (double crochet) across the chain. Continue working 1 dc in each ch across (54 dc total). This establishes the main body of the romper. Your work should start to form a lovely rectangle as you progress to the end of the row.
Row 3: Shaping the Bodice
Ch 2 (counts as first dc here and throughout), turn, and work 1 dc in each of the next 53 sts. Each stitch should be laid neatly, maintaining a consistent tension. This row will repeat again to build the height of the bodice for your crochet baby romper.
Row 4: Adding Buttonholes
Ch 2, turn, work 1 dc in the first 26 sts, ch 1 (buttonhole), skip 1 st, work 1 dc in the last 27 sts (54 dc total). By creating this buttonhole, you'll ensure that the front closure accommodates your wooden buttons beautifully. Your bodice should appear neatly arranged but with an inviting opening now.
Row 5: Continue Bodice Rows
Ch 2, turn, work 1 dc in each st across, including the buttonhole from the previous row (54 dc). This row continues to build the bodice, ensuring a secure structure. The piece should feel sturdy and ready for the transition into the next section of your crochet baby romper.
Row 6: Shaping Armholes
Ch 2, turn, and work 1 dc in each of the next 13 sts, ch 5 (creating the armhole), skip 14 sts, work 1 dc in the next 13 sts, ch 5 (for the second armhole), skip the last 14 sts (54 dc total). Ensure the armholes are comfortably sized as you form the outer edges of your baby's romper, providing room for movement.
Row 7: Completing Bodice
Ch 2, turn, work 1 dc in the first 13 sts, then make 1 dc in each ch of the armhole, 1 dc in the next 13 sts, and lastly, work 1 dc in each st until you complete the row (54 dc total). This section should connect nicely around the armholes, creating an engaging silhouette for the crochet baby romper.
Row 8: Start the Body
Ch 1, turn your work, and switch to sc (single crochet). Work 1 sc in each st across, including armhole areas (54 sc total). This row indicates the transition from the bodice to the main body of your crochet baby romper, allowing for more structure and coverage.
Row 9: Continue Downward
Ch 1, turn, and continue with sc in each st across. Repeat this for 8 more rows (54 sc total in each). Your baby romper now begins to take shape, and you should feel the fabric become cozy yet breathable with every stitch.
Step 10: Begin Leg Openings
Ch 1, turn, and work 1 sc in the first 10 sts, ch 7 (leg opening), skip the next 34 sts (leg opening), work 1 sc in the remaining 10 sts (54 sc total). Ensure the leg openings have generous spacing for comfort, allowing your little one to move freely as they explore.
Step 11: Complete Leg Openings
Ch 1, turn, sc across the first leg opening, join with 1 sc in the skipped stitches, and finish the row by working 1 sc in remaining sts (54 sc total). Your crochet baby romper should now have defined openings for little legs, marking the transition to a complete garment.
Step 12: Binding Off and Finishing
Ch 1, work 1 sc in each st across each opening separately and finish with a sl st. Weave in loose ends. Your crochet baby romper is now finished, ready for its wooden buttons and delightful adventures, lending itself to the perfect cozy outfit for your little one!
How to Wash and Care for Your Crochet Baby Romper
Machine Washing: Use cold water on a gentle cycle to protect the integrity of your crochet baby romper. Avoid agitation to prevent felting or pilling.
Hand Washing: For a more delicate clean, hand wash in cold water using a mild detergent. Gently squeeze without twisting, ensuring your romper maintains its beautiful shape.
Drying/Blocking: Lay flat on a clean, dry towel to retain its form as it dries. Avoid hanging to prevent stretching, allowing it to maintain its cozy fit.
Storage: Store your crochet baby romper in a cool, dry place, away from direct sunlight. This helps preserve its color and texture, ensuring it's ready for your little one's next adventure!
Expert Tips for Crochet Baby Romper
Consistent Tension: Always check your tension to maintain an even fabric. Loose stitches could lead to uneven sizing, while tight ones can restrict movement.
Use a Stitch Marker: Place a stitch marker at the beginning of each row. This helps you accurately count your stitches and avoid losing track, especially vital in the bodice.
Double-Check Buttonholes: When creating buttonholes, ensure they're evenly spaced and large enough for your wooden buttons. Measure twice, crochet once!
Block Your Romper: After finishing, blocking your crochet baby romper enhances its shape and texture, giving it a professional finish.
Seamless Weaving: Weave in all loose ends carefully to avoid unraveling. This step not only tidies up the piece but also keeps it comfortable against your baby’s skin.
Crochet Baby Romper Variations
Ready to breathe your own creativity into this delightful crochet baby romper?
-
Color Swaps: Choose pastel pink or soft blue to create a fresh aesthetic for your little one's wardrobe.
-
Yarn Alternatives: Try a cotton-acrylic blend for a slightly different feel, providing both softness and durability as your baby moves.
-
Larger Size: Adjusting the foundation chain can easily create a version for older siblings, ensuring that your crochet skills grow along with your family.
-
Embellished Design: Add floral appliqués or personalized embroidery for a unique touch that will surely make this romper stand out.
-
Texture Play: Incorporate textured stitches, like bobbles or shells, to add extra charm and softness to the romper’s fabric.
-
Fringe Fun: Attach a playful fringe along the leg openings for a trendy twist that adds personality to the adorable outfit.
-
Ruffled Edges: Finish the romper with a delicate ruffled border for an extra feminine detail, making it a lovely choice for any occasion.
-
Belted Look: Add a matching crochet belt or tie to create a cinched waist effect, providing a stylish design element that can be adjusted as needed.
What to Pair with the Crochet Baby Romper
Imagine adorning your little one with an entire ensemble, elevating the charm of this cozy crochet baby romper.
- Matching Bucket Hat: A stylish hat to shield baby's eyes while enhancing the romper's aesthetic—perfect for sunny adventures!
- Sweet Booties: Tiny crochet booties to keep those little feet warm and fashionable, ensuring comfort on all summer strolls.
- Snuggly Blanket: Create a lightweight, breathable baby blanket for cozy moments—ideal for picnics or naptime.
- Charming Cardigan: A soft cardigan to layer over the romper; it adds warmth and flair for cooler summer evenings.
- Floral Appliqués: Personalize your romper with cute crochet flowers, adding a unique touch and a pop of color!
Sage Green Crochet Baby Romper FAQs
Can I substitute the recommended yarn for this crochet baby romper?
Absolutely! While a soft cotton blend is ideal for breathability, you can certainly explore other options like cotton-acrylic blends or all-acrylic yarn. Just remember that you may need to adjust your hook size or gauge, so always check the yarn label for the recommended hook.
How do I make the romper bigger or smaller?
It's quite simple! To adjust the size, you can modify the foundation chain length and add or reduce rows in the bodice or body. For instance, if you want a larger romper, increase the foundation chain or add extra rows before shaping the armholes. Just be sure to keep proportions uniform throughout to maintain that lovely fit!
Why does my crochet baby romper keep curling at the edges?
Don't panic! Curling edges are a common issue often caused by too tight stitches or improper tension. Try loosening your grip on the yarn and ensuring your stitches are even. You can also block the finished romper to shape it more to your liking, which can help relax those edges nicely.
What size hook should I use for this project?
For this crochet baby romper, a 4.5mm to 5mm hook (G or H in US terms) works best. This size strikes a balance between sturdiness and flexibility, giving you a lovely texture without making the fabric too dense. Always check your gauge with a small swatch to ensure your work is coming out as expected!
How do I fix dropped stitches?
It's an easy fix! If you catch a dropped stitch while crocheting, simply pull the loop back through to the surface. Use your crochet hook to gently snag the yarn and pull it back up to the current row. If you're unsure, don’t hesitate to re-do a few stitches to keep your work nice and tidy. Remember, practice makes perfect!
Leave a Reply