
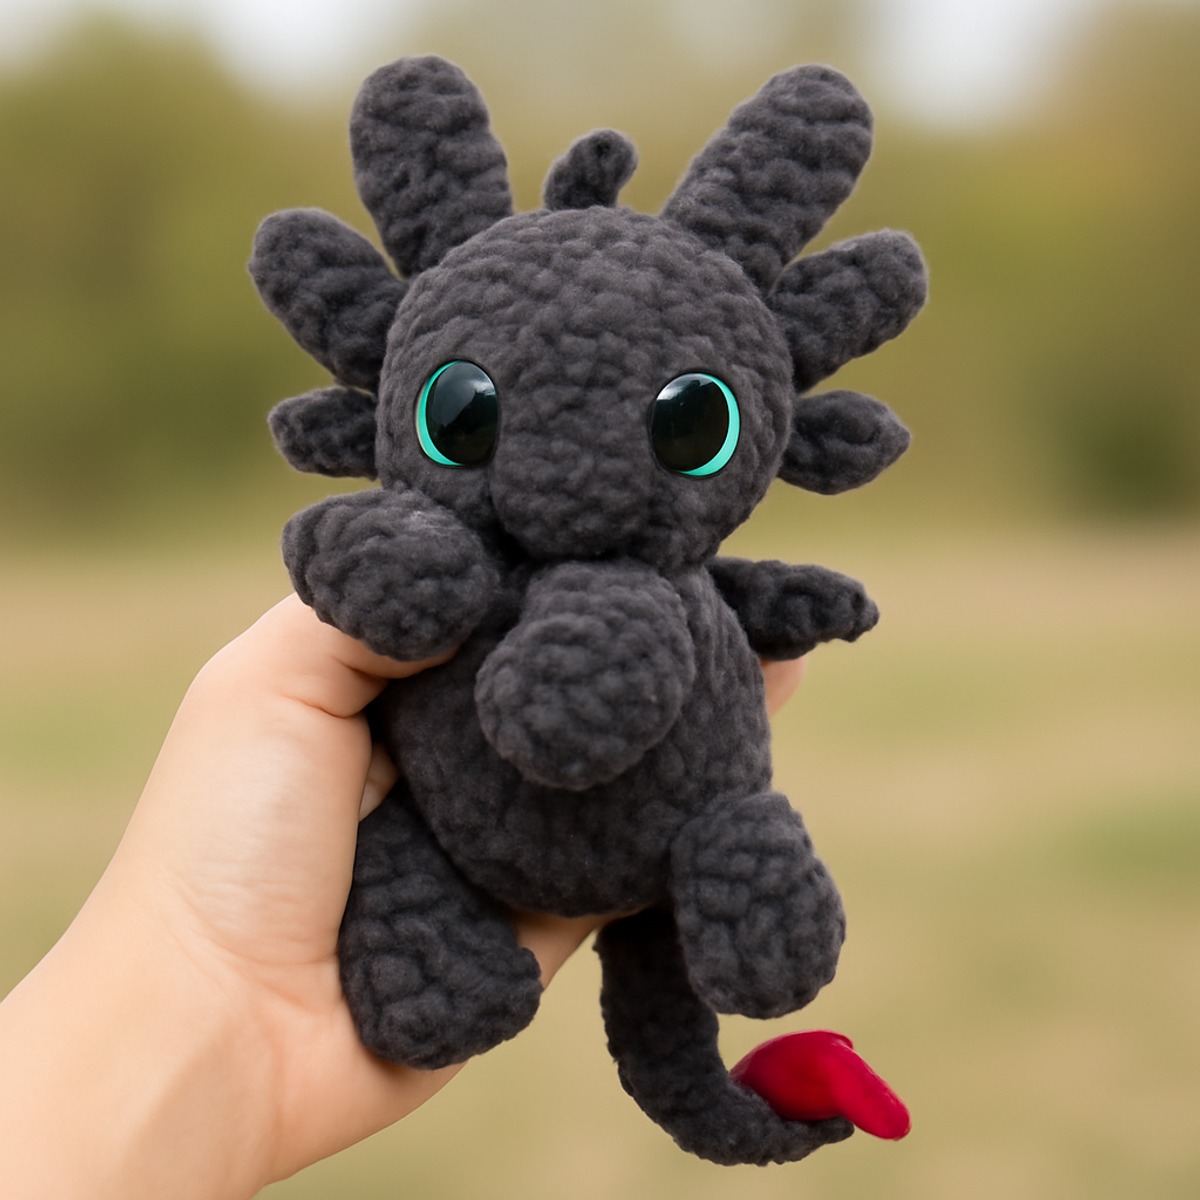
There’s something magical about crafting your very own plush dragon, a cuddly creature that holds the promise of endless adventures and companionship. In this blog post, I’m excited to share the delightful crochet dragon plush pattern, perfect for those looking to showcase their skills while letting their creativity soar. This intermediate project not only enhances your amigurumi techniques but also gives you the joy of customizing a soft buddy that fits right into your home decor or makes a cherished gift. As you work on this whimsical dragon, you’ll find it’s a wonderful way to unwind, with stitches that flow effortlessly and a plush texture that begs to be hugged. Are you ready to breathe life into your next cozy creation? Let’s dive in!
Crochet Dragon Plush Materials & Tools
- Worsted Weight Yarn – Approximately 150-200 yards total; use dark gray for the body and a smaller amount of red for the tail tip.
- 4.0mm (G-6) Hook – Ideal size for achieving excellent stitch definition in your crochet dragon plush.
- Safety Eyes (12 mm) – Adds charm to your dragon’s face, making it appealing and friendly.
- Yarn Needle – Essential for weaving in ends and securely attaching parts of your plush.
- Stitch Markers (optional) – Helpful for tracking rounds, especially when working on intricate shapes.
Why Will You Love This Crochet Dragon Plush?
Creativity Unleashed: Crafting this whimsical dragon allows you to express your artistic side as you customize colors and patterns. Each dragon can become a reflection of your imagination!
Intermediate Challenge: Perfect for those with amigurumi knowledge, this project helps sharpen your skills while creating something delightful.
Soft & Huggable: The plush texture and cuddly design make this dragon a soothing companion, appealing to both children and the young at heart.
Versatile Gifting: Create a personalized gift that stands out! Whether for birthdays or holidays, a handmade plush toy is always cherished.
Therapeutic Fun: Engage in a rewarding activity that promotes relaxation; crochet away your stress with each stitch!
Gauge & Sizing Notes
Don't skip the gauge swatch! Checking your crochet gauge is essential for the perfect fit and cuddly texture of your crochet dragon plush. A good rule of thumb is aiming for a tension swatch of around 4×4 inches (10×10 cm) to ensure your stitches are consistent and your plush turns out the right size. If you’re looking to adjust the dimensions, simply increase your starting chain in multiples of 6 or alter the number of increases in your rounds for those adorable limbs. If your tension doesn't match, and your swatch is too tight, consider going up a hook size to give your dragon the cuddly softness it deserves.
Step-by-Step Pattern for crochet dragon plush
Row 1: Start the Head
Begin by making a magic circle and working 6 sc into the circle (6 sts). Pull the circle tight, then join with a sl st to the first sc. Your work should have a small but solid base, starting to take shape as a round form.
Row 2: Increase Rounds
Ch 1, then work 2 sc in each stitch around (12 sts). This will increase the size of your dragon's head. The round shape should start to expand, becoming more pronounced as you continue to build your plush dragon.
Row 3: More Increases
Ch 1, sc in the next stitch, inc in the following stitch; repeat from * to * around (18 sts). You should see your head beginning to grow more substantial and rounded, perfect for accommodating the cute features of your dragon.
Row 4: Continue Shaping
Ch 1, sc in the next 2 stitches, inc; repeat around (24 sts). Your work will start curving outward, forming a lovely round head for your crochet dragon plush that has a friendly and charming appearance.
Row 5-8: Building Height
For Rows 5-8, simply work 1 sc in each stitch around (24 sts). These rows add height to the head; your plush should feel fuller and well-formed by this point, exhibiting a soft, plump look.
Row 9: Insert Eyes
At this point, position your safety eyes between Rows 7 and 8, about 6 stitches apart. Continue to work sc around (24 sts). The safety eyes will bring your dragon to life, offering a playful and whimsical expression.
Row 10: Forming the Neck
Ch 1, sc in the next 3 stitches, dec; repeat around (18 sts). This row begins shaping the neck, allowing the transition from the head to the body of your dragon plush. Your piece should start to narrow gracefully.
Row 11-12: Establish Body Base
Work 1 sc in each stitch around for 2 more rounds (18 sts each). The body of the crochet dragon plush begins to take form now; you should see a nice, round shape that's ready to gain dimension.
Row 13: Increase for Body
Ch 1, sc in the next 4 stitches, inc; repeat around (22 sts). This row creates a fuller belly, enhancing the cuddly appearance of your plush. Your dragon’s profile should start to showcase its inviting, soft form.
Row 14-16: Fill Out the Body
Continue working 1 sc in each stitch around for 3 rounds (22 sts each). This part adds significant body bulk, allowing your dragon plush to gain its cuddly, huggable proportions. Your work should feel plush and inviting to the touch.
Row 17: Start Shaping the Base
Ch 1, sc in the next 4 stitches, dec; repeat around (18 sts). The base is starting to define the shape; ensure the plush feels snug at the base while maintaining its fullness.
Row 18: Final Base Dec
Ch 1, sc in the next 3 stitches, dec; repeat around (14 sts). This round will shape the bottom of your crochet dragon plush, helping it stand securely and look adorable upright.
Row 19: Closing Up the Body
Ch 1, sc in the next 2 stitches, dec; repeat around (10 sts). You're nearing the end of the body; it should feel cozy and compact as you prepare to finish up this section and move on to the limbs.
Step 1: Create Limbs
For each limb, start with a magic circle and work 6 sc into the circle (6 sts). This begins crafting the adorable arms and legs for your dragon plush, ensuring they match up proportionately with the body.
Step 2: Increase Limbs
Ch 1, work 2 sc in each stitch around (12 sts). This will give your limbs the necessary size to be cuddly and cute, fitting nicely on the sides of your plush's body.
Step 3: Straighten Limbs
For the next 4 rows, work 1 sc in each stitch around (12 sts). These rows will add length to the limbs, making them snuggly and inviting. Your limbs should become little soft tubes ready for attachment.
Step 4: Finish the Limbs
To finish, fasten off, leaving a long tail for sewing. This little extra will help securely attach your limbs to the crochet dragon plush, ensuring they stay in place.
Step 5: Create the Tail
For the tail, start with a magic circle and work 6 sc into it (6 sts). The tail is an essential feature, perfect for giving your plush that whimsical charm alongside its body.
Step 6: Shape the Tail Tip
Ch 1, work 2 sc in each stitch around for the next row (12 sts). More increases will help shape a rounded and friendly tail for your crochet dragon plush, allowing it to be playful and engaging.
Step 7: Making the Tail Unique
Change to red yarn. Ch 1, work 1 sc in each stitch around for the remaining rows (12 sts). This color change offers a delightful touch, making your dragon's tail fun and distinct from its body.
Step 8: Attach the Tail
Fasten off, leaving a long tail, and sew the tail securely onto the back of the body. The tail should fit snugly, adding charm and character to your wonderful crochet dragon plush.
Step 9: Create Spikes
To make the spikes, ch 4, then work 1 sl st in the 2nd ch from the hook and 1 sl st in the next 2 ch (this creates one spike). Repeat until you have 5 spikes for your dragon.
Step 10: Final Spikes Placement
Attach the spikes evenly along the top of the head using the yarn needle. Your crochet dragon plush will now have a fabulous spiky crown, enhancing its playful and whimsical personality.
Final Step: Assembly
Make sure all parts are securely sewn together, adjusting limbs as necessary for balance. Your finished crochet dragon plush should now be complete, ready to take its place as a cherished companion!
How to Wash and Care for Your Crochet Dragon Plush
Machine Washing: Use a gentle cycle with cold water to keep your crochet dragon plush looking its best, avoiding agitation to prevent any potential damage.
Hand Washing: For delicate care, hand wash in cold water with mild detergent, gently squeezing the plush to clean it without harsh scrubbing.
Drying/Blocking: Lay your crochet dragon plush flat to dry away from direct sunlight to maintain its shape and plush texture, ensuring it stays cuddly and adorable.
Storage: Store your dragon plush in a cool, dry place, ideally in a breathable bag, to protect it from dust while keeping its adorable form intact.
What to Pair with Whimsical Cuddly Dragon Plush?
Create a delightful collection of cozy companions that spark imagination and warmth in any space.
-
Matching Dragon Wings: Add whimsical wings to your plush for a playful touch, enhancing its fantasy vibe.
-
Charming Dragon Scarf: Create a cozy scarf to wrap around your dragon, perfect for chilly adventures and photo ops.
-
Cuddly Dragon Friends: Crochet mini dragon versions in various colors as adorable companions to the main plush.
-
Playful Amigurumi Accessories: Craft whimsical accessories like hats or crowns, unleashing your creativity while adding charm to your dragon plush.
-
Cozy Decorative Pillow: Make a matching pillow that echoes your dragon's colors, creating a warm, inviting atmosphere in any room.
Expert Tips for Crochet Dragon Plush
-
Stay in the Light: When using dark yarn, work in a well-lit area to keep your stitches clear and avoid losing count.
-
Mark Your Progress: Utilize stitch markers at the end of each round. This helps track your rounds, preventing confusion while working in the round on your crochet dragon plush.
-
Count Stitches Carefully: It's easy to miscount with color changes—double-check your stitch count frequently to ensure your dragon’s shape stays consistent.
-
Secure Your Work: When attaching limbs and parts, take the time to sew securely. A loose limb can diminish the charm and cuddly quality of your plush.
-
Steam Block for Shape: Block spikes carefully with steam instead of wet blocking to retain their shape without flattening fibers in dark yarn.
Crochet Dragon Plush Variations
Unleash your creativity by customizing this delightful dragon plush to turn it into something uniquely yours!
-
Color Swaps: Try using vibrant blue or green yarn to create a completely different dragon persona. Each hue adds a distinct charm!
-
Lightweight Yarn: Opt for a lighter weight yarn to make a smaller version of your dragon. A cuddly pocket-sized companion might just become your new favorite.
-
Fun Patterns: Incorporate playful patterns like speckles or stripes into the body or limbs. This adds a whimsical twist and enhances your dragon's magical personality.
-
Themed Sets: Craft multiple dragons in different colors and styles, perhaps with unique accessories like hats or wings. Create a whole dragon family for endless imaginative play!
-
Plus Size Dragon: Use a bulkier yarn to make a larger, more huggable dragon. The added size can enhance the plush’s cuddly appeal.
-
Textured Finish: Consider adding a fringe or pom-poms for a fun textural twist. Textures add an inviting dimension that delights both the eyes and the hands.
-
Dragon Accessories: Create little scarves or capes with contrasting yarn for your dragon, elevating its charm and personality even further.
-
Adjustable Dimensions: Modify the number of stitches or rows to adjust the final size of your dragon; you can make a lighter toy for younger children or a larger companion for bigger hugs.
Crochet Dragon Plush FAQs
Can I substitute yarn types for this crochet dragon plush?
Absolutely! While the pattern suggests worsted-weight yarn, you can substitute with similar weights like Aran or a lighter worsted as long as you adjust your hook size accordingly. Just be sure to check your gauge and adjust as necessary to maintain the same finished size.
How can I make the crochet dragon plush bigger or smaller?
To adjust the size, try using a heavier yarn and a larger hook for a bigger plush. For a smaller version, opt for lighter worsted-weight yarn and a smaller hook. Remember to modify your stitch counts to keep the proportions appealing!
Why is my crochet dragon plush curling at the edges?
Don't panic! This is a common issue. Curling often occurs due to skipping stitches or an uneven tension. Check your tension and make sure you’re not missing any stitches in your rounds. Blocking your finished plush can also help flatten those curls!
What hook size should I use for the crochet dragon plush?
The recommended hook size is 4.0 mm (G-6). This size allows for optimal stitch definition, giving your crochet dragon plush a lovely, plush look. If you find your stitches are too loose or tight, feel free to adjust your hook size slightly.
I accidentally dropped a stitch while crocheting. How do I fix it?
It’s an easy fix! Pull the yarn back to the row where the stitch was dropped, and use a crochet hook to pick up the yarn back through the loop. Just be cautious and maintain a consistent tension when you work your way back to ensure your project keeps its beautiful shape.
How can I ensure my safety eyes are secure?
A great question! After inserting safety eyes, make sure to check that they’re tight and won’t come loose during playtime. It's a good idea to add a tiny drop of fabric glue behind the safety washer for extra security. Your crochet dragon plush will be safe for hugs and adventures!
Leave a Reply