
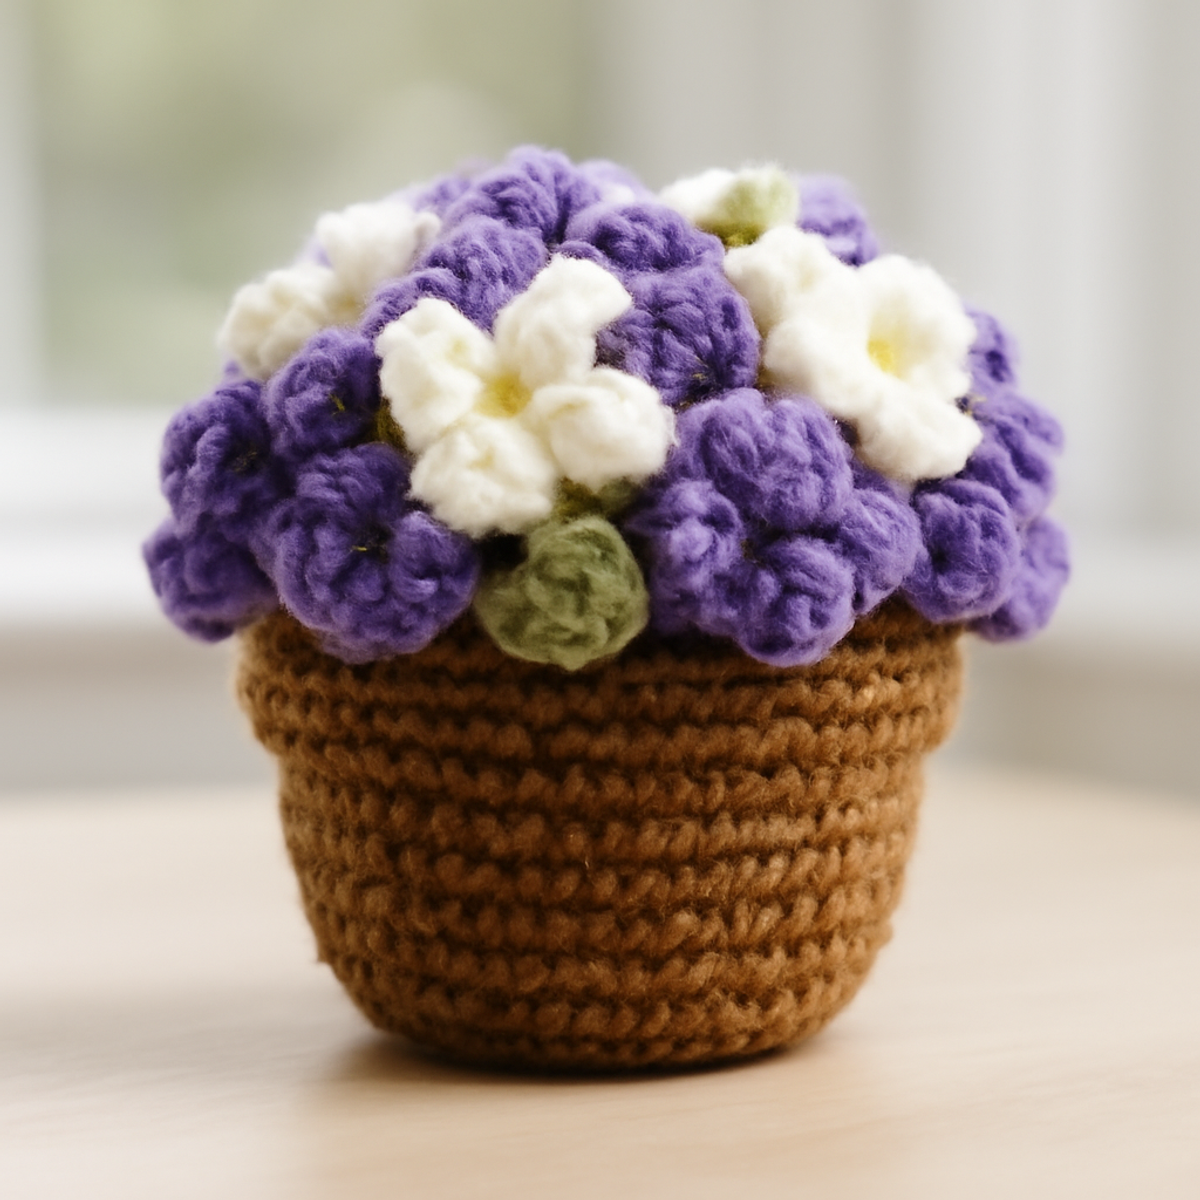
As I sat with my hook in hand, I couldn't help but smile at the vibrant splash of color around me, reminiscent of a sunny garden in full bloom. This Charming Crochet Flower Pot project is the perfect way to bring that joy indoors, transforming simple yarn into delightful decorations filled with whimsical flowers. It’s a wonderful opportunity for beginners and intermediates alike to practice essential crochet skills while creating a unique piece that brightens any space. Not to mention, this project is a fantastic stash-buster—perfect for using up those colorful yarn remnants! And with the ability to customize your flowers and pot in endless ways, no two creations will ever be alike. Get ready to start stitching and let your creativity flourish!
Charming Crochet Flower Pot Materials & Tools
- Worsted Weight Yarn – Approximately 150-200 yards in warm brown, rich purple, creamy white, and green for colorful blooms and leaves.
- 5.0mm (H-8) Hook – The perfect size for creating lovely, defined stitches with your yarn.
- Yarn Needle – Essential for weaving in ends to give your crochet flower pot a polished finish.
- Safety Eyes (optional) – Add a whimsical character to your flowers if you wish to give them a friendly face.
- Stitch Markers – Handy for keeping track of rounds and ensuring consistent tension throughout your project.
Embrace the joy of crafting your unique crochet flower pot today!
Why is this crochet flower pot a must-try?
Joyful Creativity: Dive into simple stitches while crafting a gorgeous flower pot that will light up any room.
Charming Aesthetic: The whimsical design brings a cheerful vibe, making it the perfect addition to your home decor.
Great for All Skills: Whether you're a beginner or an intermediate crocheter, this project offers a delightful challenge and learning opportunity.
Perfect Personalization: Customize your pot's colors and flower types, allowing you to create a unique piece every time.
Stash-Busting Fun: Use up that leftover yarn in your stash—this crochet flower pot is an excellent project for using colorful remnants!
Gauge & Sizing Notes
Don't skip the gauge swatch! Checking your crochet gauge is crucial for ensuring that your finished flower pot turns out just the right size. A standard crochet gauge for worsted weight yarn is typically around 4×4 inches (10×10 cm) = approximately 12-15 single crochets by 10 rows, but be sure to check your own tension to achieve the desired look. If you want to make your crochet flower pot larger or smaller, adjust your starting chain or rounds by working in multiples of 6 for the base. If you find your swatch is too small, simply switch to a larger hook size to achieve the correct tension. Happy crocheting!
Step-by-Step Pattern for Charming Crochet Flower Pot
Row 1: Create the Base
Start with a magic circle and make 6 single crochet (sc) stitches into the circle to form the base of your crochet flower pot. Pull the tail to tighten the circle, ensuring all stitches are snug. Your work should resemble a small, tightly cinched circle. (6 sts)
Row 2: Increase the Base
In this row, work 2 sc in each stitch around to create the pot's base shape. This will give it a nice, rounded look. Use a stitch marker to keep track of the beginning of each round. You should now have a larger circle. (12 sts)
Row 3: Continue Increases
For this round, make 1 sc in the first stitch, then 2 sc in the next stitch. Repeat this pattern around to continue growing your base. By spacing your increases, you’ll encourage the base to maintain a flat shape. Your round should look subtly wider. (18 sts)
Row 4: Grow the Base Further
Work 1 sc in the first two stitches, followed by 2 sc in the next stitch. Continue this pattern around the base. The flower pot begins to form a more defined shape, making it sturdy for the flowers you'll soon create. (24 sts)
Row 5-10: Build the Height
For these rows, work 1 sc in each stitch around, maintaining your stitch count at 24. Continue this until you reach your desired pot height, which should feel solid yet flexible enough to hold the floral components. Your work will now resemble a tall cylinder. (24 sts)
Row 11: Decorative Edge (Optional)
Add a decorative touch by switching to a contrasting color yarn. Work 1 sc in the first 5 stitches, then catch the next stitch with a puff stitch. This creates texture at the top of the pot. Your edge should feel more pronounced and visually appealing. (24 sts)
Row 12: Begin Flowers Assembly
Start by creating the flowers; make a magic circle and crochet 3 chain (ch) stitches, then 4 treble crochet (tc) stitches into the circle. This forms the first bloom's center. As you pull the circle tight, your flower should begin to take shape. (1 flower)
Row 13: Form Additional Florets
To create the additional flowers, repeat the last step, varying the colors used to create a mix of blooms. This layering of flowers will add depth and joy to your crochet flower pot. Each flower should have a playful appearance. (2-3 flowers)
Row 14: Create Leaves
For the leaves, chain 5 and in the second chain from the hook, create 1 sc, followed by 1 hdc in the next chain, and 2 dc in the last chain. Work back down the other side, continuing with a hdc and a sc in the final chain. Fasten off and create several leaves. (1 leaf)
Step 15: Assemble Flowers and Leaves
Once all your flowers and leaves are complete, secure them to the top of the crochet flower pot using whip stitches or slip stitches. Position your flowers and leaves creatively to enhance the whimsical charm of your crochet flower pot. This final touch brings your project to life!
Expert Tips for Your Crochet Flower Pot
-
Consistent Tension: Maintain an even tension across your flower petals to achieve a polished appearance. A relaxed grip helps in crafting uniform flowers.
-
Stitch Markers: Use stitch markers to track your row counts, especially during pot assembly. This can help prevent losing your place and ensure accuracy in your crochet flower pot.
-
Blocking Technique: Remember to block your finished pieces to help flowers maintain their shape and sit nicely. This final touch adds professionalism to your work.
-
Count Carefully: Always double-check your stitch counts, particularly during increases. Losing track can lead to uneven shapes, diminishing the overall beauty of your crochet flower pot.
-
Secure Ends: Weave in all loose ends meticulously to avoid unraveling. A clean finish elevates the charm of your handcrafted flower pot, ensuring it remains a delightful decor piece.
Crochet Flower Pot Variations
Embrace your creative spirit and tailor your crochet flower pot to perfectly suit your personal style and surroundings!
-
Yarn Substitutions: Try using lighter cotton yarn for a breathable feel, perfect for brighter colors. This change enhances the whimsical vibe of your design.
-
Color Block Pot: Alternate yarn colors in the pot's height for a playful striped effect. It layers a delightful twist to the overall design, inviting visual interest.
-
Size Adjustments: To create a smaller pot, reduce your initial base steps by one or two rounds. This mini version stays just as charming and cute!
-
Flower Diversity: Incorporate various flower types, such as cheerful daisies or elegant tulips, to enhance your collection. This variety in blooms makes your pot truly unique.
-
Textured Details: Add fringe to the bottom of the pot for a boho touch. This extra detail brings warmth and depth to your flower display.
-
Embellishment Fun: Consider sewing on small decorative beads to the flowers. The added sparkle elevates your crochet flower pot into a whimsical, eye-catching masterpiece.
-
Seasonal Themes: Switch the colors to reflect the seasons—pastels for spring or warm earth tones for fall. Each season can inspire a fresh take on this classic design.
-
Larger Bloom Layers: Create multiple flower layers for a fuller, more dynamic floral display. Transform the pot into a lively explosion of color and texture that draws the eye.
What to Pair with Charming Crochet Flower Pot?
Creating your whimsical flower pot opens up a world of delightful projects that can beautifully complement your handiwork.
-
Cozy Crochet Coaster: A set of coasters in matching colors can enhance your decor while protecting your surfaces.
-
Charming Mini Planters: Craft tiny pots with the same stitch pattern for a coordinated look, perfect for succulents or vibrant air plants.
-
Decorative Wall Hanging: Pair your flower pot with a colorful wall hanging that echoes the floral theme, adding visual warmth to the space.
-
Delightful Flower Bunting: Create a whimsical bunting of crocheted flowers that can be strung across a wall or window, enriching the cheerful atmosphere.
-
Colorful Throw Pillow: A pillow using your yarn colors can tie the room together, providing a comfy spot to relax while admiring your crochet flower pot.
Care Instructions for Crochet Flower Pot
-
Machine Washing: Use cold water on a gentle cycle to protect the integrity of your crochet flower pot. Avoid agitation to prevent any felting or pilling of the yarn.
-
Hand Washing: If you prefer, gently hand wash your crochet flower pot in cold water with mild detergent. Be careful not to twist or wring the piece, ensuring it retains its lovely shape.
-
Drying: Lay your crochet flower pot flat on a clean, dry towel to dry completely. Reshape gently if needed to maintain form and texture, allowing it to air dry away from direct sunlight.
-
Storage: Store your crochet flower pot in a cool, dry place when not in use. Avoid squeezing or folding to retain its shape and vibrancy, ensuring it's ready to display whenever you’d like!
Charming Crochet Flower Pot FAQs
Can I use a different yarn instead of worsted weight?
Absolutely! While I recommend using worsted weight yarn for the best results, you can certainly experiment with other yarn types. Just make sure to adjust your hook size accordingly. Thicker yarn may require a larger hook, while thinner yarn will need a smaller one. Keep in mind that your finished crochet flower pot may vary in size and appearance.
How do I adjust the size of my crochet flower pot?
Don’t panic! Increasing or decreasing the pot’s size is easy. To make it larger, simply add more rounds to the base and height sections. Conversely, to create a smaller pot, you can decrease the starting stitches in your base, or reduce the number of rows for the height. Just be mindful of keeping consistent tension throughout!
Why is my work curling at the edges?
This can happen sometimes, but it's an easy fix! Curling usually indicates that your tension is too tight. Try loosening your grip on the yarn or switching to a larger hook size to give your stitches more room to relax. Don't forget to block your piece after finishing; this can help to reshape those edges beautifully!
What do I do if I dropped a stitch?
Oh no, it happens to the best of us! If you notice a dropped stitch, simply grab a crochet hook and pull the yarn strand up to reinsert it back into the fabric of your work. If it looks tricky, don't hesitate to unravel a few stitches back to re-establish your pattern. Patience is key, and you’ll get it back on track in no time!
What size hook should I use for this project?
For the Charming Crochet Flower Pot, I suggest using a 5.0mm (H-8) hook. This size will give you a nice balance of defined stitches and flexibility in your project. If you’re using a different yarn weight, like bulky yarn, consider going up a size to maintain the drape and support the overall structure of your flower pot.
Can I use cotton yarn instead of acrylic?
Yes, you can absolutely use cotton yarn! It’s a wonderful alternative, especially if you're looking for a more breathable finish. Just keep in mind that the feel and drape of your crochet flower pot might vary slightly. Cotton tends to be more structured, which can create a beautiful, crisp appearance, perfect for showcasing your lovely flowers!
Leave a Reply