
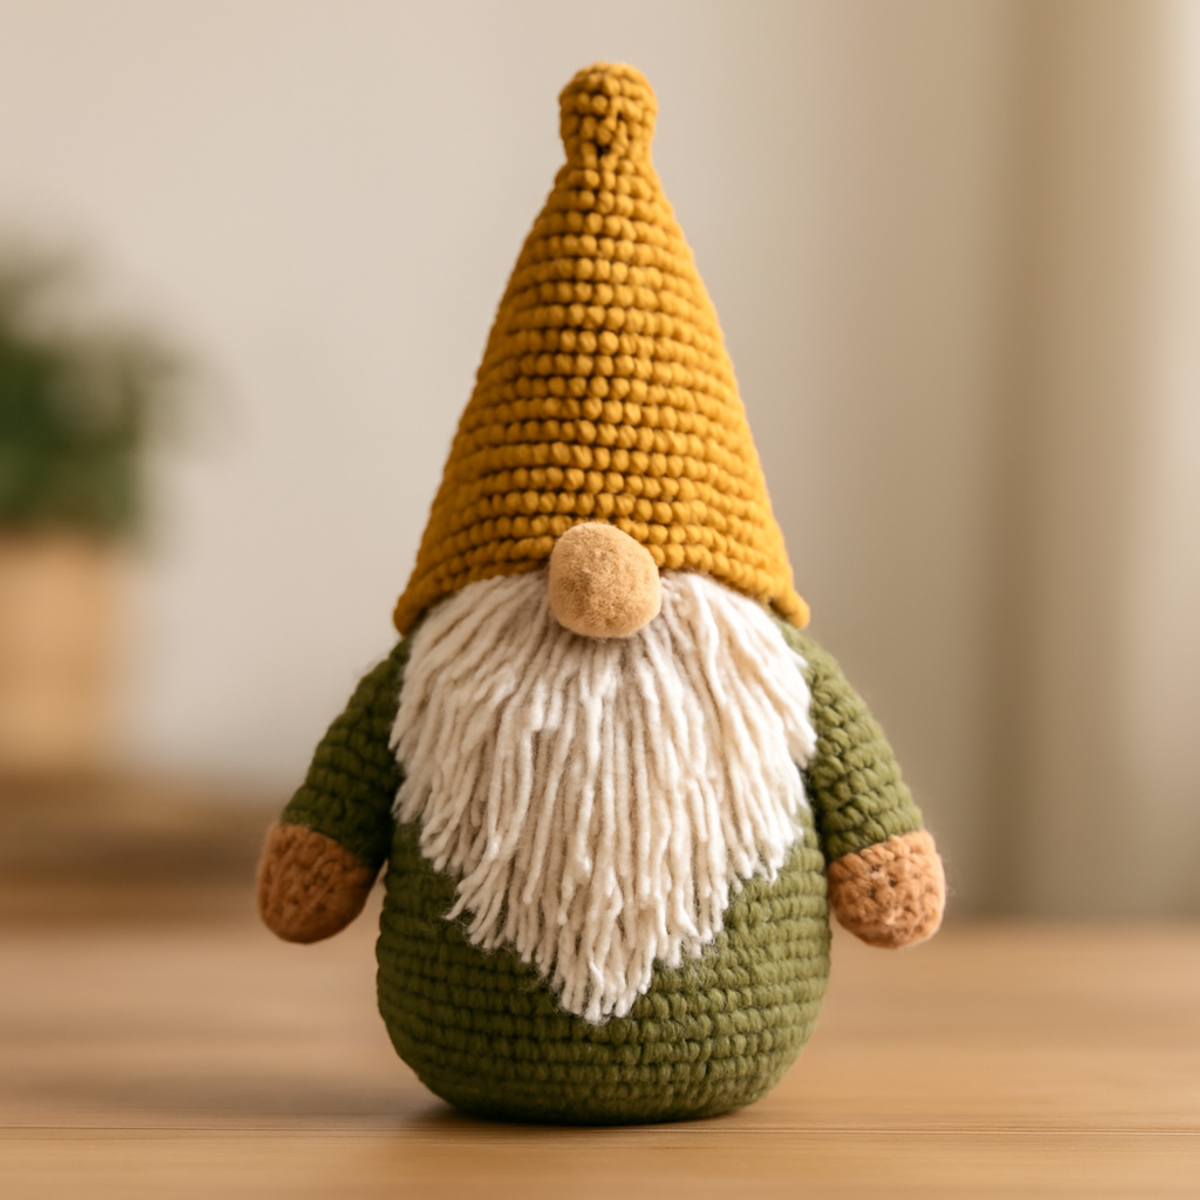
As I settled into my favorite nook, surrounded by soft yarns and the cozy glow of warm lights, my fingers began to dance with anticipation. Today, I’m thrilled to share my delightful crochet gnome pattern, perfect for adding a sprinkle of whimsy to your home decor or holiday celebrations. These charming gnomes are a joy to create, utilizing simple stitches that make them ideal for both beginners and seasoned crafters alike. What’s more, you can easily customize each gnome with your favorite colors and unique embellishments, turning them into treasured keepsakes or heartfelt gifts. With a manageable time commitment, you'll find that these cuddly companions will work up in no time, filling your space with their festive spirit. Let's dive into the world of whimsical crochet gnomes and infuse some warmth into your crafting journey!
Crochet Gnome Pattern Materials & Tools
- Worsted Weight Yarn – You'll need about 150-200 yards for each gnome, making this a great stash-buster for your favorite colors!
- 3.5mm (E) Crochet Hook – Ideal for achieving clear, even stitches that define your gnome's adorable features.
- Scissors – Essential for cutting yarn and trimming any excess fibers as you finish your project.
- Yarn Needle – Perfect for sewing pieces together and weaving in those pesky ends, ensuring a tidy finish.
- Fiberfill Stuffing – Use to give your gnomes a delightful, plump shape; be sure to stuff them firmly!
- 20mm Wooden Beads – These little gems make perfect noses, adding to the whimsy of your crochet gnome pattern!
Dive into this enchanting project, and let the crafting journey begin!
Why Choose This Crochet Gnome Pattern?
Fun & Whimsical: This pattern invites you to explore your creativity while crafting charming gnomes that brighten any space.
Beginner-Friendly: Even novice crocheters will find joy in creating these delightful figures using simple stitches, ensuring a stress-free crafting experience.
Quick Projects: With a manageable time commitment, you can whip up these cuddly companions in no time, perfect for last-minute gifts or decor.
Customizable: Unleash your artistic flair by experimenting with colors and embellishments, allowing each gnome to reflect your personal style or seasonal themes.
Adorable Decor: Once completed, these cheerful gnomes make for warm decorations, infusing your home with cozy charm during the holidays and beyond.
Gauge & Sizing Notes
Don't skip the gauge swatch! For your crochet gnome pattern, checking your tension ensures that your adorable gnomes come out just the right size. A standard gauge is often around 4×4 inches (10×10 cm), but as you create, remember to focus on achieving a comfortable fit rather than stressing over exact measurements. If your swatch is too small, try going up a hook size to loosen your tension; conversely, if it’s too large, consider using a smaller hook. To make these whimsical gnomes larger, increase your starting chain or initial rounds in multiples of 6 to maintain the desired shape. Happy stitching!
Step-by-Step Pattern for Whimsical Crochet Gnomes
Row 1: Start the Body
Begin your crochet gnome pattern by creating a magic ring. Work 6 sc into the ring, pulling the tail to close it tightly. The initial round establishes the base of your gnome’s body. Your work should be closed, and you will have (6 sts) in total.
Row 2: Increase for Shape
In the next round, work 2 sc in each stitch around to widen the body. This increase will give your gnome a lovely rounded shape as you continue to build its form. You should end the round with (12 sts) as it starts to take on a cup-like appearance.
Row 3: Continue Increasing
For Row 3, work 1 sc in the first stitch, then inc in the next around. Repeat this pattern to gradually increase your gnome's body size. As you stitch, your gnome will begin to resemble a plump little figure. Complete this round with (18 sts).
Row 4: Shape the Body
In this row, execute 1 sc in the first 2 stitches, then inc in the next as you progress around. This technique will help shape the gnome’s body further. By the end of this round, you’ll have (24 sts) and your gnome should appear even rounder.
Row 5-6: Work Even
For the next two rows, simply work 1 sc in each stitch around. This will give the gnome a steady height. After completing Row 6, take a moment to check that your work stands up nicely on its own. You’ll maintain (24 sts) in each round.
Row 7: Start Decreasing
To create the tapering for the gnome’s body, work 1 sc in the first 2 stitches, then dec in the next across the round. This will gradually narrow the base. By the end of this row, you should have (18 sts), and you’ll notice it's beginning to lose some bulk.
Row 8: Continue Shaping
In this round, work 1 sc in the first stitch, then dec in the next. Repeat this pattern all around, reducing the body size further. Your gnome should be nicely shaped now, maintaining (12 sts) as you continue to sculpt.
Row 9: Final Decrease
For the last decrease, work dec around to close up the body. It’s time to stuff your gnome firmly with fiberfill to give it volume. Finish this row with (6 sts), and your gnome should be shaping up beautifully, ready for the hat!
Round 1: Start the Hat
Begin the gnome's hat with a magic ring, and then work 8 sc into the ring. Pull the tail to secure. This will create the foundation for the fun hat shape that makes your crochet gnome so whimsical. You will have (8 sts) to work with.
Round 2: Increase Hat Width
In the second round, work 2 sc in each stitch around to increase the size of the hat. This will form the base of your gnome’s pointy hat, making it nice and wide at the bottom. Complete this round with (16 sts), and it should start to fan out.
Round 3: Define the Hat Shape
In this row, work 1 sc in the first stitch, then inc in the next. Repeat this pattern to create a comfortable snugness as the hat starts to rise. At the end of this row, you’ll have (24 sts) and the hat will begin to take on its classic shape.
Round 4-6: Continue to Work Even
For these rounds, simply work 1 sc in each stitch around. These rounds will elongate the hat, allowing it to reach a perfect height. After completing these, your hat should feel tall and whimsical, maintaining (24 sts) in each round.
Round 7: End the Hat
For the final row, work dec around to close off the top of the hat. Leave a long tail for sewing. Your crochet gnome's hat should feel snug but not too tight, finishing this round with (12 sts)—perfect for a fluffy pom-pom or sewing shut.
Nose Construction
To create the gnome’s nose, take the 20mm wooden bead and crochet a circle around it by making a magic ring with 6 sc. Pull the ring tight and fasten off, leaving a long tail for sewing it onto the body. This will add a delightful three-dimensional touch!
Beard Assembly
Cut strands of yarn for the beard; aim for about 10-12 pieces, each approximately 6 inches long. Fold them in half and attach them to the brim of the hat for a soft and cuddly look. Position them right under the nose; it’ll bring your gnome to life!
Step 1: Assembly
Now it's time for the fun part! Start by securing the hat atop the body using your yarn needle. Make sure it’s centered. Next, sew the nose onto the front of the body, positioning it right between the hat and beard. Your crochet gnome is coming together beautifully!
Step 2: Final Touches
Attach any arms and feet you’d like to crochet separately, or you can simply decorate the gnome with additional embellishments like buttons or unique features. This is your moment to let your creativity shine! Your whimsical crochet gnome is now ready to bring joy to your space!
Crochet Gnome Pattern Variations
Let your creativity run wild as you play with different ideas to make your crochet gnomes uniquely yours!
-
Yarn Weight Swap: Try using a bulky yarn for a fluffier, larger gnome that makes a bigger statement in your decor.
-
Fiber Alternatives: Switch to cotton yarn for a breathable option, perfect for summer displays that showcase those delightful gnome features.
-
Color Blocking: Create a multi-colored gnome by alternating between two or three colors in the body and hat for a vibrant, eye-catching piece.
-
Mini Gnomes: Consider crafting smaller versions of your gnomes, ideal for garlands or table centerpieces that add a touch of whimsy.
-
Textured Additions: Incorporate textures by using boucle or chenille yarn, adding cozy appeal to your handmade creations that are sure to delight the eye.
-
Playful Features: Customize facial expression by using embroidered eyes or felt pieces for a unique touch, making each gnome feel even more personal.
-
Seasonal Themes: Adjust colors to create themed gnomes for different holidays, like bright pastels for Easter or warm tones for autumn celebrations.
-
Embellished Hats: Add a charming pom-pom or funky tassel to the hat's tip for an extra flair that will make your gnome stand out in any collection.
How to Wash and Care for Your Crochet Gnome
Machine Washing: Use a gentle cycle with cold water when washing your crochet gnome to help maintain its shape and color, avoiding harsh agitation that may cause pilling.
Hand Washing: For best results, hand wash your gnome in cold water with mild soap; gently squeeze out excess water without wringing to prevent damage to the fibers.
Drying/Blocking: Lay your crochet gnome flat to dry, reshaping as necessary. This helps retain its whimsical form and prevents any distortion from hanging or tumbling in the dryer.
Storage: Store your gnomes in a cool, dry place away from direct sunlight to keep colors vibrant and protect them from any potential damage during off-seasons. Using proper care for your crochet gnome pattern will ensure these adorable figures remain charming for years to come!
Expert Tips for Crochet Gnome Pattern
-
Keep Tension Even: Use smooth yarn to avoid splitting during your stitches, which can disrupt your project’s flow and appearance.
-
Count Your Stitches: After each round, double-check your stitch count to ensure you stay on track. Losing count can lead to uneven shapes or sizing.
-
Stuff Firmly: When assembling, make sure to stuff the body sufficiently. A firm gnome will hold shape and add a delightful plumpness to your crochet gnome pattern.
-
Block Your Work: Gently block your finished gnome to achieve a polished look, allowing it to take on its intended shape without losing any charm.
-
Embrace Customization: Don't hesitate to experiment with colors and embellishments! Each gnome can reflect your unique style or seasonal flair, enhancing its whimsical nature.
What to Pair with Whimsical Crochet Gnomes?
Immerse yourself in the joy of pairing by creating delightful companions that echo the charm of your gnomes.
-
Charming Crochet Mushroom: A playful mushroom adds a whimsical touch to your gnome display and is a breeze to whip up! It captures the spirit of nature, enhancing your enchanting scene.
-
Cozy Crochet Mini Blanket: Stitch a soft blanket to create a cozy setting for your gnomes. Its warmth invites tactile comfort, perfect for cuddly decor.
-
Festive Crochet Ornaments: Create small ornaments for your tree or home that echo the gnome’s colors. They turn your gnome theme into a delightful holiday showcase.
-
Adorable Crochet Garden Flowers: Bloom where you are planted with flowers that complement your gnomes. Their vibrant colors can harmonize your crochet gnome pattern beautifully.
-
Whimsical Crochet Banners: Stitch a cheerful banner to drape above your gnome display. Adding letters or motifs can personalize the space for celebrations or daily joy.
Let your creativity flourish as you explore these fun pairings!
Whimsical Crochet Gnomes: A Quick and Easy Pattern FAQs
Can I substitute yarn types for this crochet gnome pattern?
Absolutely! While a worsted weight acrylic or cotton blend is recommended for softness and easy care, you can experiment with different fibers. Just keep in mind that yarn texture might affect the final appearance of your gnome. If you choose a thicker yarn, you may need to adjust your hook size for proper gauge.
How can I make my gnome larger or smaller?
To adjust the sizing of your gnome, you can either use a thicker yarn with the corresponding larger hook or simply modify the number of rounds in the body and hat while maintaining the standard increase and decrease patterns. This flexibility allows you to create mini gnomes or even larger festive ones!
What should I do if my work is curling?
Don't panic! Curling is often a result of uneven tension or not enough stitches in a round. To fix this, make sure to count your stitches and maintain even tension. If it's already curled, you can gently block your gnome with steam to help shape it into its intended form.
Why do my stitches keep getting loose while I crochet?
If you find your stitches getting loose, it could be that you're crocheting with an inconsistent tension. I recommend slowing down a bit to focus on maintaining an even pull of the yarn through each stitch. Practice will help you achieve that lovely rhythm!
How do I fix a dropped stitch in my crochet gnome pattern?
It's an easy fix! If you notice a dropped stitch, simply use a yarn needle to pull the yarn up through the correct stitch below it, ensuring to maintain the pattern. If necessary, you can also re-crochet it. Always be mindful of your stitch count afterward to keep things in check!
What hook size works best for fine details?
For the finest details of your gnome, such as facial features or tight stitches, a 3.5 mm (E) crochet hook is your best bet. If you’re looking for even tighter stitches, feel free to downsize to a 3.0 mm (C) hook. Just remember to adjust your yarn accordingly if you switch!
Leave a Reply