
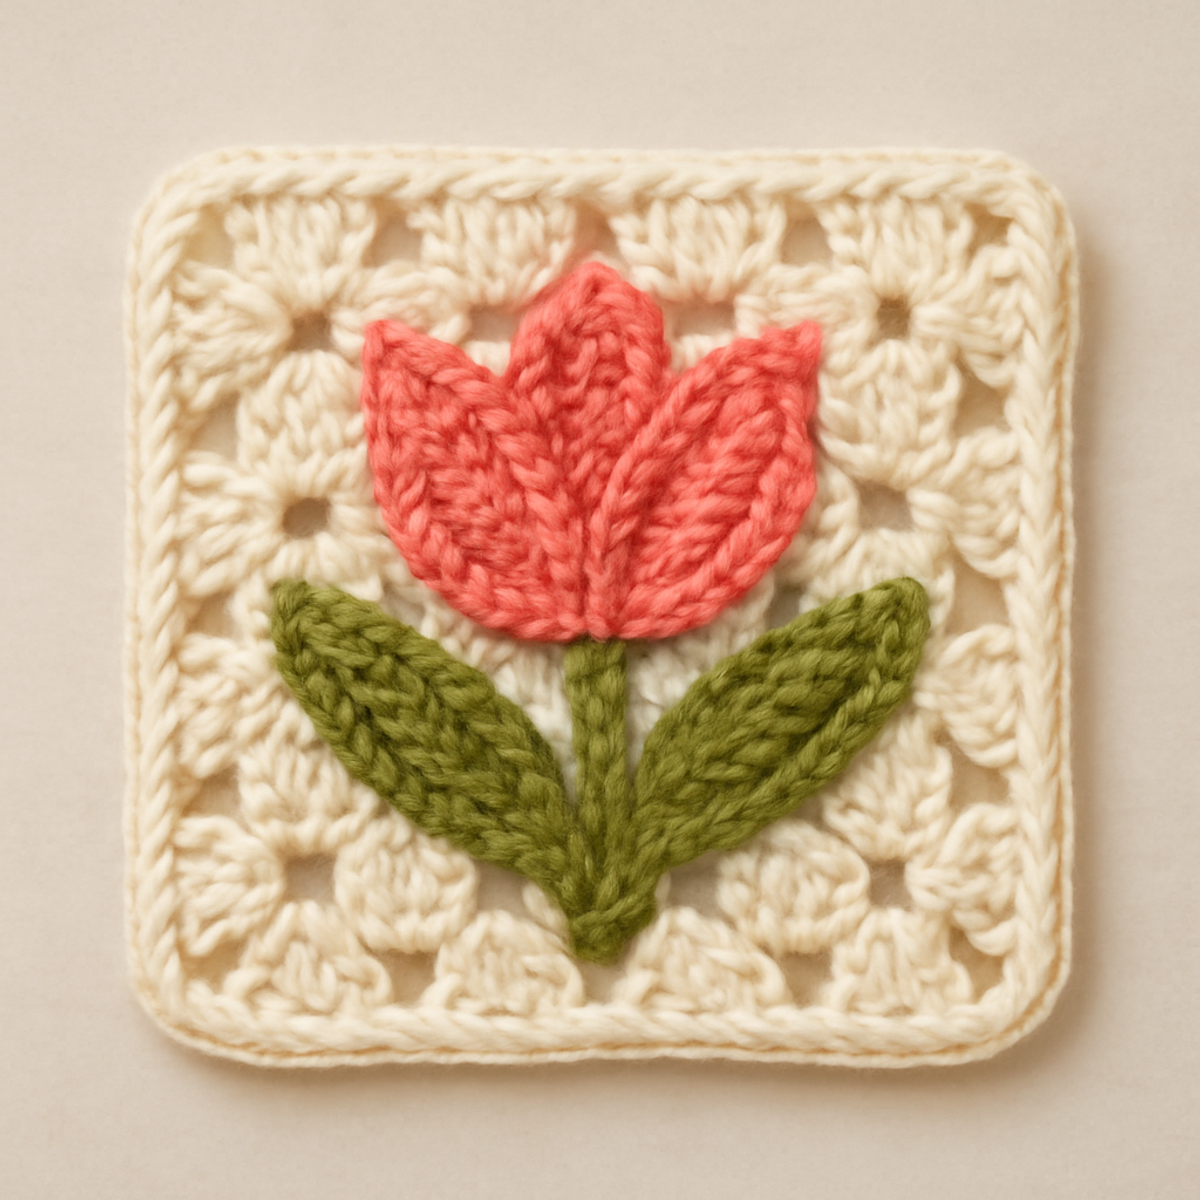
As I sat outside with my favorite yarn, a sudden warmth enveloped me—spring was finally in full bloom. Inspired by the vibrant colors and life around me, I couldn't resist crafting the delightful 'Tulip Bloom Granny Square.' This crochet granny square pattern is not just a cheerful project; it's a celebration of nature's beauty, making it perfect for both the beginner and the seasoned crocheter. One of the best aspects of this square is its versatility; use it as a standalone decorative piece or stitch multiple squares to create a cozy blanket that radiates warmth. Plus, the charming tulip design transforms any space, inviting smiles and compliments. Ready to add a touch of blooming joy to your crochet collection? Let’s dive into this colorful adventure!
Tulip Bloom Granny Square Materials & Tools
To embark on this radiant crochet journey, gather the following essentials:
Yarn
- Medium Weight Yarn (Worsted) – Choose a blend, such as cotton or acrylic-cotton, ensuring a soft and vibrant texture. Expect around 100-150 yards for multiple squares.
Tools & Notions
- 4.0-5.0mm (G-6 to H-8) Hook – A perfect match for worsted yarn, allowing for smooth stitch work.
- Scissors – Keep handy for snipping yarn ends while working on your crochet granny square.
- Yarn Needle – Essential for weaving in ends and sewing squares together.
With these materials, you're all set to create your blooming masterpiece! 🌷
Why Choose This Crochet Granny Square?
Unique Floral Design: Featuring a delightful tulip motif, this crochet granny square brings a burst of nature indoors, perfect for brightening any space.
Beginner-Friendly: With simple stitches and clear instructions, this project is ideal for both beginners and intermediate crocheters looking to hone their skills.
Versatile Use: Whether it's a standalone decor item or part of a larger crochet masterpiece, this square adapts beautifully to any project.
Comfortable Texture: The medium-weight yarn ensures a plush, cozy feel, perfect for everything from coasters to cushions.
Spring Vibes: Celebrate the season with this cheerful pattern that resonates with the vibrant colors of spring.
Gauge & Sizing Notes
Don't skip the gauge swatch! Ensuring your tension is correct for the crochet granny square is essential to guarantee your finished project fits perfectly. For this Tulip Bloom Granny Square, a general guideline is to aim for approximately 4×4 inches (10×10 cm) to achieve the ideal look, though specific measurements can vary based on your personal crochet style. If you desire a larger square, simply increase your starting chain in multiples of 6. Conversely, if your tension doesn't match the gauge, consider adjusting your hook size—if your swatch is too small, try going up a hook size for a looser tension. Happy crocheting!
Step-by-Step Pattern for Tulip Bloom Granny Square
Row 1: Foundation Chain
Begin your tulip bloom granny square by making a slip knot and chaining 6 (ch 6). Join the chain into a ring with a slip stitch (sl st) in the first chain to form a loop.
Round 1: First Round of Clusters
Ch 3 (counts as 1 dc), then work 2 dc (double crochet) into the ring. Follow with (ch 2, 3 dc) for a cluster. Repeat this 3 more times, ensuring to chain 2 between clusters, for a total of 4 clusters. Join with a sl st to the top of the ch 3 to close the round (12 sts).
Round 2: Petal Formation
Ch 3 (counts as 1 dc), then work 2 dc in the first ch-2 space. Ch 2 and work 3 dc in the same space. Move to the next ch-2 space and repeat this process until you have 4 petals formed. Each petal consists of 3 dc, ch 2, and 3 dc. Join with a sl st to the top of the ch 3 to close the round (24 sts).
Round 3: Tulip Detail
Begin with a ch 1 (counts as sc). In the same stitch, work (sc, hdc, dc) to create the base of the tulip in the center of each petal. This will create dimension and a flower-like effect. Repeat across all 4 petals, then join with a sl st. Your tulip’s center should be defined with raised stitches (32 sts).
Round 4: Leaf Contouring
In the next round, start in any ch-2 space with (ch 1, sc, hdc). Follow with 2 dc and ch 2; then repeat 2 dc back in the same space to form leaves. Continue this in alternating petals, and sl st to close the round. Your work should begin to fan out (40 sts).
Step 5: Finalizing the Granny Square
Ch 1 and evenly sc around the entire square edge for a neat finish, ensuring 3 sc in each corner to maintain the square shape. This final touch not only reinforces the edges but also adds a polished look. Finish with a sl st and weave in your ends (48 sts).
Step 6: Blocking and Assembly
Once finished, gently block your tulip bloom granny square to achieve a flat, even square. This step enhances the texture and visual appeal. If you are creating multiple squares, join them by slip stitching edges together for a blanket or throw. Enjoy the vibrant beauty of your completed crochet granny square!
Customizable Crochet Granny Square Ideas
As you embark on creating your charming crochet piece, feel free to let your creativity shine through by customizing this pattern to fit your style!
- Yarn Substitutions: Experiment with cotton or bamboo yarn for a summer feel, offering breathable options for warmer months.
- Color Play: Use a pastel palette for spring or warm earth tones for a cozy fall vibe. Let the seasons inspire your choices!
- Larger Size: Adjust the hook size or increase the chain length to create a larger square, perfect for bigger projects like throws.
- Mini Granny Version: Create smaller squares by reducing the foundation chain, ideal for coasters or as a decorative accent.
- Fringe Detail: Add playful fringe around the edges for a boho twist that enhances the lively character of your tulip design.
- Textured Borders: Incorporate a bold textured border using front post and back post stitches, giving your square a unique, dimensional look.
- Embellishments: Experiment with buttons or fabric flowers sewn into the center for added charm and personality!
- Seasonal Theme: Change the tulip colors to holiday shades—red and green for Christmas or pastel for Easter—to celebrate various occasions.
Let your imagination bloom just like the vibrant tulips in your crochet granny square! 🌷
Expert Tips for Crochet Granny Square
-
Gauge Matters: Always create a gauge swatch. This ensures your stitch count aligns with the desired size, helping you avoid disappointment later on.
-
Consistent Tension: Keep an eye on your tension, especially with the tulip motif. A uniform tension will help the squares fit together seamlessly during assembly.
-
Mind the Count: Use a stitch marker when chaining or working in rounds. It’s easy to lose track, and a marker helps maintain your stitch count accurately.
-
Don’t Skip Blocking: Blocking is crucial for achieving a flat and polished finish. It enhances the textures created by your stitches and sets your square beautifully.
-
Finishing Touch: When adding a border, ensure you distribute stitches evenly, placing more in corners. This keeps the edges smooth and helps maintain the square shape.
-
Stay Organized: Keep your workspace tidy and yarn ends trimmed while you work. A clean area minimizes distractions and allows you to focus on your crochet granny square.
What to Make after Tulip Bloom Granny Square?
As you bask in the joy of crafting your vibrant crochet granny square, consider these delightful projects to accompany your blooming creation.
- Cheerful Coasters: Perfect for adding a pop of color to your tables while echoing the tulip's design.
- Matching Pillow Covers: Create a stunning set by designing pillows that feature your beautiful tulip squares, inviting warmth into your living space.
- Charming Blanket: Assemble multiple granny squares for a cozy throw, perfect for cool evenings and family gatherings.
- Delightful Tote Bag: Use the tulip squares to craft a unique bag that showcases your crochet skills and brightens your day.
- Springtime Wall Hanging: Stitch your granny squares together to make an eye-catching wall display that brings nature’s beauty indoors.
Each project will enhance your crocheting experience and create a vibrant atmosphere in your home!
How to Wash and Care for Your Crochet Granny Square
-
Hand Washing: Gently hand wash your crochet granny square in cold water with a mild detergent. Avoid vigorous agitation to prevent any felting or pilling on the delicate stitches.
-
Drying/Blocking: Lay your finished square flat on a clean dry towel. Reshape it gently into its original form and allow it to air dry completely to maintain its lovely texture and vibrant colors.
-
Storage: Store your crochet granny square in a cool, dry place away from direct sunlight. This helps prevent fading and keeps your beautiful tulip design looking fresh and inviting.
-
Avoiding Wrinkles: If your square needs freshening up, steam block it with a cool iron. This will remove any wrinkles while preserving the intricate details of your crochet granny square.
Tulip Bloom Granny Square FAQs
Can I substitute yarn for my crochet granny square?
Absolutely! You can easily swap out yarn types. While cotton brings a lovely softness and sheen, acrylic offers durability and colorfastness. Just remember that the weight should be similar, ideally a medium weight (worsted), to maintain the pattern's integrity.
How can I adjust the size of my granny square?
If you want to make your crocheted granny square bigger or smaller, a simple adjustment in hook size or yarn weight can help. Using a larger hook will create looser stitches and a bigger square, while a smaller hook will yield a tighter, smaller square. You can also increase the total number of rounds for a larger piece, but be sure to maintain even stitch counts for a neat shape.
Why is my work curling at the edges?
Don't panic! Curling can happen if your tension is too tight or if you’re working with a fiber that isn't holding its shape well. I recommend checking your tension while you crochet—working with a larger hook or yarn might help. Additionally, blocking your finished square can help it lay flat and look tidy.
What size hook should I use for this pattern?
For the Tulip Bloom Granny Square, a hook size of 4.0-5.0mm (G-6 to H-8 in U.S. terms) is ideal. This range complements the medium weight yarn nicely and allows for even stitching. Adjust if you're using a different yarn type, but always test your gauge first!
How do I fix dropped stitches in my crochet granny square?
It’s an easy fix! Simply pull the yarn back to the last completed stitch and use your hook to retrieve the dropped loop. Reinsert it into your work and continue crocheting as normal. Practicing this technique on scrap yarn can really boost your confidence!
What should I do if my tulip motif doesn't look right?
If the tulip doesn’t appear as expected, ensure you’re following the instructions accurately and watch for stitch counts on each round. Also, maintaining consistent tension throughout your work is key—this will help the flower remain defined and lovely. If it’s still not working, consider pulling it apart and redoing those rounds slowly until you're satisfied!
Leave a Reply