
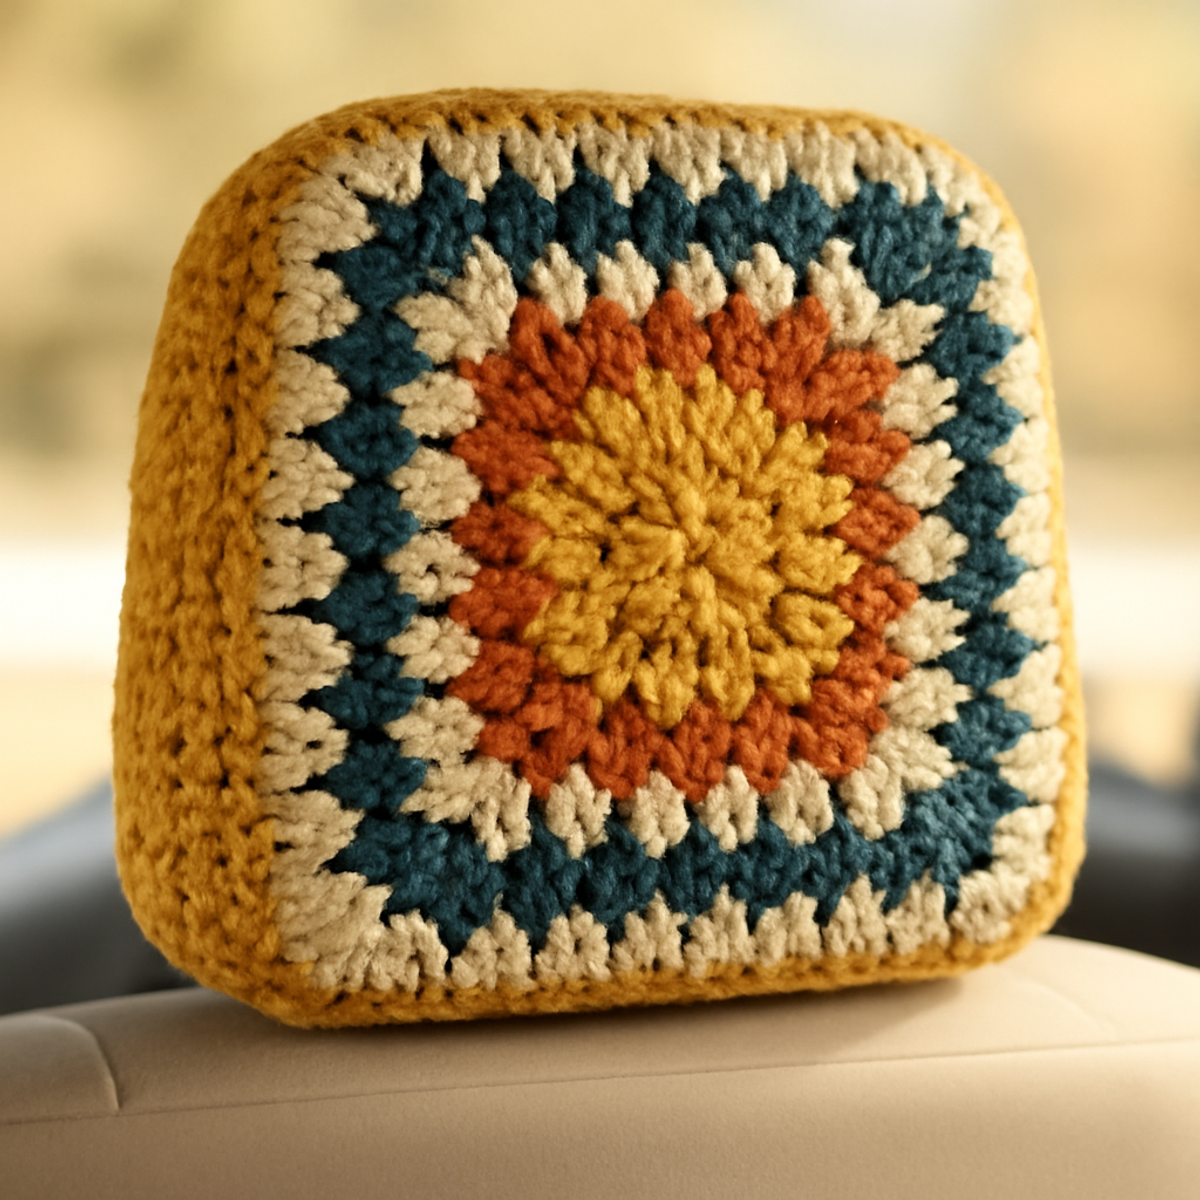
As I settled into my car on a sunny afternoon, I couldn’t help but notice that my plain headrest was calling for a splash of color and warmth. That’s when the idea for a crochet headrest cover came to life. This cozy project not only elevates the aesthetic of your car’s interior but also serves the practical purpose of protecting your headrests from wear and tear. Designed for the adventurous intermediate crocheter, this Chic Granny Square Headrest Cover allows you to show off your favorite yarn while reimagining an often overlooked space. Plus, it’s a fantastic way to use up leftover yarn scraps and create a functional piece that enhances your driving experience. So, if you’re ready to transform your vehicle into a cozy retreat with vibrant textures and a satisfying sense of accomplishment, let’s dive into this delightful project and start making your own unique crochet headrest cover!
Crochet Headrest Cover Materials & Tools
-
Yarn
- Bulky or Super Bulky Yarn (Weight 5-6) – Aim for about 150-250 yards, made from cotton or acrylic for durability and maintenance ease.
-
Tools & Notions
- 6.5mm (K) or 9mm (M) Hook – Choose this size to create the thick, cozy texture of your crochet headrest cover.
Why Make a Crochet Headrest Cover?
Transformative Appeal: With its chic granny square design, this crochet headrest cover is a stunning way to revamp your car's interior. Cozy Texture: The purposeful blend of colors and stitches results in a warm, inviting feel that enhances your driving environment.
Functional Protection: Beyond aesthetics, this project protects your headrests from wear and tear, ensuring longevity and durability. Creative Outlet: Ideal for intermediate crocheters, it offers the chance to flaunt your yarn stash and creativity. Whether you choose playful pastels or bold hues, each cover becomes a personalized statement piece, making every journey more enjoyable!
Gauge & Sizing Notes
Don't skip the gauge swatch! Checking your tension is crucial for ensuring the fit of your crochet headrest cover. A solid guideline is to aim for a 4×4 inch (10×10 cm) square with approximately 12 double crochets and 8 rows. If you find that your tension is either too loose or too tight, adjusting the size is simple: to make your headrest cover larger, increase your starting chain in multiples of 4. Conversely, if your swatch is too small, try going up a hook size to achieve the desired measurements. Happy crocheting, and enjoy every stitch of your cozy crochet headrest cover!
Step-by-Step Pattern for Crochet Headrest Cover
Row 1: Foundation Chain
Begin by making a slip knot, then ch 36 to create the foundation chain for your crochet headrest cover. This starting chain will form the width of your project. Ensure your chain is not too tight; it should lay flat and have a slight flexibility to accommodate the design.
Row 2: First Row of Single Crochet (sc)
Starting in the second ch from the hook, work 1 sc in each ch across, totaling 35 sc. This row will establish a solid base for your granny square pattern. After completing this row, your work should maintain a neat, even tension and lay flat.
Row 3: Begin Granny Square Motif
To start forming the granny square, ch 3 (counts as your first dc), then in the same stitch, work 2 dc (this counts as your first cluster). Skip 2 stitches, then work (3 dc in the next stitch, skip 2 stitches), repeating across. Finish the round with a sl st to the top of the ch 3. You should have 5 clusters.
Row 4: Next Round of Granny Square
Ch 3, work 2 dc in the same space, then (ch 1, working in the ch-1 space from the previous round, make 3 dc). Repeat from * to * for each corner, ensuring to create a proper square shape. At the end of this round, you should have 5 corners and 8 clusters.
Row 5: Building Up the Motif
Continue to grow your granny square by repeating the previous round. Ch 3 at the beginning, then cluster 3 dc into each ch-1 space from the previous round, creating the square pattern further. After this round, you should have a total of 8 clusters on each side of your crochet headrest cover.
Row 6: Check Your Size
Once you reach your desired dimensions (approximately 10–12 inches square), it's time to finish the last round of clusters. Ensure your work is flat and the edges are even. If necessary, adjust the clusters by adding or reducing stitches to achieve a consistent shape as you prepare for the edging.
Step 7: Edging
For a polished finish, work a round of sc around the entire piece. Start with a sc in each dc from previous rounds and 3 sc in each corner to maintain shape. This edging will not only secure the design but also prevent any unraveling. Your crochet headrest cover should now have that lovely, snug fit.
Step 8: Assembly
To finish, fold the cover to fit your headrest size, align the edges, and seam them together using a sl st or your preferred joining method. Ensure the fit is snug around the corners and that your work remains neat. After seaming, weave in any loose ends and block the piece if desired to help shape it. Enjoy the cozy, inviting feel of your completed crochet headrest cover!
What to Pair with Chic Granny Square Headrest Cover
Embrace the joy of crafting a cohesive style for your vehicle with these delightful projects that complement your crochet headrest cover beautifully.
-
Cozy Seat Cushion: Create a matching cushion to provide ultimate comfort while harmonizing with your headrest cover's colors and textures.
-
Vibrant Car Blanket: A colorful throw blanket can bring warmth and continuity to your car's interior, inviting snuggly road trips and weekend getaways.
-
Adorable Keychain: Craft a mini-granny square keychain to carry a piece of your cozy aesthetic everywhere you go, adding a fun touch to your keys.
-
Colorful Coasters: Make a set of coasters to protect your cup holders, using the same yarn to maintain a unified look throughout your vehicle.
-
Stylish Storage Bag: Crochet a storage bag for your essentials that matches your headrest cover, ensuring everything stays organized while showcasing your creativity.
Crochet Headrest Cover Variations
Explore delightful possibilities that allow you to personalize your crochet headrest cover and showcase your unique style.
-
Colorway Swaps: Experiment with soft pastels or bold hues to match your car’s interior vibe. Each color transforms the ambiance of your space.
-
Yarn Substitutes: Try fibers like bamboo or soft wool blends for added texture and comfort. Different yarns can completely change the overall feel of your project.
-
Size Adjustments: Customize the dimensions based on your vehicle’s headrest. Whether snug or oversized, adapting the size makes this cover truly yours.
-
Pattern Modifications: Incorporate adorable motifs like bobbles or puff stitches for extra flair. These additions create visual interest and charm in your design.
-
Textured Borders: Add a playful fringe or a sweet pom-pom edging for a whimsical touch. The added texture can elevate the cozy feel of your headrest cover.
-
Color Blocking: Mix and match multiple shades in a fun color-blocked design. This technique can brighten up your interior and make your piece a conversation starter.
-
Embellished Details: Personalize with embroidered initials or a cute design in the center. Small embellishments can make your crochet headrest cover a true piece of art.
-
Durability Enhancements: Consider incorporating a waterproof lining inside for those road trips. This modification not only protects but extends the life of your beautiful creation.
How to Wash and Care for Your Crochet Headrest Cover
Machine Washing: Use cold water on a gentle cycle to protect the integrity of your crochet headrest cover, avoiding any agitation that may lead to felting or distortion.
Hand Washing: For added care, consider hand washing in cold water with mild detergent. Gently immerse your cover, swirl it briefly, then rinse thoroughly before proceeding to drying.
Drying/Blocking: Lay your crochet headrest cover flat on a clean towel to dry, making sure to reshape it as needed. This will help maintain its form and keep those beautiful granny squares looking their best.
Storage: Keep your headrest cover in a cool, dry place and avoid folding it tightly to prevent creases. Proper storage will ensure its cozy allure remains intact for your driving adventures.
Expert Tips for Your Crochet Headrest Cover
-
Manage Your Tension: Keep an eye on your tension throughout the project. A loose crochet headrest cover might slip off, so practice consistent pressure in your stitches.
-
Count Carefully: Count your stitches at the end of each round to avoid missing any. It's easy to drop a stitch when switching between clusters, which can throw off your design.
-
Seam Neatly: When assembling your crochet headrest cover, ensure that the edges are aligned perfectly before seaming. A neat finish enhances the overall look and durability.
-
Color Change Technique: When switching colors, ensure a seamless transition by avoiding excessive pulling on the yarn. This prevents holes and maintains fluidity in your design.
-
Final Touches: Consider blocking the finished piece to define the edges. A polished look not only adds to the appearance but also helps it fit snugly on your headrest.
Crochet Headrest Cover FAQs
Can I substitute the yarn for this crochet headrest cover?
Absolutely! While the pattern recommends bulky or super bulky yarn, you're welcome to experiment with other fibers. If you use acrylic, that's a great option for durability, but you could also try a bamboo or wool blend for a different texture. Just be sure to adjust your sizing accordingly!
How can I make my headrest cover bigger or smaller?
Don’t panic! To resize your crochet headrest cover, add or subtract stitches in your foundation chain to achieve the desired width. For height, simply continue to add rounds of granny squares until you reach your preferred size. Remember to check your headrest dimensions beforehand for the best fit!
Why is my crochet headrest cover curling at the edges?
Curling can happen sometimes, but it's an easy fix! Check your tension and ensure you are maintaining consistent stitch size throughout your work. If curling persists, consider adding more border stitches or even blocking the finished piece to help it lay flat.
What size of hook should I use for this crochet headrest cover?
For this project, you can use a 6.5mm (K) or a 9mm (M) crochet hook. Choose the one that feels most comfortable for you! A larger hook can create a looser drape, while a smaller hook yields a denser piece, so pick based on your texture preference.
How do I fix a dropped stitch in my crochet headrest cover?
No worries, fixing dropped stitches is a common challenge! Just use a crochet hook to gently pull the dropped loop back up through the last completed row. You can chain it back up to stay in line with your pattern—it's a minor hiccup that will be barely noticeable!
What should I do if my yarn colors bleed when washing?
Great question! To prevent color bleeding, always wash your crochet headrest cover in cold water separately the first time. A little vinegar in the wash can help set the colors, but be cautious with bright or dark hues. If you're unsure, a test swatch is a wise move before washing your beautiful cover!
Leave a Reply