
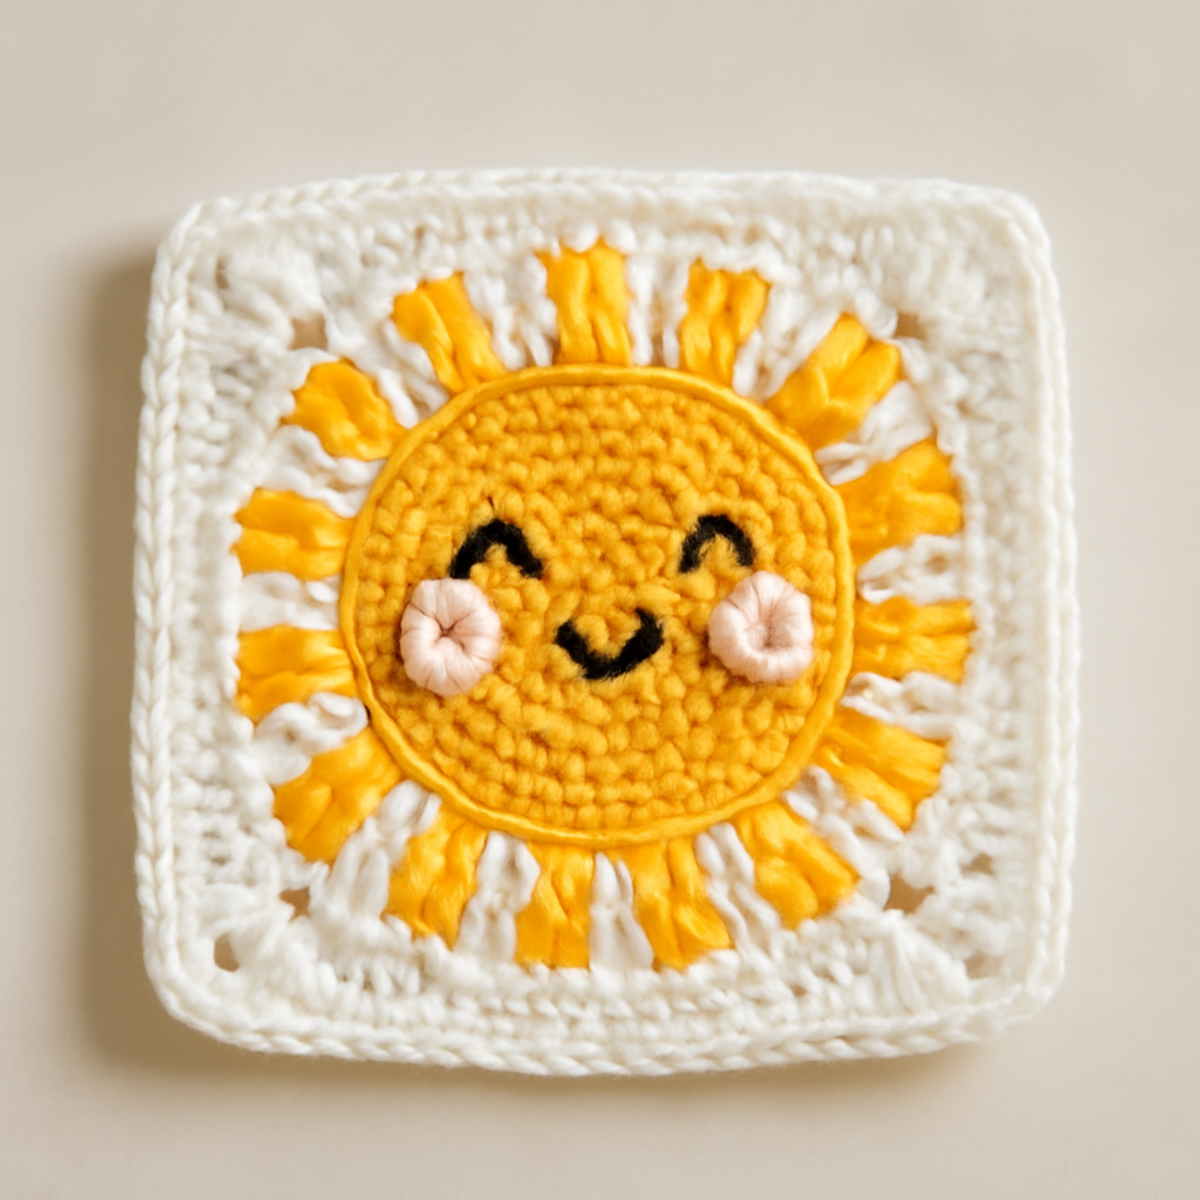
Sitting on my couch with a warm cup of tea, I can’t help but feel giddy as I stitch away at the cheerful crochet sun square. This delightful pattern is not just a project; it's an invitation to bring a burst of joy into your crafting space. Perfect for both beginners and intermediate crafters, this decorative square motif showcases a sunny design that brightens up any home décor or children's accessory. Making this crochet sun square allows you to refine essential crochet skills, like color changes and textured stitches, while creating a vibrant piece that’s great as a stand-alone decoration or a playful patch for a larger project. Whether you're planning to gift it or add it to your own collection, you'll love the joy it brings. Grab your yarn and let’s get started on a sunny adventure!
Crochet Sun Square Materials & Tools
- Medium Weight Yarn (Category 4) – Use a vibrant yellow for the sun, white for the background, and a small amount of peach or pink for the cheeks; approximately 150 to 200 yards total is estimated.
- 4.0mm (G/6 US) Crochet Hook – This size is recommended for achieving a nice tension and texture in your crochet sun square.
- Safety Eyes – Optional embellishment for adding character to your sun’s face!
- Buttons – Use these to decorate your square for additional charm.
- Stitch Markers – Keep track of your rounds easily, especially when changing colors.
Why Make a Crochet Sun Square?
Endless Versatility: This cheerful motif is perfect for various uses, from brightening a room as decor to completing a cozy blanket.
Skill Enhancement: Perfect for beginners and intermediates, you'll practice essential techniques, boosting your crochet confidence with easy color changes and textured stitches.
Vibrant Aesthetic: Using vibrant yellow and white, your finished piece radiates warmth and joy, making it an eye-catching addition to any project.
Creative Customization: Play around with colors and facial expressions to make each sun square uniquely yours, adding sparkle or pastels for different vibes.
Gauge & Sizing Notes
Don't skip the gauge swatch! Checking your tension is crucial for achieving the desired dimensions of your crochet sun square. A recommended gauge is to aim for your stitches to fit within a 4×4 inch (10×10 cm) square. This will ensure your finished square is vibrant and uniform. If you want to make your crochet sun square larger or smaller, adjust your starting chain in multiples of 6 to scale it accordingly. If your tension is too tight or too loose, you might need to swap your hook for a larger or smaller size. Happy crafting, and may your sunny motifs shine bright!
Step-by-Step Pattern for crochet sun square
Row 1: Start the Sun Center
Begin with a magic ring and work 6 sc into the ring. Pull the loop tight to close and join with a sl st to the first sc. This creates the small circular base of your crochet sun square. Your work should have a snug center (6 sts).
Row 2: Increase the Sun Center
Ch 1 to start the next round, then in each st from the previous round, inc by placing 2 sc in each (12 sts). Join with a sl st to the first sc. Your circle should begin to expand, forming the sun's face.
Row 3: Continue Expanding
Ch 1, then sc in the next st, inc in the following st; repeat around (18 sts). Finish with a sl st to join. You will notice the sun shape starting to take form and grow in size.
Row 4: Adding Texture
Ch 1, sc in the next 2 sts, inc in the next st; repeat to end (24 sts). Join with a sl st. Your crochet sun square should feel fuller, with a textured look enhancing the cheerful design.
Row 5: Explore Color Change
Switch to your white yarn. Ch 1, then sc in each st around (24 sts). Make sure to carry the yellow yarn along the edge lightly. Your fabric should now show a clean transition from the sun to the next border.
Row 6: Create Sun Rays
Ch 1 and sl st in the first st, ch 3, sl st back into the same st for the ray; repeat around the circle (12 rays total). Join with a sl st. You'll see the sun’s energetic rays radiating outward in vibrant yellows and whites.
Row 7: Adding the Last Border
Switch back to yellow yarn. Work a round of sc around the entire piece, ensuring you cover the previous rays evenly (30 sts). Join with a sl st. The crochet sun square should feel sturdy and have defined edges.
Step 8: Final Assembly
Ensure all color changes are neat, then block your crochet sun square to shape it properly and define dimensions. Your completed piece will radiate joy, ready to brighten any space as a lovely decorative motif.
Expert Tips for Crochet Sun Square
-
Consistent Tension: Keep your tension even throughout the project. This uniformity is crucial, especially when switching colors, to maintain the overall appearance of your crochet sun square.
-
Count Your Stitches: Regularly check your stitch count, especially after each round. Use stitch markers to mark the beginning of each round and prevent losing track.
-
Secure Color Changes: When changing colors, ensure you carry the unused yarn along the edge lightly. This avoids any loose ends and keeps your crochet sun square looking neat and tidy.
-
Blocking Benefits: Don't skip blocking! It helps define the shape and enhances the dimensions of your finished piece, making the sun rays and center stand out beautifully.
-
Review as You Go: Periodically hold your work up to a light source to spot any gaps or uneven stitching. Fix them early to avoid extra work later on.
Crochet Sun Square Variations
Feel the creative spark as you explore delightful ways to customize your crochet sun square to make it uniquely yours!
-
Color Swaps: Choose pastel shades instead of bright yellows for a soft, whimsical vibe. Pastels can create a dreamy effect, adding a gentle touch to your space.
-
Larger Hook Size: Experiment with a bigger crochet hook for a more open, airy texture. This can give your square a light and breezy feel, perfect for a sunny look.
-
Different Facial Expressions: Alter the sun's face using various crochet stitches to create smiles, frowns, or even silly expressions. Each personality will add character and fun to your piece!
-
Sparkle Yarn: Incorporate glimmering or shimmery yarn into your design for eye-catching accents. This addition can elevate the festive appeal, making your sun motif shine even brighter.
-
Fringe Finish: Add fringe around the edges for a playful finish. Just a few strands can provide extra texture while maintaining that cheerful, whimsical charm.
-
Border Variations: Experiment with different borders, such as scallops or a layered approach, to frame your sun square. A unique border can enhance the overall design and elevate its look.
-
Sizing Adjustments: Adjust your stitch count to create a larger or smaller sun square. This versatility allows your project to suit various uses, from coasters to larger decorative items.
-
Textured Stitches: Incorporate puff stitches or bobbles within the sun's rays for added dimension. This tactile element can help draw in the eye and create captivating visual interest.
Care Instructions for Crochet Sun Square
Machine Washing: Wash your crochet sun square in cold water on a gentle cycle to preserve its vibrant colors and prevent any shrinking or stretching.
Hand Washing: For delicate care, immerse in cold water with mild soap, gently agitating to remove dirt, and avoid wringing to prevent distortion.
Drying/Blocking: Lay your finished square flat to dry, reshaping it as needed. This helps define the sunny design and maintains its cheerful aesthetic.
Storage: Store your crochet sun square in a dry, cool place away from direct sunlight to avoid fading, ensuring it remains bright and beautiful for years to come.
What to Pair with Sunny Crochet Square
Embrace the joy of creativity by crafting a delightful matching set that radiates warmth and cheer, perfect for any sunny day!
-
Bright Crochet Coasters: Create a cheerful set of coasters that will bring sunshine to your coffee table, mirroring the vibrant hues of your square.
-
Sunshine Pillow Cover: Turn one or multiple squares into a charming pillow cover, perfect for enjoying cozy reading sessions on the couch.
-
Colorful Crochet Bunting: Use the same sunny palette to craft a festive bunting, bringing a playful vibe to any party or children's room.
-
Cheerful Hat: Design a whimsical hat featuring the sun motif, ideal for keeping little ones warm while brightening up winter days.
-
Lightweight Beach Tote: Combine multiple crochet sun squares into a stylish tote, perfect for carrying beach essentials while showcasing your creative flair.
Crochet Sun Square FAQs
Can I use a different type of yarn for my crochet sun square?
Absolutely! While a medium-weight acrylic or cotton yarn is recommended for this project, you can substitute with other yarn types. Just make sure to check the yarn weight and adjust your hook size accordingly to maintain a similar texture and finished size.
How can I make my crochet sun square larger or smaller?
To adjust the size, you can change your hook size. Using a larger hook will give you a more open and airy square, while a smaller hook will yield a tighter fabric. Additionally, you can add extra rounds in the sun center or increase the number of stitches in each increase round to achieve your desired size.
Why is my work curling at the edges?
Don't panic! Curling can occur when the tension is too tight, especially during color changes. To fix this, try using a looser tension as you crochet or check that you are not inadvertently pulling on your stitches. Blocking your finished square can also help to flatten and define the edges.
What hook size should I use for the crochet sun square?
The pattern recommends a 4.0 mm (G/6 US) crochet hook. This size strikes a lovely balance between drapey and structured fabric. If you're using a different yarn weight, feel free to adjust the hook size to match the yarn's needs while staying aware of your gauge.
How can I prevent dropped stitches while working on my crochet sun square?
Keep a close eye on your stitches as you crochet, especially when switching colors. If you notice a dropped stitch, don't fret—simply use your hook to pick it back up and pull it back through to secure it. Regularly count your stitches and use stitch markers to help maintain your stitch count as you go!
My colors are not transitioning smoothly. How can I improve this?
To ensure smooth color transitions in your crochet sun square, try to carry the unused yarn along the edge lightly without pulling it too tightly. This can help reduce gaps or unevenness. For added finesse, practice your color changes on a sample swatch to perfect your technique before diving into the full project!
Leave a Reply