
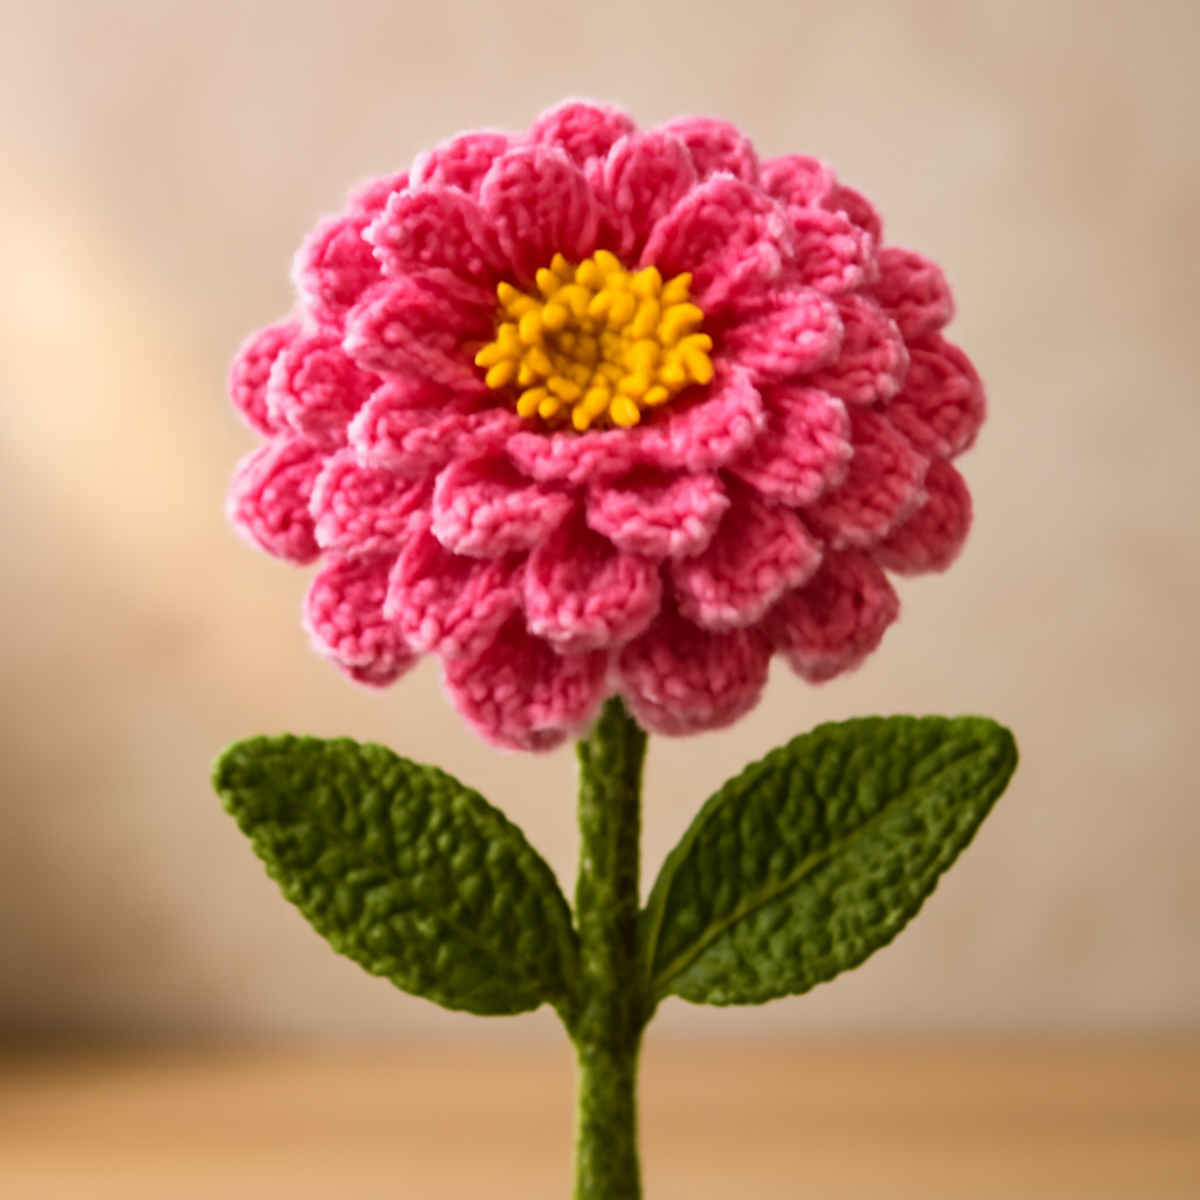
As I sat by the window, basking in the afternoon sun, the thought of creating a vibrant bloom danced in my mind. This Crochet Zinnia flower not only brings an explosion of cheerful color to any space but also offers a delightful challenge for intermediate crocheters. With its intricate layers and rich textures, this project is a fantastic way to enhance your skills while crafting something truly special. Imagine the joy of placing this stunning flower in your home or gifting it to a friend who adores all things handmade. It’s a perfect pick for those looking to elevate their crochet game and bring a touch of florals into their lives. So, gather your yarn and let’s dive into the colorful world of crochet zinnia flowers!
Crochet Zinnia Flower Materials & Tools
- Worsted Weight Yarn – Choose varying shades of pink for petals, yellow for the center, and green for the stem and leaves; estimated yardage is around 150-200 yards depending on size.
- 2.5 mm (C-2) Hook – This hook size is perfect for achieving detailed stitches in your crochet zinnia flower.
- Stitch Markers – Helpful for organizing your rounds and keeping track of your progress while crafting.
- Scissors – Essential for trimming any excess yarn and achieving neat finishes.
- Floral Wire (optional) – Use this for a sturdier stem if you prefer your flower to stand upright proudly.
Why Choose the Crochet Zinnia Flower?
Cheerful Vibrancy: The vibrant colors of this crochet zinnia flower instantly brighten up any room, serving as a delightful centerpiece or cheerful addition to your décor.
Skill Enhancement: With intricate layers and unique stitching techniques, this pattern offers an enjoyable challenge that allows you to refine your crochet skills while creating a beautiful piece.
Perfect Gift Idea: Handmade gifts are always cherished, and this zinnia serves as a lovely option for friends and family, especially flower lovers who appreciate artful creations.
Flexible Customization: Experiment with different colors or even sizes, allowing your creativity to flourish while making each flower uniquely yours.
Fun and Relaxing Project: The rhythmic rounds and engaging design make this a joy to work on, providing a perfect way to unwind while producing something gorgeous.
Gauge & Sizing Notes
Don't skip the gauge swatch! Checking your tension is essential when crafting this crochet zinnia flower to ensure it blooms with the perfect dimensions. For this project, aim for a gauge of approximately 4×4 inches (10×10 cm), which typically translates to about 14 double crochets by 8 rows; however, this can vary based on your stitch style. If you'd like to make your flower larger, simply increase your starting chains or rounds in multiples of 6 for an expansive petal effect. If your swatch is too small, try using a larger hook size to achieve that lovely, plush look characteristic of the crochet zinnia flower!
Step-by-Step Pattern for Crochet Zinnia Flower
Row 1: Create the Center
Begin by making a magic ring. Work 6 single crochet (sc) stitches into the ring (6 sts). Pull the ring tight to close it, ensuring the center is compact. This foundation creates a lovely base for your crochet zinnia flower’s bright yellow center, which should now sit flat without holes.
Round 2: Increase for Thickness
Ch 1 to start the round, and then work 2 sc in each stitch around (12 sts). As you crochet, the center will start to expand, appearing slightly rounded. Take care to keep your tension even for a smooth finish. Your work should remain flat and free of twisting.
Round 3: Adding Dimension
Ch 1, then work 1 sc in the next stitch, 2 sc in the following stitch and repeat around (18 sts). This round continues to build upon the center of the crochet zinnia flower, shaping it further while giving a slight texture and stability to the base.
Round 4: Start the Petals
Switch to your chosen shade of pink. Ch 1, then work 1 dc in the next 5 stitches, 2 dc in the next stitch and repeat around (24 sts). The height of the double crochets will start to form the lovely petals of the zinnia, making your work take on a more floral shape as it begins to blossom.
Round 5: Layering Petals
Ch 1, and work 1 dc in the next 6 stitches, 2 dc in the next stitch around (30 sts). With each layer, take time to enjoy the shifting textures; the petals will begin to fluff out to create that delightful zinnia flower look. Your project should be blooming beautifully now!
Round 6: Final Petal Layer
Ch 1 for the last petal round. Work 1 dc in the next 7 stitches, 2 dc in the next stitch and repeat (36 sts). The zinnia flower petals are now reaching their fullest potential, forming a stunning layered effect. Enjoy watching your flower take shape as it grows larger.
Round 7: Closing Off the Flower
Ch 1 and work a sl st in each stitch around to finish off the petal edges. This step will help set your flower into its final structure, making sure everything stays nicely rounded. Upon completion, your crochet zinnia flower should be plush and vibrant, radiating with joy.
Step 1: Create the Stem
Switch to the green yarn. Ch 12, then sl st into the second chain from the hook and each chain across (11 sts). This will form a sturdy stem for your crochet zinnia flower. The unworked chain should now look like a firm base that nicely aligns with your flower.
Step 2: Attach the Stem
To attach the stem to the flower, use a yarn needle to sew the stem securely to the center of the zinnia. Weave in any loose ends to keep a clean finish. Your flower’s vibrancy now meets its sturdy base, creating a perfect decorative piece ready for display!
Step 3: Add Leaves
For each leaf, with green yarn, ch 8 and work 1 hdc in the second ch from the hook, 1 dc in the next 4 chains, 1 hdc in the final two (total of 8 sts). Fasten off and attach to the stem with your needle. Crafting leaves offers a finishing touch that complements your entire crochet zinnia flower beautifully.
Crochet Zinnia Flower Customizations
As you embark on your crochet journey, let your imagination run wild and make this pattern uniquely yours.
-
Color Variations: Try different shades like coral or lavender for a unique floral touch. Your zinnia can reflect your personal style with just a simple color swap.
-
Center Change: Replace the yellow center with white or orange for a striking contrast. This twist can dramatically transform the overall look of your zinnia flower.
-
Yarn Substitution: Opt for a cotton blend instead of worsted weight yarn for a different drape and texture. This change can yield a more delicate feel, perfect for sunny display settings.
-
Sizing Adjustments: Crocheting a larger flower can create an eye-catching statement piece for home décor. Bigger blooms can also make delightful gifts, bringing joy to anyone who receives them.
-
Texture Additions: Incorporate a pom-pom or fringe to the flower petals for an extra touch of charm. These playful elements can enhance your creation's whimsical character.
-
Leaf Design Modifications: Experiment with different leaf shapes by altering your stitch pattern. Adding a more intricate leaf design can elevate the entire flower's aesthetic, showcasing your creativity.
-
Fringe Accent: Add fringe to the edges of petals by loosely attaching yarn for a fun, bohemian flair. This simple addition can transform the flower into a showstopper.
-
Border Technique: Finish off the edges of the petals with a contrasting color for a defined look. This bordering can give your crochet zinnia flower a modern twist while keeping it vibrant and cheerful.
Care Instructions for Crochet Zinnia Flower
Hand Washing: Gently hand wash your crochet zinnia flower in cold water with mild detergent to preserve its delicate structure and vibrant colors. Avoid vigorous agitation which could cause felting or pilling.
Drying/Blocking: Lay your finished flower flat on a clean, dry towel to air dry, reshaping the petals as needed. Blocking will help enhance the shape and presentation of your crochet zinnia flower for that perfect finish.
Storage: Store your crochet zinnia flower in a cool, dry place, avoiding direct sunlight to prevent fading. This will ensure it stays looking bright and cheerful for a long time.
Displaying: Keep your crochet zinnia flower in a well-ventilated area, avoiding damp spots. This will maintain its freshness and softness, adding a beautiful touch of charm to your home décor.
Expert Tips for the Crochet Zinnia Flower
-
Maintain Even Tension: Consistent tension throughout your stitches will ensure beautiful, uniform petals. Practice on a swatch if you're unsure of your tension control.
-
Count Your Stitches: It’s easy to lose track when working in rounds. Regularly count your stitches at the end of each round to avoid mistakes in your crochet zinnia flower.
-
Block for Shape: Once your flower is complete, blocking it can significantly enhance its appearance. This technique allows the petals to lay flat and showcases the intricate detailing beautifully.
-
Watch for Twists: Pay close attention while creating your foundation chain to avoid twisting. A twisted chain can lead to uneven rounds and misaligned petals.
-
Weave in Ends: Ensure to weave in any loose ends securely after finishing each piece. This will keep your crochet zinnia flower looking tidy and professional, enhancing its charm as a decorative piece.
What to Pair with Crochet Zinnia: A Cheerful Bloom
Building your crochet garden with vibrant elements can elevate your crafting journey to new heights of joy and creativity.
-
Crochet Leaves: Enhance your zinnia's beauty with lush, green leaves that beautifully frame the colorful bloom.
-
Floral Bouquet: Create a mixed bouquet of various crochet flowers for a stunning centerpiece that showcases your skills and colors.
-
Matching Vase Cozy: Crochet a cozy or decorative holder for your flower to rest in, perfectly complementing the zinnia's chic look.
-
Crochet Coasters: Add charming coasters in colors that reflect your zinnia for lovely table decor, enhancing the cheerful vibe of your space.
-
Crochet Headband: Use the leftover yarn to create a vibrant headband with a mini zinnia, letting your creativity bloom in wearables, too!
Crochet Zinnia Flower FAQs
Can I substitute yarn for my crochet zinnia flower project?
Absolutely! While worsted weight yarn works best, you can use any yarn that maintains similar thickness, like a cotton blend, for a different drape or texture. Just ensure you adjust your hook size if you switch to a thinner or thicker yarn to keep your flower’s structure.
How do I make my crochet zinnia flower bigger or smaller?
To adjust the size, you can either use a thicker yarn combined with a larger hook for a bloomier flower, or a lighter yarn with a smaller hook for a daintier version. You can also increase or decrease the number of rounds in the petal layers, but remember to keep an eye on your stitch count for balance.
Why is my crochet zinnia flower curling at the edges?
Don’t panic! Curling edges often happen due to tight tension or skipping a stitch. I recommend blocking your flower after completing it. This will help the petals lay flat and present beautifully. If curling persists, double-check your tension while crocheting.
What hook size should I use for my crochet zinnia flower?
For the crochet zinnia flower, a 2.5 mm (C-2) hook works best for achieving those detailed stitches. If you find your stitches are too tight or too loose, consider experimenting with different hook sizes until you achieve your desired look and feel.
How do I fix a dropped stitch in my crochet zinnia flower?
It's an easy fix! Simply pull the yarn of the dropped stitch back to your current row, and rework that stitch. If you're unsure, refer back to your previous rounds to help guide where the stitch should go. Just take your time and don't rush—it'll come back together beautifully!
Leave a Reply