
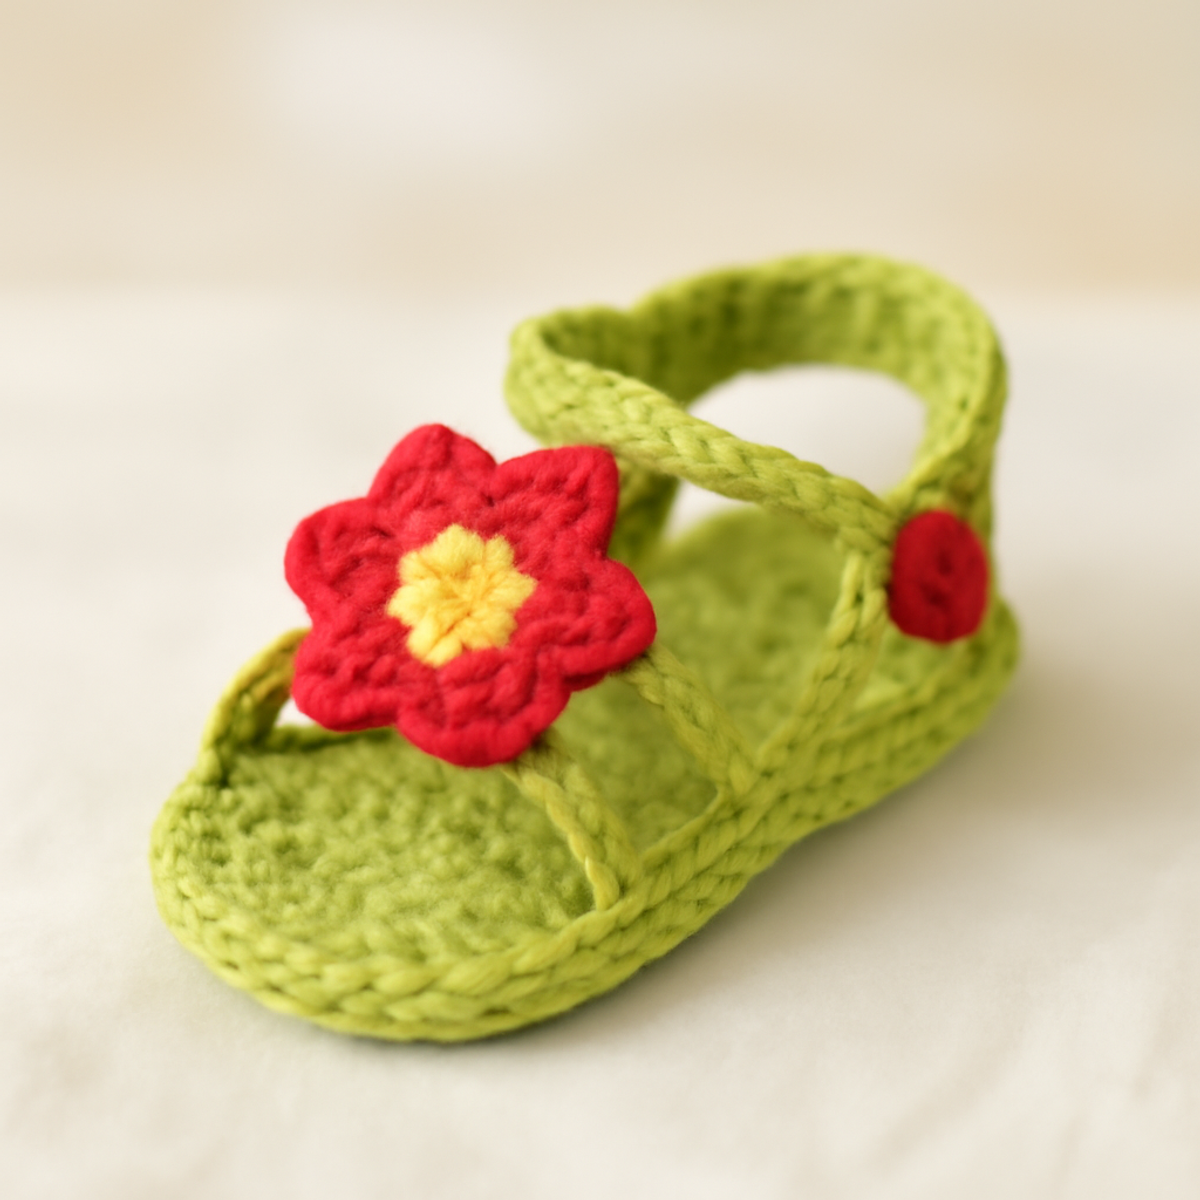
There’s something undeniably heartwarming about tiny feet adorned in playful crochet, isn’t there? Introducing the Flower Power Baby Sandals—a delightful project that will bring sunshine and smiles to every little outfit. Perfect for summer outings or special occasions, these whimsical sandals feature vibrant colors and charming flower motifs that are sure to capture hearts. One of the best parts of making these flower power baby sandals is how customizable they are, allowing you to pick the perfect palette for your little one. Plus, they offer both protection and breathability for those first wobbly steps. With just a bit of yarn and a few basic stitches, you’ll create a stunning accessory that’s as practical as it is cute. Ready to bring some flower power into your crochet repertoire? Let’s dive into this cheerful adventure together!
Flower Power Baby Sandals Materials & Tools
Yarn
- Worsted Weight Yarn – Approximately 100-150 yards in bright green for the base, bright red for the flowers, and a hint of yellow for the flower centers is recommended for these flower power baby sandals.
Tools & Notions
- 5.0mm (H) Hook – This size hook is perfect for creating a comfortable fit and maintaining even tension.
- Stitch Markers – Helpful for keeping track of your rows and stitches, especially when transitioning between different parts of the sandals.
- Optional Buttons – Consider adding buttons to the flower centers for an extra touch of whimsy and charm!
Why Choose Flower Power Baby Sandals?
Whimsy and Charm: These adorable sandals add a delightful touch to any baby outfit, making them perfect for summer fun and special occasions.
Easy for Beginners: Written with simplicity in mind, this pattern is a fantastic starting point for those new to crocheting, focusing on basic stitches.
Fun Customization: With endless color possibilities, you can personalize each pair to match your child's wardrobe, allowing your creativity to shine.
Textured Elegance: The combination of single and double crochet stitches crafts a beautiful texture, while the flower motifs pop with charm.
Perfect Fit: Constructed with flexibility in mind, these sandals ensure comfort and support for those first wobbly steps, keeping little feet secure.
Quick Project: Ideal for those crafting on-the-go, these sandals can be made quickly, allowing for instant gratification with a practical outcome.
Gauge & Sizing Notes
Don't skip the gauge swatch! Checking your tension is essential for creating the perfect fit with your flower power baby sandals. Aim for a standard gauge of approximately 4×4 inches (10×10 cm) for your tension swatch, which translates to about 14 single crochets by 8 rows. If you wish to customize the size, you can adjust the starting chain to accommodate different foot sizes; for instance, to make the sandal longer, simply increase your starting chain in multiples of 2. If your tension doesn’t match and your swatch is too small, don’t worry—try going up a hook size to achieve that cozy, snug fit your little one needs!
Step-by-Step Pattern for Flower Power Baby Sandals
Row 1: Create the Sole
Start by making a slip knot, then ch 12. In the second ch from the hook, sc across (11 sc). For the last ch, work 3 sc into it, creating the first curve. Now, continue along the opposite side of the starting chain, sc in each st till the end (22 sts). Your work should form a slight curve resembling a sole.
Row 2: Establish the Shape
Ch 1, then sc around the entire sole, placing 3 sc in the center stitches to maintain the curve (26 sts). Remember to stitch evenly along the edges. After completing this row, your sole should have a nice rounded shape, allowing it to lay flat.
Row 3: Build Up Sides
Join your bright green yarn with a sl st to any stitch. Ch 2, then hdc in the same stitch and each stitch around (26 hdc). This row will help give the sandal its height and shape. You’ll notice the sides begin to rise, providing support for the baby sandal's body.
Row 4: Continue to Build Height
Ch 2, then hdc around again (26 hdc). It's important to keep your tension even to ensure uniformity in the sandal. By now, the sides should look nice and sturdy, forming the body of the flower power baby sandals.
Row 5: Create Straps
Ch 8 to form the first strap and sk the first st. In the next st, sc to create a firm anchor point. Ch 8 again and sk the next st, sc into the next st (this forms the second strap). Your work should start to resemble the sandal shape, with straps for securing.
Row 6: Flower Construction
For your flower, start with a magic ring, ch 2, then work 12 dc into the ring. Pull the ring tight and join with a sl st. Your flower should be fluffy and full, providing the charming feature that sets apart these flower power baby sandals.
Row 7: Adding Petals
Ch 2, then work 1 dc in the same stitch. In the next st, dc, ch 1, dc to create petals (repeat around). Join with a sl st, ensuring each petal stands tall. The flower should now have a lovely texture, ready to embellish the front of your sandals.
Step 8: Attach Flowers
Position your flower at the front of the sandal, ensuring it is centered. Sew it securely with a darning needle and yarn tail. This final touch will add a delightful pop to your flower power baby sandals, and make them truly eye-catching for any little outfit.
Step 9: Finishing Touches
To polish off your sandals, go around the edges with a slip stitch to secure any loose ends, creating a neat finish. Ensure all yarns are woven in properly, so the flower power baby sandals have a professional look. Your finishing touches should leave you with a pair of beautiful, vibrant baby sandals.
Care Instructions for Flower Power Baby Sandals
Machine Washing: Use cold water and a gentle cycle to wash your flower power baby sandals. Avoid agitation to prevent any felting or pilling of the yarn.
Hand Washing: For best results, hand wash your sandals in cold water with mild detergent. Gently squeeze out excess water without wringing or twisting, to protect the beautiful texture.
Drying/Blocking: Lay your sandals flat on a clean towel to dry. Avoid hanging them, as this can distort their shape. Blocking after washing can help maintain their lovely structure and floral details.
Storage: Store your sandals in a cool, dry place away from direct sunlight. Keep them flat or in a breathable bag to avoid any deformation between wearings.
Helpful Tricks for Flower Power Baby Sandals
-
Maintain Even Tension: Consistent tension keeps your sandals uniform in size. If uneven, the sandals may not fit as intended, especially around the edges.
-
Count Your Stitches: Double-check your stitch count often, particularly when transitioning between parts. Losing count could lead to gaps in the straps or misshaped flowers.
-
Secure Your Flowers: When attaching flowers, ensure they are stitched tightly. A loose flower can ensemble a messy appearance, diminishing the charm of your flower power baby sandals.
-
Block for Shape: Consider blocking your sandals after finishing to retain their structure. This technique helps floral embellishments lay flat, giving a polished look.
-
Use Stitch Markers: Utilize stitch markers to help track your stitches and rows. They are invaluable, especially when you’re working complex sections like the straps and flowers.
Flower Power Baby Sandals Variations
There's no limit to how you can transform these adorable sandals, allowing your creativity to flourish and shine!
-
Color Swaps: Replace the bright green base with pastel shades for a soft, dreamy look. Imagine a sweet baby wearing soothing hues like lavender or mint!
-
Variegated Flowers: Use variegated yarn for the flowers to create unique, eye-catching patterns with every pair. Each flower can tell its own vibrant story, making each sandal a special masterpiece.
-
Sizing Adjustments: Customize the size effortlessly by increasing or decreasing the number of stitches in the sole. This way, you can create snug sandals for petite feet or roomier options for growing toddlers.
-
Textured Pops: Add a charming pom-pom to the center of the flower for a fun and playful touch. The added dimension will not only enhance the aesthetics, but it’ll also invite playful touches from curious little hands.
-
Sparkling Embellishments: Integrate beads or buttons at the flower centers for a delightful, whimsical look. A touch of sparkle can elevate these sandals to a fabulous accessory for special occasions!
-
Fringed Edges: Add a fringe border around the edges of the sandal for a boho-inspired twist! Fringes are not just trendy; they can bring a tactile experience for those little explorers.
-
Funky Straps: Swap traditional straps with decorative braids or even lace for a fresh take on the classic design. The unique style can make these sandals stand out just as much as the little ones wearing them.
-
Seasonal Themes: Think beyond the flowers! Consider incorporating seasonal designs, such as little leaves for fall or snowflakes for winter, to create themed sandals throughout the year. Every season can lead to a new delightful creation!
What to Pair with Cheerful Flower Power Baby Sandals
As you welcome the vibrant charm of these tiny sandals into your crochet collection, why not explore matching accessories that embody the same playful spirit?
-
Adorable Baby Hat: Create a cute hat adorned with flowers to keep your little one stylish and sun-safe while enhancing the playful theme.
-
Matching Diaper Cover: A crochet diaper cover in bright green complements the sandals, making a delightful set that is perfect for summer outings.
-
Flower Motif Hair Clips: Crochet tiny flower hair clips to complete the look, allowing little ones to flaunt their flower power in style!
-
Baby Blanket: A lightweight, colorful blanket featuring similar shades provides warmth and comfort, ideal for cozy summer picnics at the park.
-
Crochet Toy Rattle: Craft a playful rattle using the same colors and floral motifs. It’s the perfect companion for your little walker, bringing both joy and engagement!
Embrace your creativity while adding adorable pieces to your little one's wardrobe!
Flower Power Baby Sandals FAQs
Can I use a different yarn for my flower power baby sandals?
Absolutely! While worsted weight cotton yarn is recommended for these sandals, you can substitute acrylic yarn, but keep in mind that it might affect the breathability and softness. If you prefer a slightly thicker or fluffier texture, a wool blend could also work, ensuring it meets the weight category.
How can I adjust the size if my baby’s feet are bigger or smaller?
Don’t panic! You can easily customize the size of the sandals by adjusting the number of stitches in the sole. Simply add or reduce a few chains at the beginning, keeping the overall pattern consistent. You might want to measure your little one’s feet to find the perfect fit.
Why is my work curling at the edges?
Curling can be a common issue, especially if you're not maintaining even tension. I recommend checking your tension throughout your work. More importantly, ensure you're using the correct hook size. If the problem persists, blocking your sandals can help flatten them out.
What crochet hook size should I use for the flower motifs?
For the flower power baby sandals, a size H (5 mm) hook is recommended throughout the project, including for the flowers. However, if you find your flowers are too tight, you may want to switch to a larger hook for them. Just make sure you keep your gauge consistent.
How do I fix dropped stitches in my sandals?
It's an easy fix! If you notice a dropped stitch, simply use a crochet hook to pull the yarn up to the correct row. Then, secure that stitch back in place by crocheting into it again to ensure it stays put. Remember, it’s always best to fix things as you go to avoid larger issues later!
Leave a Reply