
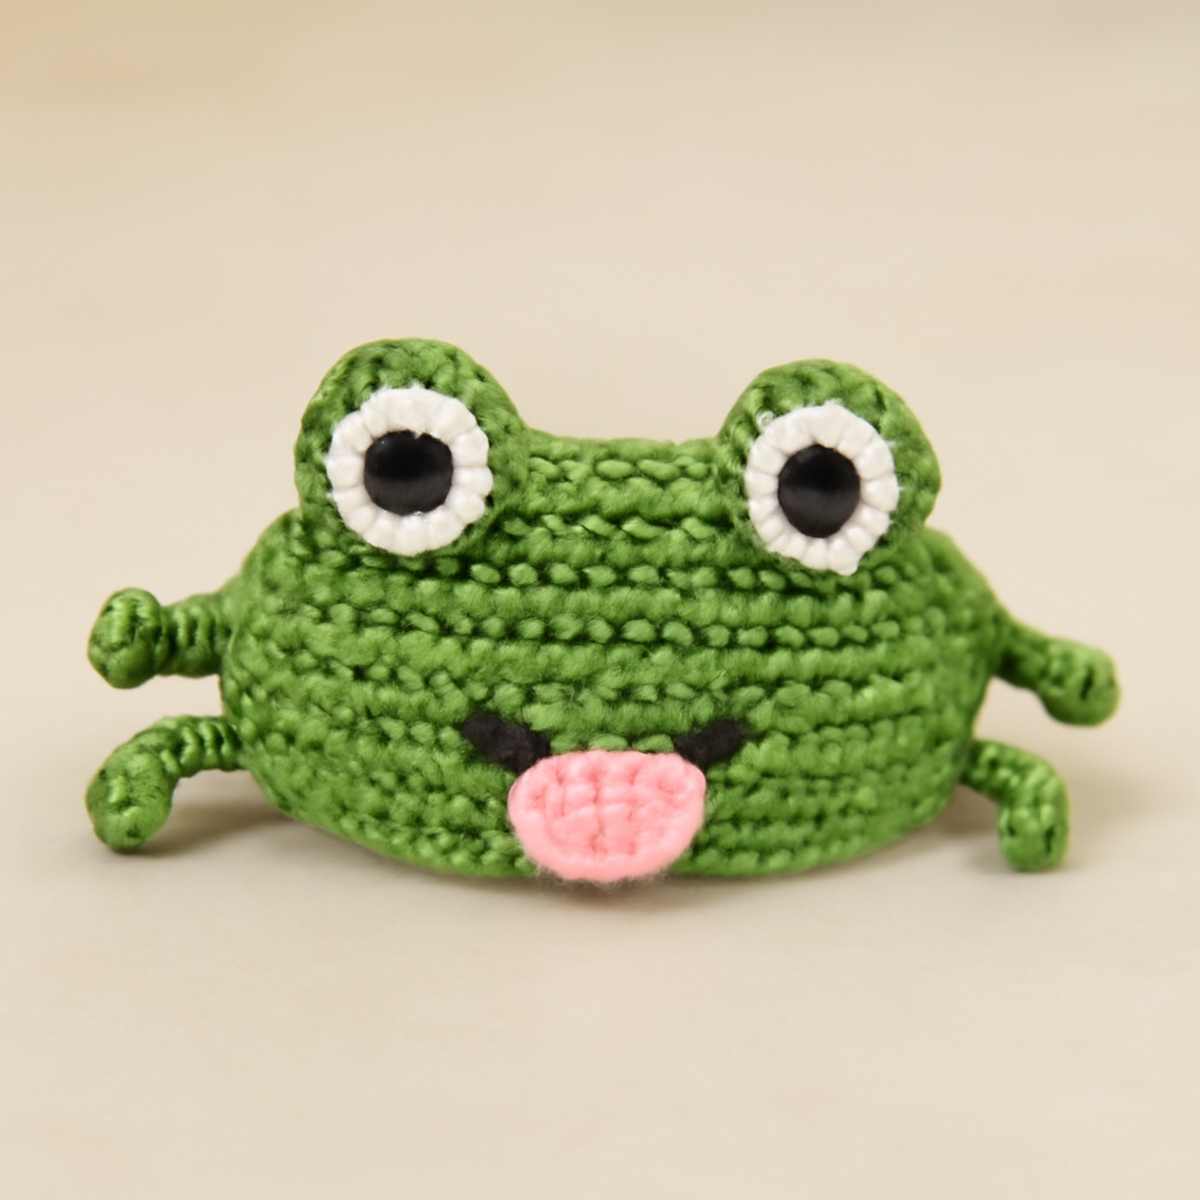
As I settled into my favorite nook with a warm cup of coffee, I couldn't help but smile at the delightfully quirky frog mug hugger I had just finished crocheting. This project brings together fun and functionality, making it the perfect accessory for your morning brew. Not only does this frog mug hugger keep your hands cozy while sipping a hot drink, but its playful design adds a touch of whimsy to any kitchen. Crafted with simple techniques, this pattern is ideal for beginners and can be completed in no time, ensuring immediate satisfaction and a vibrant pop of joy in your home. Ready to add some charm to your mug game? Let’s hop into the details and get crocheting!
Frog Mug Hugger Materials & Tools
-
Yarn
- Worsted Weight Cotton Yarn – You’ll need approximately 100 grams total: 40 grams green for the base, plus small amounts of white, black, and pink for eyes and tongue.
-
Hook
- 3.5mm (US E/4) Crochet Hook – This size will help achieve the perfect tension for the frog mug hugger.
-
Tools & Notions
- Scissors – Useful for trimming yarn ends neatly to finish your project.
- Stitch Markers (optional) – Helpful for tracking rounds and maintaining your stitch count as you crochet.
Why Choose the Frog Mug Hugger?
Whimsical Design: The frog mug hugger is not only amusing but also a fantastic conversation starter, bringing smiles to every sip.
Beginner-Friendly: Using simple crochet techniques, this pattern makes it easy for newcomers to craft with confidence.
Quick Completion: You'll love how quickly this project comes together, allowing you to enjoy your creation almost immediately.
Functional Flair: Not only a cute accessory, but it also protects your hands from hot beverages, blending fun with practicality.
Customizable Options: Add your flair by varying colors or sizes, making each frog uniquely yours!
This pattern will surely become a favorite in your crochet repertoire, combining charm and function effortlessly.
Gauge & Sizing Notes
Don't skip the gauge swatch! Checking your tension is vital for the frog mug hugger, as it ensures your cozy will fit snugly around your favorite mug. A good guideline is to aim for a tension swatch of approximately 4×4 inches (10×10 cm) with 18 single crochets by 22 rows. If you’d like to adjust the size to fit a larger or smaller mug, simply increase or decrease your starting chain in multiples of 6 for the base. If your swatch turns out too small, don’t fret—just try going up a hook size to achieve the perfect crochet gauge for your frog mug hugger!
Step-by-Step Pattern for frog mug hugger
Row 1: Create the Base
Start by making a magic ring. Work 6 sc into the ring, pull tight to close. Join with a sl st to the first sc. Your work should form a small circle now, ready for expansion (6 sts).
Row 2: Increase for Shape
Ch 1, inc in each sc around (12 sts). Make sure your circle begins to flatten out as you work, providing a sturdy base. Join with a sl st to the first sc to complete the row.
Row 3: Form Circle for Base
Ch 1, sc in next sc, inc in next sc repeat around (18 sts). This row should show a gentle increase, giving your base more diameter. Join with a sl st to the first sc to close the row.
Row 4: Continue the Base Expansion
Ch 1, sc in next 2 sc, inc in next sc repeat around (24 sts). At this stage, your base will appear larger and flatter, forming a solid foundation for the frog mug hugger. Join with a sl st.
Row 5: Finalize Base Size
Ch 1, sc in next 3 sc, inc in next sc repeat around (30 sts). Your work should lay flat and start to look like a cozy cup hugger. Join with a sl st to finish the round.
Row 6: Begin the Body
Ch 1, sc in each sc around without increases (30 sts). Keep your tension even as your work transitions from the base to the sides, creating a smooth body. Join with a sl st when completed.
Row 7: Continue the Body
Repeat Row 6 (30 sts). Your work should maintain the cylindrical shape, and you may start to see the mug hugger taking form.
Row 8: Capping the Body
Ch 1, sc in next 3 sc, dec over next 2 sc repeat around (24 sts). This slight tapering will help secure the fit of the cozy around the mug. Join with a sl st.
Row 9: Finishing the Body
Ch 1, sc in next 2 sc, dec over next 2 sc repeat around (18 sts). Your mug hugger will start to feel snug as it nears completion. Join with a sl st to secure.
Step 10: Create the Eyes
Using white yarn, ch 2. Work 6 sc into the second ch from the hook (6 sts). This will form the first frog eye. Repeat to create a second eye. Your eyes should be small and round, set to attach to the mug hugger.
Step 11: Add the Pupils
Using black yarn, make a magic ring, and work 3 sc in it (3 sts). Join with a sl st to close. Attach these black pupils onto the white eyes, giving your frog personality and charm.
Step 12: Crochet the Legs
Using green yarn, ch 10, then hdc in 3rd ch from the hook, followed by 6 dc in each ch to create a curly effect (4 curly legs total). These legs will add movement and whimsy to your frog mug hugger.
Step 13: Make the Tongue
Using pink yarn, ch 12, then sc in 2nd ch from hook, sc across to the end (11 sts). This playful tongue will be positioned hanging out of your frog's mouth, adding a fun detail to the design.
Step 14: Assembly
With all components ready, securely sew the eyes, legs, and tongue onto the frog mug hugger body. Position the eyes near the top, the legs coming out from the sides, and the tongue hanging down. The final product should display a happy frog ready to hug your mug.
How to Wash and Care for Your Frog Mug Hugger
Machine Washing: Use cold water on a gentle cycle to keep your frog mug hugger looking fresh. Avoid harsh agitation to prevent any potential felting or pilling.
Hand Washing: For a gentle clean, soak your mug hugger in cold water with mild soap. Swirl gently, then rinse thoroughly without twisting or wringing.
Drying/Blocking: After washing, lay your frog mug hugger flat to dry in a well-ventilated area, reshaping as needed. This helps maintain its whimsical form!
Storage: When not in use, store your frog mug hugger in a cool, dry place. Avoid damp areas which can affect the cotton’s integrity and color over time.
What to Pair with the Frog Mug Hugger?
As you embark on this cheerful crafting adventure, consider enhancing your cozy collection with delightful companions that celebrate whimsy and charm.
-
Crochet Coasters: Create a set of vibrant coasters that mirror the frog's fun colors. They’ll not only protect surfaces but also tie in the joyful theme!
-
Playful Frog Appliqués: Embellish your projects with small frog appliqués. They can adorn bags, hats, or cushions, adding a touch of playful character.
-
Crochet Tea Towels: Craft matching tea towels using a coordinating color palette. They blend beautifully with your frog mug hugger for a cohesive kitchen vibe.
-
Frog-Themed Plushies: Dive into making playful frog plushies, the perfect companions for kids or a whimsical decor piece in your home.
-
Curly Leg Potholder: Design a whimsical potholder that features curly legs just like your mug hugger. It’s sure to steal the show in the kitchen!
Helpful Tricks for Frog Mug Hugger
-
Maintain Tension: Consistent tension is key. An uneven tension can lead to a misshapen mug hugger, so keep your stitches uniform throughout the project.
-
Count Your Stitches: Losing track of stitches can easily happen, especially during increases. Periodically check your count to ensure your pattern stays on track.
-
Secure Finishing: When assembling, ensure all components are stitched securely. This will prevent any parts from coming loose and ensure the frog mug hugger holds up with use.
-
Blocking Benefits: Lightly blocking the final piece can help it maintain its shape and clean edges, achieving a polished look that showcases your hard work.
-
Keep Extra Yarn: To avoid any mishaps, keep a small amount of your yarn colors handy throughout the project—mistakes can happen, but you can easily fix them!
Frog Mug Hugger: Variations & Substitutions
Feel free to unleash your creativity and customize the frog mug hugger to truly make it your own!
-
Yarn Substitutions: Try using soft bamboo yarn for a lovely sheen and an eco-friendly alternative that feels luxurious.
-
Color Variations: Swap green for a vibrant purple or a sunny yellow to create a frog that stands out in any kitchen. A colorful display will surely brighten your day!
-
Add Texture: Incorporate a fluffy border using a different yarn or add playful pom-poms to the legs for a delightful twist that enhances its charm.
-
Size Adjustments: Scale the pattern up or down to fit different mug sizes, making it versatile for both oversized coffee mugs and petite teacups. Just adjust your base correctly to ensure a snug fit.
-
Arm Variations: Instead of curly legs, craft straight or looped legs for a different aesthetic, adding variety to your frog collection. Each leg style brings its own personality!
-
Eye Enhancements: Experiment with eyes by creating larger versions using puff stitches for an even cuter look, making your frog more expressive and whimsical.
-
Tongue Options: Vary the tongue's length or create a multi-colored tongue using stripes for additional fun; it will surely be a conversation starter with friends.
-
Frog Species: Create different frog species by changing the base to incorporate spots or stripes, showcasing a variety of unique designs! Each version will tell a story of its own.
Frog Mug Hugger FAQs
Can I use a different type of yarn instead of cotton for my frog mug hugger?
Absolutely! While the pattern suggests worsted weight cotton yarn for its durability and softness, you can experiment with other fibers. Just be sure to maintain a similar weight to achieve the best fit. Acrylic yarn can be a great choice as it’s widely available and often softer.
How can I adjust the size of the frog mug hugger if I want it to fit a larger mug?
Don't panic! To make your frog mug hugger larger, simply increase the number of stitches in your base rows. For instance, you might add an extra round of increases in the base before transitioning to the body. Just ensure your stitches remain even so the shape is maintained.
Why is my work curling at the edges?
This is a common issue! Curling often happens if your tension is too tight, or if you have fewer stitches than needed. I recommend checking your gauge first! If the tension is tight, try using a larger hook size. Remember to count your stitches to ensure you’re not missing any increases.
What hook size should I use if my tension is too tight?
If you find your stitches are feeling tight, I suggest moving up a hook size (for example, try a 4 mm hook instead of the 3.5 mm). This can help loosen your work and achieve a more relaxed tension, making it easier to crochet and resulting in a more comfortable fit for your frog mug hugger.
I dropped a stitch while crocheting the body—how do I fix it?
It's an easy fix! Simply grab your crochet hook and pull the dropped stitch back up through the last completed stitch. Re-insert your hook into the next stitch to continue. If you drop a stitch repeatedly, consider slowing down and paying extra attention during tricky sections.
How do I ensure my frog mug hugger retains its shape after finishing?
Great question! After completing your project, lightly blocking the finished piece is beneficial. This involves wetting the piece and gently shaping it to the desired dimensions, then letting it dry flat. This process can help your frog mug hugger maintain its structure and display beautifully!
Leave a Reply