
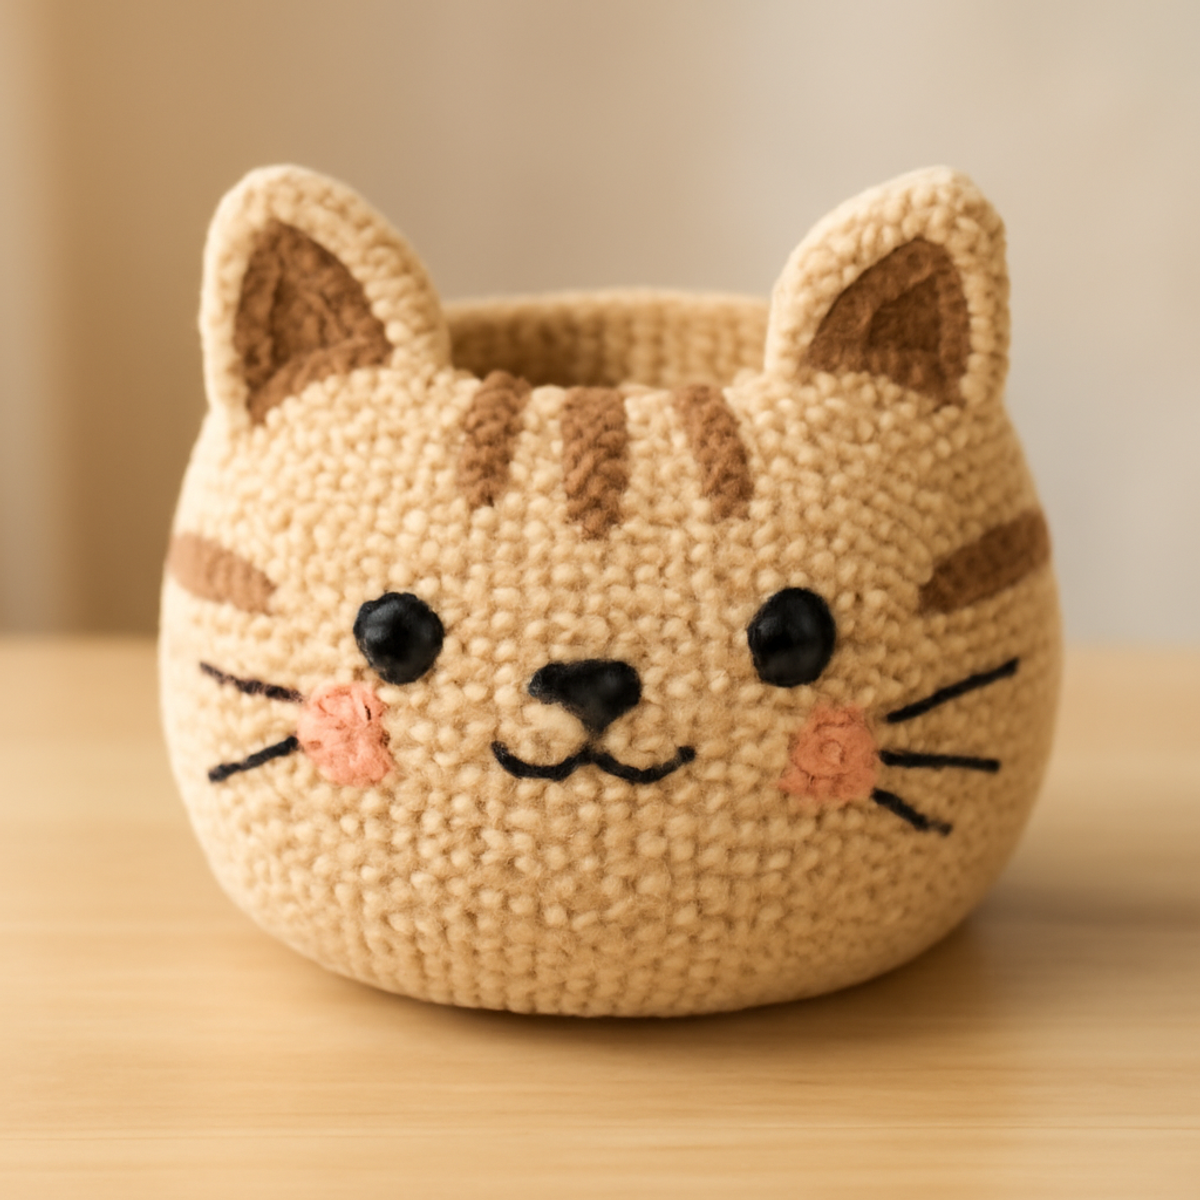
As the sunlight spills into my crafting nook, I can’t help but feel drawn to a project brimming with charm—the Dreamy Yarn Kitty Basket crochet pattern! This delightful creation not only brightens up any space but also serves a practicality that every home can appreciate. I love how the soft, plush texture invites both experienced and novice crafters to dive into this fun adventure. This kitty basket crochet project works up quickly, making it an ideal gift for little ones, as its cuddly design also acts as a playful toy holder. Plus, with endless customization options, you can easily adapt colors and sizes to suit any décor or personality. I'm excited to guide you through this enchanting journey of stitches and creativity—let's get started and bring your cozy kitty basket to life!
Kitty Basket Crochet Materials & Tools
- Plush or Chenille Yarn – Approximately 150-200 yards of Bulky (5) or Super Bulky (6) yarn for that soft, inviting texture.
- 4.5 mm (G/6) Hook – This hook size is perfect for achieving the right tension while working on your kitty basket.
- Safety Eyes (8 mm) – Add adorable, expressive eyes to your kitty basket for that delightful animal charm.
- Polyester Stuffing – Use this to give your basket a cuddly shape and structure, making it perfect for holding items.
- Yarn Needle – Essential for assembling and weaving in ends, ensuring your basket looks neat and finished.
- Scissors – A handy tool to snip your yarn and finish all those cute touches on your kitty basket crochet project.
Why Is This Kitty Basket So Special?
Charming Aesthetic: The kitty basket's adorable design transforms any space into a whimsical retreat, making it an excellent conversation starter.
Functional Storage: Beyond its cuteness, it serves as a playful toy holder, perfect for organizing small items around the house.
Beginner-Friendly: With simple crochet techniques involved, this project welcomes newcomers while keeping seasoned crafters engaged.
Quick Project: Finishing up in just a few sessions, it’s a perfect gift idea or a satisfying weekend project that brings cheer and utility.
Customization Galore: Easily personalize colors and sizes to fit your unique home decor, ensuring every kitty basket feels special and one-of-a-kind.
Gauge & Sizing Notes
Don't skip the gauge swatch! Checking your crochet gauge for the Dreamy Yarn Kitty Basket is essential to ensure your adorable creation holds its shape when stuffed. A general guideline suggests a tension swatch of approximately 4×4 inches (10×10 cm) should yield around 8 single crochets by 8 rows. If your gauge doesn't match, don’t worry; if your swatch is too small, simply go up a hook size to loosen your tension, or if it's too large, try going down a hook size for a snugger fit. To make this kitty basket crochet larger or smaller, adjust your starting chain in multiples of 6 for a wider base while keeping the same increase pattern. Happy crocheting!
Step-by-Step Pattern for Dreamy Yarn Kitty Basket
Row 1: Create the Base
Begin by making a magic ring and ch 1. Work 6 sc into the ring, pulling it tight to form the circle (6 sts). Your work should create a small, snug base.
Row 2: Increase the Base
In this row, work 2 sc in each stitch around for a total of 12 sts (12 sts). The newly formed circle should lie flat and be slightly wider than the previous row.
Row 3: Expand the Base
Now, work 1 sc in the first stitch, 2 sc in the next, and repeat this pattern all the way around (18 sts). You should notice a lovely curvature beginning to take shape.
Row 4: Continue Increasing
For this row, work 1 sc in the first 2 stitches, then 2 sc in the next stitch all around (24 sts). The base will start widening to accommodate the sides of your kitty basket crochet project.
Row 5-10: Build the Sides
In the following rows, simply work 1 sc in each stitch around for 6 rows (24 sts each). Your basket should be taking on a cylindrical shape—this is where it starts to rise!
Row 11: Prepare for the Top
Now, we’ll begin to decrease slightly. Work 1 sc in the first 2 stitches, then 1 dec (1 sc in next 2 sts, skip next st) all around (18 sts). Your work should remain even but start to taper slightly.
Row 12: Shape the Top
Continue with the decreasing by working 1 sc in the first stitch, then 1 dec all around (12 sts). The top of your kitty basket should start to narrow, giving it a charming form.
Row 13: Final Decrease
For this row, work 1 dec around. You should have 6 stitches remaining (6 sts). Your kitty basket should begin to look quite adorable at this point!
Row 14: Closing Off
Insert your polyester stuffing into the body for structure. Now, sl st in each of the remaining 6 sts, then fasten off and weave in the ends. The base of your kitty basket is ready for decorating!
Step 1: Attach Ears
Using your yarn needle, sew two ear triangles made from small squares folded into triangles to the top of your basket. Position them symmetrically, and your kitty basket crochet is one step closer to completion!
Step 2: Add Facial Features
Embellish your kitty basket by sewing on safety eyes and using yarn to create a cute nose and whiskers. Adjust the expressions to give your kitty basket character—every basket can have its unique charm!
Step 3: Finishing Touches
For a polished look, consider adding an edging around the top with sc or dc stitches. This creates a neat finish, enhancing the cute aesthetics of your Dreamy Yarn Kitty Basket.
What to Pair with the Dreamy Yarn Kitty Basket
As you complete your charming kitty basket, consider bringing even more warmth and whimsy to your space with these delightful matching projects.
-
Cuddly Toy Mouse: Create an adorable yarn mouse that can live happily in your kitty basket for extra playfulness. This small project uses the same techniques and gives your basket a delightful companion.
-
Fluffy Blanket: Whip up a cozy throw that complements the softness of the kitty basket. Imagine wrapping yourself in warmth while your furry friend snuggles beside it!
-
Playful Cat Pouch: A small pouch that mimics the kitty basket, perfect for holding little treasures or crafting supplies. Its playful design will echo the charm of your original project.
-
Whimsical Wall Hanging: Create a decorative wall piece featuring yarn leaves or flowers that match the colors of your kitty basket. This pairing adds a touch of artistry to your decor while being visually cohesive.
-
Cute Matching Coasters: Design some coasters in similar hues to protect your surfaces while tying the whole aesthetic together. These simple crochet squares add charm and practicality to your space, ensuring nothing distracts from your lovely kitty basket crochet.
Expert Tips for Kitty Basket Crochet
-
Tension Matters: Keep your tension even throughout the project to ensure the structure holds its shape, especially when stuffing it.
-
Count Carefully: Accurate stitch counting is essential, as it helps maintain proportions and avoids any awkwardly shaped features.
-
Seam Neatly: When assembling parts, use a yarn needle to sew edges together snugly for a clean finish. This enhances the overall appearance of your kitty basket.
-
Block for Perfection: If desired, gently steam-block finished pieces before assembly to refine shapes and make them look polished.
-
Stay Organized: Keep track of your row counts and stitch patterns on a paper or app to prevent any future confusion during your kitty basket crochet journey.
Care Instructions for Kitty Basket Crochet
- Machine Washing: Use cold water and a gentle cycle to maintain the integrity of your kitty basket crochet without causing felting or pilling. Avoid any harsh detergents to protect the plush texture.
- Hand Washing: If you prefer, hand wash in cold water with mild soap, gently pressing the basket to clean it without agitating, which could distort its shape.
- Drying/Blocking: After washing, lay your kitty basket flat on a clean towel and reshape it gently. Avoid hanging as it may stretch; instead, let it air dry completely.
- Storage: When not in use, store your kitty basket in a cool, dry place. Stuffing it lightly with tissue paper can help maintain its shape and keep it looking fabulous!
Variations & Substitutions for Kitty Basket Crochet
Embrace your creativity and let your imagination run wild as you explore ways to customize your kitty basket!
-
Color Swaps: Change the main color to grey or cream for a more sophisticated kitty look. A soft pastel can also create a serene vibe.
-
Yarn Choice: Experiment with cotton for a sturdier basket or choose a multi-colored yarn to add a playful burst of color. Each fiber brings a unique touch!
-
Size Alteration: Adjust the yarn weight and hook size to craft a larger toy holder or a smaller decorative basket, catering to your storage needs. Size can completely change the character of your creation!
-
Facial Expression: Give your kitty basket a unique personality by modifying facial features—try different shapes for whiskers or add fun accessories like bows or glasses!
-
Textured Edging: Incorporate a textured border using puff stitches or scallops for a decorative finish. This playful touch can elevate your basket's charm!
-
Playful Pom-Pom: Attach a fluffy pom-pom on top to mimic a playful kitty tail. This fun addition adds whimsy and tactile appeal!
-
Fringed Fun: Create fringe around the top edge for an eye-catching boho look. It can add not only fun but also vibrant movement to your basket.
-
Lined Interior: Consider adding a removable fabric lining to the interior for a more polished finish. It’s also an opportunity to use your favorite prints for that extra flair!
Dreamy Yarn Kitty Basket FAQs
Can I use a different type of yarn for my kitty basket crochet?
Absolutely! While the pattern suggests plush or chenille yarn for a soft feel, you can substitute it with cotton or wool yarn. Just make sure to adjust your hook size accordingly based on the yarn weight you choose to maintain the overall shape and structure.
What if my kitty basket is curling at the edges?
Don't panic! Curling often happens when the tension is too tight or the stitches are too few. I recommend checking your tension and ensuring you have the correct number of stitches in each round. If necessary, try adding a few more stitches to help your edges lie flat.
How can I make my kitty basket bigger or smaller?
It's easy to adjust the size of your kitty basket! To increase its dimensions, use a thicker yarn or a larger hook. If you want a smaller basket, opt for a lighter yarn and a smaller hook size. Just remember to adjust your stitch counts accordingly to maintain the shape!
What should I do if I've dropped a stitch?
It happens to all of us! Don't worry; it's an easy fix. Simply locate the dropped stitch, pick it back up with your hook, and work it back into the correct row. If it's already a few rows down, you can use a small crochet hook or a yarn needle to weave it back into place carefully.
Which hook size should I use for this pattern?
The recommended hook size for the Dreamy Yarn Kitty Basket is 4.5 mm (G/6). This size allows you to get a nice tight tension, providing structure for the basket without any gaps. If you opt for a different yarn, make sure to check the yarn label for the best hook size recommendation!
Why does my basket have uneven sides?
Uneven sides may occur if your stitch count varies from row to row. To remedy this, double-check your stitch counts at the end of each round, and keep your tension consistent throughout the project. Taking your time and counting your stitches will yield a beautifully crafted kitty basket!
Leave a Reply