
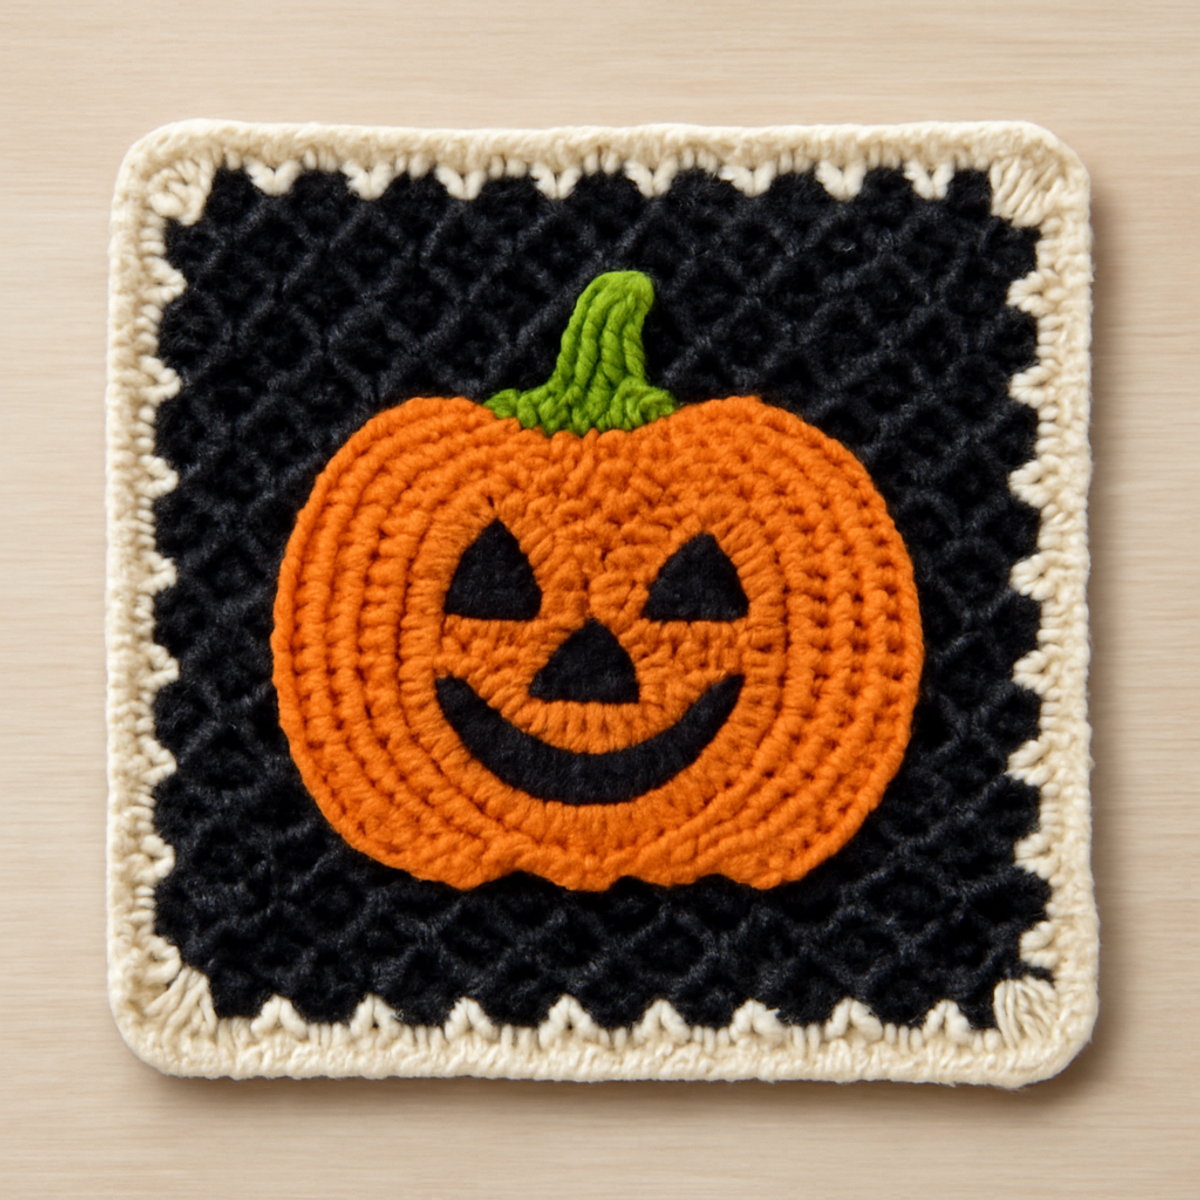
As I sipped my pumpkin spice latte, the vibrant colors of autumn inspired me to pick up my hook and yarn for a cozy project. Enter the pumpkin crochet square—an irresistible decorative piece that perfectly captures the spirit of the season. Ideal for both beginners and intermediate crafters, this cheerful square will brighten up any fall-themed decor or make a unique gift for loved ones. Creating this delightful design offers the joyful experience of working with warm colors while producing something functional, whether as coasters or a whimsical blanket square. Plus, it’s an enjoyable way to celebrate the beauty of autumn! Are you ready to bring some seasonal charm into your home with this enchanting pumpkin crochet square? Let’s dive in and get crafting!
Pumpkin Crochet Square Materials & Tools
- Worsted Weight Yarn – Use approximately 200-250 yards of 100% acrylic or cotton yarn in vibrant shades of orange, black, green, and cream.
- 5.0mm (H-8) Hook – This size complements the stitches and helps maintain a lovely texture throughout your pumpkin crochet square.
- Stitch Markers – Helpful for keeping track of rounds, especially for managing the pumpkin's 3D effect.
Why Choose This Pumpkin Crochet Square?
Versatile Design: This crochet project is perfect for enhancing your fall decor, whether used as coasters or part of a cozy blanket.
Beginner-Friendly: With approachable stitches, both new and intermediate crafters will find joy in the process.
Festive Colors: Vibrant oranges and deep greens reflect autumn's charm, making each piece a delightful addition to your seasonal displays.
Functional and Fun: Not only is it aesthetically pleasing, but it's also a practical item that can be gifted or used throughout the season!
Personalization Options: Customizing colors or sizes allows your pumpkin crochet square to match your unique style and decor!
Gauge & Sizing Notes
Don't skip the gauge swatch! Ensuring your tension is correct will keep your pumpkin crochet square at a charming size, perfect for any fall display. A commonly recommended gauge for this project is around 4×4 inches (10×10 cm) with approximately 14 double crochets by 8 rows—though remember this can vary with your chosen yarn and hook size. To make your pumpkin crochet square larger, consider adding rounds or increasing your foundation chain in multiples of 2. If your swatch is too small, don't fret! Simply go up a hook size to achieve the desired measurements. Happy crafting!
Step-by-Step Pattern for Pumpkin Crochet Square
Row 1: Foundation Chain
Ch 31. This will form the base of your pumpkin crochet square. Make sure your chain is loose enough for a comfortable work on the following rows. Your foundation row should be straight and even, setting up a solid base for your beloved pumpkin square. (30 sts)
Row 2: First Row of Double Crochets
In the second chain from the hook, dc across the row. For this row, you'll create a lovely textured foundation that will enable your pumpkin square to maintain its shape and dimension. Once finished, you should have a total of 29 double crochets at the end of this row. (29 sts)
Row 3: Second Row of Double Crochets
Ch 2, turn your work, and dc in each st across. This will add height and create the primary structure of your pumpkin crochet square. Keep a consistent tension to ensure your stitches are uniform. At the end of this row, you’ll again have 29 double crochets. (29 sts)
Row 4: Third Row of Double Crochets
Repeat Row 3 by chaining 2 and dc across. Continue building the height of your square, and your work should be looking increasingly filled out and sturdy. By the end of this row, your pumpkin square will have grown noticeably in height and still maintains 29 double crochets. (29 sts)
Row 5: Begin the Pumpkin Body
Switch to your orange yarn. Ch 1, then sc in the first st and across the row. Keeping to single crochet provides a dense and cozy feel, which is perfect for the pumpkin shape you’re creating. At the end of this row, you should maintain the same stitch count of 29. (29 sts)
Row 6: Establishing the Pumpkin Shape
Ch 1, turn, and make sc in the first 14 stitches. Then, inc in the next stitch (2 sc in 1 st), followed by sc in the next 14 stitches across. This row begins to shape your pumpkin, creating a subtle curve. When complete, you will have 30 stitches. (30 sts)
Row 7: Continue the Pumpkin Shaping
Ch 1, turn, and sc in the first 15 stitches. Next, inc in the following stitch, and then sc in the remaining 14 stitches. Your pumpkin crochet square should start to exhibit a rounded contour in this step, giving it that 3D effect. The stitch count will be 31 at the end. (31 sts)
Row 8: Finalizing the Pumpkin Body
Ch 1, sc in the first 16 stitches, then inc in the next stitch, and finish with sc in the last 16 stitches. By now, you should see your pumpkin taking form beautifully. The cozy density of the stitches creates a lovely texture. Your final stitch count will be 32. (32 sts)
Row 9: Beginning the Face
Change to black yarn. Ch 1 and sc across the row. Here, you will begin adding the fun and festive face details of your pumpkin crochet square. This layer will contrast beautifully against the orange. Ensure you have 32 stitches as you complete this row. (32 sts)
Row 10: Adding the Pumpkin's Smile
Ch 1, and sc in the first 15 stitches, ch 2, then skip 2 stitches, finally sc in the remaining 14 stitches. This step creates the mouth opening of your pumpkin. Your pumpkin crochet square should be looking delightfully spooky! Keep that stitch count at 32. (32 sts)
Step 11: Edging the Square
Switch to a cream yarn. Ch 1, then sc in each st around the entire square edge, adding 3 sc in each corner to maintain a smooth finish. This border will frame your pumpkin nicely, giving it a polished look. When you reach back to the beginning, join with a sl st. Your final edge should be neat and tidy. (Approx. 132 sts total around)
What to Make after Pumpkin Crochet Square?
As the leaves change color, let your creativity bloom with delightful companion pieces that will enhance your seasonal decor.
-
Cozy Pumpkin Pillows: Create matching throw pillows featuring the pumpkin motif to add extra charm to your living space. They'll invite guests to snuggle up and enjoy the cozy atmosphere.
-
Charming Table Runner: Crochet a vibrant table runner adorned with mini pumpkin squares to bring a festive touch to your dining area. This piece will elevate your autumn gatherings and create a welcoming atmosphere.
-
Joyful Coasters: Whip up a set of coasters using the same colors and stitches for a perfect functional addition. Not only will they protect your surfaces, but they'll also tie your decor together beautifully.
-
Playful Pumpkin Basket: Craft a decorative basket that mimics the pumpkin design, providing a fun storage solution while enhancing your autumn theme. It's as practical as it is whimsical and serves as a delightful conversation starter.
-
Glimmering Wall Hangings: Experiment with your yarn choices by making wall hangings that blend sparkling yarn and your favorite colors from the pumpkin crochet square. They’ll create an enchanting focal point in any room.
Pumpkin Crochet Square Variations
Feel free to put your own spin on this cheerful pumpkin crochet square to make it uniquely yours!
-
Color Swaps: Experiment with different shades of orange or even pastel hues to create a whimsical vibe for your square. The flexibility in color adds a playful touch to your autumn decor.
-
Yarn Alternatives: Try using a cotton yarn for a softer finish or a sparkly yarn for a festive touch that catches the light beautifully. This can elevate your pumpkin square, making it a charming centerpiece.
-
Larger Size: To create an eye-catching throw pillow instead of a coaster, simply add more rounds to increase the dimensions. A jumbo pumpkin square will bring extra warmth to your space.
-
Texture Play: Incorporate unique stitch patterns like bobbles or puffs into the background for added dimensionality. This provides contrast that makes the pumpkin shape stand out even more.
-
Fringed Edges: Add a playful fringe to the border for a cozy, bohemian feel. It's a delightful way to enhance the autumnal aesthetics while giving your square a new dimension.
-
Playful Shapes: Turn the square into a pumpkin face pillow by altering the facial features. Add different expressions for a fun Halloween vibe that will delight all ages.
-
Border Details: Consider finishing with a ruffled or shell stitch border to give your pumpkin crochet square a decorative flair. These delicate finishes beautifully frame your creation, making it all the more appealing.
-
Seasonal Changes: Shift the theme from Halloween to Thanksgiving by adjusting colors to browns and creams, and swapping the face details for fall motifs like leaves or acorns. This lets your creation celebrate the entire autumn season!
Expert Tips for Your Pumpkin Crochet Square
-
Consistent Tension: Maintain an even tension throughout to ensure that your pumpkin crochet square holds its shape beautifully. Loose or tight stitches can alter the final look.
-
Count Regularly: Make it a habit to count your stitches at the end of each row. This prevents discrepancies in size and confirms you’re on the right track as you create your pumpkin's form.
-
Blocking Matters: Once you've completed your square, consider blocking it. This technique helps the edges lay flat, enhances detail clarity, and ensures that your designs stay crisp and defined.
-
Foundation Check: Ensure your foundation chain is not too tight. A loose chain will allow your stitches to move freely and will create a comfy base for your pumpkin crochet square.
-
Mind the Ends: When switching colors, secure your yarn tails well to avoid unraveling. Weave them in thoughtfully to produce a neat finish on your pumpkin square.
Care Instructions for Pumpkin Crochet Square
Machine Washing: Use cold water on a gentle cycle to keep your pumpkin crochet square vibrant and prevent unwanted pilling.
Hand Washing: For a more delicate approach, hand wash your square in cool water with mild detergent, gently squeezing to clean without agitation to avoid distortion.
Drying/Blocking: Lay your pumpkin crochet square flat to dry on a clean, dry surface. Blocking after washing helps to maintain its shape and crisp edges.
Storage: Keep your finished square in a cool, dry place, preferably in a breathable bag to protect it from dust, ensuring it stays looking beautiful for many seasons to come!
Pumpkin Crochet Square FAQs
Can I use a different yarn instead of worsted weight?
Absolutely! While the recommended yarn for the pumpkin crochet square is medium worsted weight, you can substitute it with a lighter or heavier yarn. Just keep in mind that this may alter the final size, so you might need to adjust your hook size and stitch count accordingly for a proper fit.
How do I make my pumpkin crochet square bigger or smaller?
To adjust the size of your pumpkin crochet square, you can add or remove rows as needed. If you want a larger square, simply continue working additional rows of double crochets and follow the pumpkin shaping section accordingly. For a smaller version, consider starting with fewer foundation chains or reducing the number of rows in each section.
Why is my work curling at the edges?
Don't panic! Curling can occur if your tension is too tight or if you're using a yarn that doesn't match the recommended style. Make sure to maintain consistent stitch tension throughout your project. Additionally, blocking the finished square can help flatten the edges and improve its overall shape.
What hook size should I use for the pumpkin crochet square?
The pattern suggests using a 5.0 mm (H-8) crochet hook. However, if you find that your tension is either too tight or too loose, feel free to experiment with a smaller or larger hook size until you achieve the consistency you desire.
How do I fix dropped or missed stitches in my crochet square?
It's an easy fix! Simply identify the dropped stitch and use a crochet hook to pull the yarn back through the last completed stitch. Fixing misplaced stitches while working in progress can help maintain the integrity of your pumpkin crochet square. If you miss a stitch in a previous row, you might have to unravel back to that point to fix it correctly.
Can I mix and match yarn brands for my pumpkin crochet square?
Yes, you can definitely mix yarn brands! Just ensure that the chosen yarns have similar characteristics, such as weight and fiber content. This helps maintain the same texture and drape in your pumpkin crochet square, ensuring a consistent final look. Happy crocheting!
Leave a Reply